Server Configuration Utility |
Overview
Automate Enterprise is essentially a collection of individual components that work together to act as one cohesive unit. Each individual component such as the Management Server, Execution Server, Agents and Management Tools communicate with each other by way of TCP/IP, whether remotely or on the local system. This enables you to customize installation of each component to best fit your organization's needs.
The Management Server is responsible for storing information regarding workflow objects as well as audit and execution data. It is basically the repository off all Automate Enterprise information. The Execution Server is responsible for communicating information in regards to which agent should execute the proper workflow objects and thereafter, transmits all execution statistics back to the Management Server, which in turn stores the data. Automate Enterprise agents communicate directly with the Execution Server, whereas, the SMC and WFD communicates with the Management Server. Configuration of certain Automate Enterprise execution server and management server aspects are normally performed during installation.
The Automate Enterprise Configuration Utility is a stand-alone component that allows you to view or modify configuration settings in case you need to verify or make changes to specific values after installation. Here, you can specify connection data for both the Management and Execution Server, such as Data store information and port numbers.
Accessing Server Configuration Utility
The Server Configuration Utility is placed in the program files directory during initial Automate Enterprise Execution Server or Management Server component installation. Starting this utility may vary by operating system, however, once started, the fields that are displayed are the same on all operating systems. The Server Configuration utility's default path and file name is:
-
Automate Enterprise 32-bit: C:\Program Files (x86)\Automate Enterprise 11\ConfigurationEditor.exe.
-
Automate Enterprise 64-bit: C:\Program Files\Automate Enterprise 11\ConfigurationEditor.exe
Usage Instructions
The Server Configuration utility is very simple to use. Step by step instructions are as follows:
-
Start the Server Configuration utility.
-
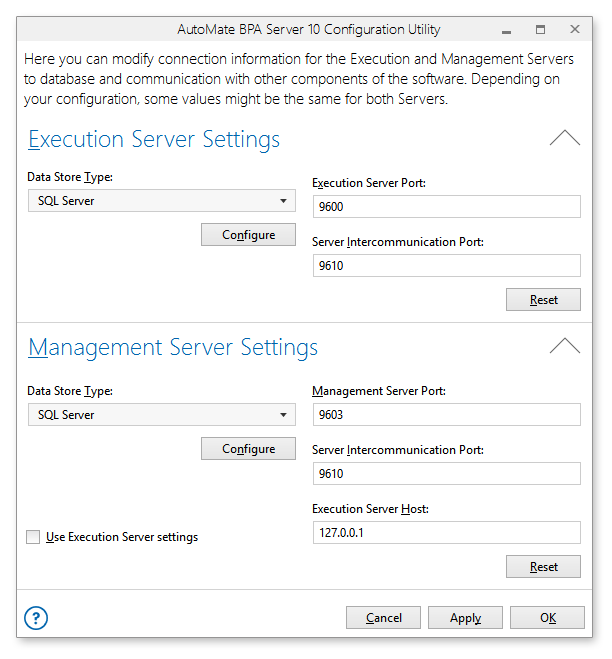
Upon starting the Server Configuration utility, you are presented with a dialog box that looks similar to the one above, which prompts for information that enables connectivity between the two servers and Server Management Console (SMC) as well as specification of a data store.
-
Make the desired adjustments (more details regarding available parameters are entered in the tables below).
-
Click the button that corresponds to the action you want to perform:
-
Reset - Reverts to the original settings displayed when the configuration utility initially started.
-
Cancel - Cancel any modifications and close the configuration utility dialog.
-
Apply - Save all changes without closing the configuration utility dialog.
-
OK - Save all changes and close the configuration utility dialog.
-
If clicking OK, before any changes are applied, a popup window appears prompting to restart the service. Upon clicking YES, the configuration utility copies the values you entered, such as database type, port, and so forth, to the proper server configuration file and restarts the Automate Enterprise service, completing the process.
Parameters
After you have added or modified remote database connections with the Server Configuration utility, you will be able to connect to those servers immediately from the Server Management Console upon restart of the service. The system will automatically catalog the remote database on the first connection. The following tables describe the available parameters.
Execution Server Settings
| Property | Description |
|---|---|
| Data Store Type | The type of database to use as the Automate Enterprise Execution
Server data store. Different parameters may become active depending
on which option is chosen. The available options are:
|
| Execution Server Port | The port that Automate Enterprise Execution Server should use to communicate with the Task and Process Agent. This is set to port 8500 by default. |
| Server Intercommunication Port | The port that the Execution Server and Management Server should use to communicate with each other. This is set to port 8510 by default. |
Management Server Settings
| Property | Description |
|---|---|
| Data Store Type | The type of database to use as the Automate Enterprise Management
Server data store. Different parameters may become active depending
on which option is chosen. The available options are:
|
| Management Server Port | The port that Automate Enterprise Management Server should use to communicate with the Server Management Console and Workflow Designer. This is set to port 8503 by default. |
| Server Intercommunication Port | The port that the Execution Server and Management Server should use to communicate with each other. This is set to port 8510 by default. |
| Execution Server Host | The computer name or IP address of the machine where the Execution Server resides. |
Data Store Type Settings
The available preferences as they appear in the Server Configuration utility's Data Store Type settings are shown below. Click the Configure button to view or modify available preferences.
| Database | Description/Options |
|---|---|
| OLEDB | Specifies standard OLEDB connection to the database. This option requires configuration by way of a standard Windows Data Link Properties dialog. |
| SQL Server | Specifies connection to Microsoft SQL Server.
Requires the following information to be entered:
Click the Test Connection button to test the database connection. Click Accept to accept any changes or Cancel to discard changes. |
| MySQL | Specifies connection to MySQL database. Requires
the following information to be entered:
Click the Test Connection button to test the database connection. Click OK to save changes or Cancel to discard changes. |
| Oracle | Specifies connection to an Oracle database.
Requires the following information:
Click the Test Connection button to test the database connection. Click OK to save changes or Cancel to discard changes. NOTE: An Oracle client must be installed on the same machine as the
Automate Enterprise component. |