Debugging & Testing Workflows
|
Overview
Before putting a potential workflow into production, proper testing
and analysis should be performed to determine errors or predict bottlenecks.
Analysis also provides further means to hone or tweak individual tasks
within a workflow in order to improve the quality and completeness of
the workflow system that you envision. This article focuses on practical
techniques used to assist in the examination and debugging of a workflow
during the design and development stage. As more and more business requirements
are mapped into a workflow, debugging becomes an essential tool to expedite
the implementation of the workflow process.
Debugging Tools & Techniques
Workflow Designer (WFD) incorporates the use of several debugging tools and
techniques to enable examination of a running workflow and the components
with which it interacts. You can, for instance, simulate workflow execution
by allowing input of sample data and conditional events such as evaluations
and results, then use available debugging options to uncover logic errors
or visually determine completion states. Available debugging techniques
are detailed below. Since each workflow can be made up of many different
elements, certain techniques may be more appropriate on specific workflows
than others.
Workflow Designer's Output/Shared
Objects panel contains a variety of testing and debugging
features that enables verbose, real time information to be displayed
during workflow execution. This allows developers to easily monitor
and examine many aspects of a workflow as it is being constructed.
For example, developers can perform a series of “test runs” and view
a variety of debugging and diagnostic features such as output data
or the current value of shared variables, arrays or datasets.
The Output/Shared Objects
panel consists of four separate views separated by tabs. The following
table describes each. For more details on a particular view, click
the associated link.
| Output
|
Can
contain invaluable information about what a workflow is doing
at any given time and usually provides the best indication
of why a workflow failed. As a workflow executes, information
about each object is logged to the Output panel in real-time,
including the object name, which agent ran the object,
when it started, its execution and completion state. If the
workflow fails, extended error information is logged in red
for easy detection. |
| Variables
|
Allows you to you to add, edit, rename or
delete shared variables and examine variable content
during runtime without inserting additional steps to output
the values. You
can insert breakpoints at certain points in your workflow
to halt execution in order to view the contents of a shared
variable to determine if the current value has been properly
set or modified by a specific task. |
| Arrays
|
Allows you
to add, edit, rename or delete shared arrays and examine them
during runtime without inserting additional steps to output
the values. |
| Datasets
|
Allows you
to add, edit, rename or delete shared datasets and examine
them during runtime without inserting additional steps to
output the values. |
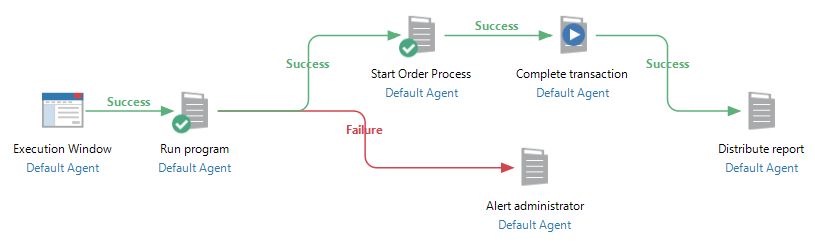
By running the project in the Workflow
Designer, the path of the workflow can be monitored to see if it is
executing as expected. When a workflow starts, each object (that is, task,
condition, or sub-workflow) that is running at a specific moment is
marked with a special icon to visually illustrate the workflow's progress
(as shown below).
An object is overlaid with a blue run icon at the point of its
execution. Upon successful completion, the run icon is replaced with
a green check-mark denoting accomplishment, at which point, the workflow
progresses to any ensuing objects followed by a green (success)
arrow. If an object fails, it is marked with a red "!",
at which point, the workflow halts or continues to any ensuing object
followed by a failure (red) arrow. You can right-click each element
of the workflow at any time to identify or edit specific properties.
The following table further describes the available icons that may
appear during execution.
Note that when an in-line condition is non-licensed, it should generate
an error based on the error rules associated with the condition (for example, error and stop workflow, or error and continue). The condition should
behave the same as if it were disabled.

|
Denotes execution. An object is overlaid
with a blue run icon at the point of its execution. Upon completion
(whether a success or failure), this icon is replaced with
one of the icons below. |

|
Denotes successful completion. When execution
of an object completes successfully, the blue run icon is
replaced with a green check-mark, at which point, the workflow
progresses to any ensuing object followed by a green (success)
arrow. A running workflow can be manually stopped by pressing
the Stop button on
the ribbon. If a workflow is stopped, execution of the currently
running object immediately halts and it is marked with a green
check-mark denoting success. |

|
Denotes failure. If an object fails during
its execution, the blue run icon is replaced with a red exclamation
point, at which point, the workflow halts, continues to any
ensuing object followed by a failure (red) arrow or executes
defined step, task or system level error handling options
(if any). Information about the failure is logged in red in
the Output panel for easy detection. |

|
Denotes a pause due to a breakpoint. When
a workflow reaches a breakpoint, execution is suspended and
a red breakpoint icon flashes to alert the user that a break
has occurred. More execution options are revealed upon selection
of an object that contains a breakpoint. For more details,
see Breakpoints and
Execution Options
below. |

|
Denotes a manual pause. A running workflow
can be paused by pressing the Pause
button on the ribbon. Note that pressing Pause
does not halt the current workflow object in the middle of
its execution. Instead, a pause will occur after the current
object completes and before the ensuing object starts. |
When you run a workflow
from Workflow Designer, real-time debugging may be too difficult due
to the speed at which execution occurs. Trying to manually suspend
a workflow at a precise point while it is running (using the Pause button on the ribbon) may
deliver inaccurate results due to execution speed of individual workflow
objects as well. Breakpoints may be an ideal solution when such issues
arise. When
you use Workflow Designer, you can set breakpoints on your graphical
workflows during design time as you would for your tasks when using
Task Builder.
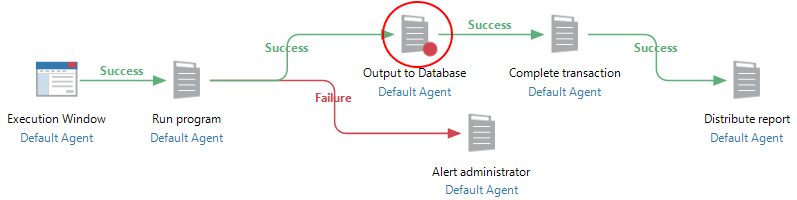
Breakpoints are represented by a solid red icon (circled below). When
workflow execution reaches an object that has a breakpoint,
the WFD interface pauses the workflow before the object executes and
waits until you click the Run
or Step button on the ribbon,
at which point, workflow execution continues.
Breakpoints are often useful for pausing execution at specific points
of a problematic workflow in order to examine internal elements, such
as inspecting variables, observing tasks or determining other factors
that may cause the workflow to fail. They do not affect anything within
the workflow itself and are ignored when the workflow is triggered
or manually ran from the Server Management Console.
Breakpoints can be set on an object in the Workflow Designer by
either highlighting the object and pressing F9 or
clicking the Breakpoint button
on the ribbon's Selection
tab. A breakpoint icon is then displayed on the object (circled below).
To Set a Breakpoint
Select the workflow object you wish to set with a breakpoint and
do one of the following:
- Click the Breakpoint
button on the ribbon's Selection
tab.
- Press F9 on your keyboard.
- Right-click the object and select Breakpoint
from the context menu that appears.
NOTE: A workflow can contain
multiple breakpoints, however, since a workflow can change
its course based on conditions, certain breakpoints may be
ignored.
Workflow Designer encompasses a set of
execution options that allow you to dictate how workflow execution
should commence after a breakpoint is encountered. When workflow execution
reaches an object that contains a breakpoint, Workflow Designer pauses
the workflow before the object executes and waits for user input.
You can continue from a breakpoint by selecting the object that contains
the breakpoint and clicking the Run
from here, Resume or Step
button, at which point workflow execution continues, or click the
Stop button, at which point,
execution halts but is treated as completing successfully.
The table below describes each execution command.

|
Run from here |
Runs the workflow in its entirety from
the currently selected object. |
CRTL + SHIFT
+ F5 |

|
Resume |
Resumes execution from the breakpoint.
|
--- |

|
Step |
Steps through each object of the workflow
sequentially. Sometimes, in order to solve a problematic workflow,
you may need to slowly run every step, one by one, to look
for errors. You can do this by stepping through your workflow,
rather than running it all at once. To step through a workflow
from a breakpoint, press the Step
button or F10. When
you do this, WFD will run the next object, and then pause.
You can then take some time to evaluate the result of the
action, and ensure it’s what you’re expecting. When you’re
ready to proceed, press Step
or F10 to run the
next action. |
F10 |

|
Stop |
Halts
execution at the current object and logs status as success.
|
--- |
After correcting an error, you may decide
to re-run the workflow that caused the error to check for additional
issues. Normally, you would click the Run
button located on the Home
tab of the Ribbon or press CTRL + F5. Doing so will run the entire
workflow from the very beginning. However, you may not want to run
the workflow in its entirety, but instead, start execution from the
point of the previous error. This can be done by selecting the down
arrow below the Run button
and selecting Resume Failed
(circled below). This option only appears if Workflow Designer encounters
an error on a previous run. It does not appear if a previous run was
successful, aborted or stopped prematurely by a user.
 Output
Data
Output
Data