Datastore Migration Utility
Overview
Data migration is the process of transferring data from one hardware or software configuration to another. It can be a standard yet crucial element of IT and business operations, allowing organizations the ability to maintain the integrity of important data while moving forward to face constantly changing technologies. The downside is that data migration is often time consuming and causes major disruptions due to downtime or application performance problems. As a result, Automate comes equipped with the Datastore Migration Utility, designed to effectively reduce the time, effort, and risk of migrating data between older and newer versions of Automate. This simple yet powerful tool exports the designated repository from the source database, imports it into the target database, and synchronizes the physical schema of the target database with the original schema definition of the source database. It can also be used during database upgrades or changes in database technologies by converting the Automate datastore from one database format to another without affecting the database functionality.
Accessing and using the Datastore Migration Utility
Stop the Automate 2024 services
- Close Automate 2024 Management Console.
- Press the Windows logo+R keys on your keyboard to open the Run window.
- Enter services.msc in the Open box, and then click OK.
- From the Services (Local) list, select Automate 2024 Management Server.
- From the Action menu, click Stop.
- From the Services (Local) list, select Automate 2024 Execution Server.
- From the Action menu, click Stop.
- Leave the Services window open so that you can restart these services later.
Accessing and using the Datastore Migration Utility
- Depending on your version of Automate 2024, go to the C:\Program Files (x86)\Automate 2024 or C:\Program Files\Automate 2024 directory, and then double-click on the DatastoreMigrationUtility.exe file to open the utility.
- The "Please verify both Automate services are stopped before continuing." message appears. If you have already stopped these services, as instructed above, disregard this message and click OK.
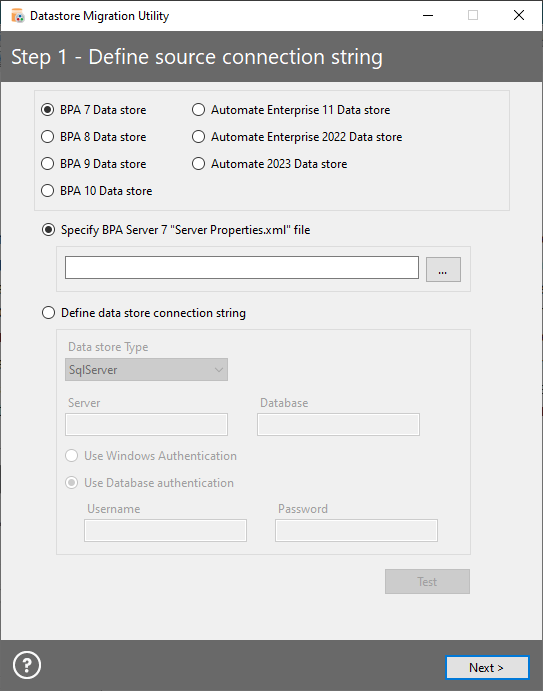
- On the Step 1 - Define source connection string window, select the Data store version you want to migrate.
- Depending on how you want to define the source connection string, select the option that fits your scenario:
- To use the XML file where the selected data store version originates from, select
the Specify option. Click
 to browse to and select the Server Properties.xml or ExecutionServer.config.xml file, based on the Data store option you chose.
 - If your data store originates from an external database, select the Define data store connection string option, and then populate the following parameters:
- From the Data store Type list, select the proper database type.
- In the Server field, enter the computer name or IP address of where the database runs.
- In the Database field, enter the name of the database server.
- Select the Use Windows Authentication or Use Database authentication option, based on the username and password credentials you want to use.
- In the Username field, enter the username to use to connect to the server (if required).
- In the Password field, enter the password to use to connect to the server (if required).
-
Click Test to test the database connection.
NOTE: Testing is only available for the BPA 7 Data store, BPA 8 Data store, or BPA 9 Data store options in the 32-bit (x86) version of Automate 2024. - Click Next.
- On the Step 2 - Define destination connection string window, select the option that fits your scenario:
- If your Automate data store points to the ExecutionServer.config.xml file, select the Specify
Automate 2024 "ExecutionServer.config.xml" file option. Select to browse to and select the ExecutionServer.config.xml file.
- If your data store originates from an external database, select the Define data store connection string option, and then populate the following parameters:
- From the Data store Type list, select the proper database type.
- In the Server field, enter the computer name or IP address of where the database runs.
- In the Database field, enter the name of the database server.
- Select the Use Windows Authentication or Use Database authentication option, based on the username and password credentials you want to use.
- In the Username field, enter the username to use to connect to the server (if required).
- In the Password field, enter the password to use to connect to the server (if required).
Click Test to test the database connection.
NOTE: Testing is only available for the BPA 7 Data store, BPA 8 Data store, or BPA 9 Data store options in the 32-bit (x86) version of Automate 2024.
- If your Automate data store points to the ExecutionServer.config.xml file, select the Specify
Automate 2024 "ExecutionServer.config.xml" file option. Select
- On the Step 3 - Select Data to Migrate window, all available data items that can be migrated are selected by default. Clear any items you do not want to migrate. When finished, click Next.
- On the Confirm? dialog, verify if all source and destination preferences are correct. Click Yes to continue with the migration. Otherwise, click No, and then click Back to make any adjustments.
- On the Step 4 - Migrate Data window, the migration's progress is displayed . When the migration is complete, click Finished.
Restart the Automate 2024 services
- Return to the Services window.
- From the Services (Local) list, select Automate 2024 Execution Server.
- From the Action menu, click Start.
- From the Services (Local) list, select Automate 2024 Management Server.
- From the Action menu. click Start.
- Close the Services window.
- Open Automate 2024 Management Console.