Using the Calendar
Overview
The Execution Calendar is a timetable format that supplies information about the results of previously executed workflows as well as ones that are scheduled to run in the future (with the use of a Schedule event). By default, the calendar displays in the month view, but you can switch to a day, week, work week or custom time scale. The Day view supplies an hour-by-hour list of events for the selected day. You can click on a particular run instance to view details and execution statistics about that event. Dates that are displayed in bold type indicate that there is at least one workflow item for that day.
To access the Calendar, select Reports on the Server Management Console's navigation bar, and then select Calendar.
Related Topics
 Date Navigator
The Date Navigator is a small calendar view that appears on the side panel which allows for point and click selection of specific dates to be displayed in the main viewing area. When you click a number in the Date Navigator, that date is displayed in the main panel. The Date Navigator can also help orient you as to which days of the month you're viewing, the current day, and which days currently contain task events. Dates that appear in the main viewing area are highlighted in the Date Navigator. You can choose which dates to view by dragging across a range of dates in the Date Navigator (up to a maximum of six weeks). That date range will be displayed in the main viewing area in a format similar to Month view. Dates that are boldfaced in the Date Navigator indicate that they contain at least one task event. The current day is always enclosed in a red box.
By manipulating the Date Navigator, you can control what appears in the main viewing area. The following is a list of common Date Navigator operations:
| To... | Do this... |
|---|---|
| Display previous month | Click on the left arrow next to the month/year view. |
| Display next month | Click on the right arrow next to the month/year view. |
| Change year to view | Click the current year that appears on the date navigator to open a pop-up dialog displaying the last 4 years and next four years. Select the desired year from the list. |
| Change month to view | Click the current month to open a pop-up dialog displaying the last 4 months and next four months. Select the desired month from the list. |
| View consecutive weeks | Drag across a range of dates in the date navigator (up to a maximum of six weeks). The selected date range will be displayed in a format similar to month view. |
| View specific days | Hold down the CTRL key and select the desired days from the date navigator. The selected days will be displayed in a format similar to the week view. |
| View task events for a specific day. | Double-click a specific day on the date navigator. The selected day will be displayed in a format similar to a day view. |
| Show more than the default two month view | Rest the mouse pointer on the split bar to the right of the Date Navigator. The pointer will become a double arrow. Drag the double arrow cursor to the right until additional months are displayed. |
 Views
Views
Views give you different ways to look at the same information in the calendar by putting it in different date and time-based arrangements and formats. To change the number of days that are displayed in the main viewing area, simply select the corresponding button (shown below). Selecting the Week view allows you to choose whether to display a 5 day work week or full 7 day week.
Change between views by clicking the large Day, Week, and Month buttons near the top of the window pane. If you are in Week or Month view, clicking on the heading in a column (which displays the date) will switch you to the Day view for that date.
Available views
The following table describes the available calendar views.
| View | Description |
|---|---|
| Day | The main viewing area shows one day at a time. Use the date navigator to move to a new date by clicking a date on the calendar. |
| Week | The
main viewing area displays the following week view:
|
| Month | The main viewing area displays the current calendar month (default calendar view). |
| Time Scale | The
main viewing area displays a specific time grid (between 5
minutes and 1 hour). This preference is active only if the
view is set to Day, Week,
or Work Week.
The available time scales are:
|
 Status filter
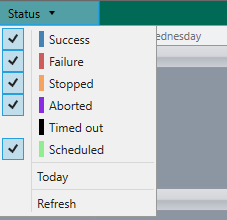
The Status filter allows you to select the type of events to display in the main viewing area.
| Status Type | Description |
|---|---|
| Success | If enabled, previous workflow executions that ran successfully are included in the current view. Successful workflow events are color coded blue. |
| Failure | If enabled, previous workflows executions that failed are included in the current view. Failed workflow events are color coded red. |
| Stopped | If enabled, previous workflow executions that were stopped are included in the current view. Stopped workflow events are color coded orange. |
| Aborted | If enabled, previous workflow executions that were aborted are included in the current view. Aborted workflow events are color coded purple. |
| Scheduled | If enabled, workflows that are scheduled to run in the future (with the use of the Schedule event) are included in the current view. Scheduled workflow events are color coded green. |
| Today | Switches the view to Day view specifying the current day. |
| Refresh | Refreshes the current view. |
 Repository filter
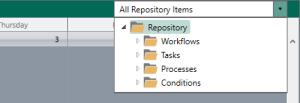
Selecting the All Repository Items box allows you to control what Automate objects display in the active view. You can filter the timetable to display execution dates of a specific workflow or workflows that contain a specific object.
To display all workflows
Select the All Repository Items box, and then select the Workflows folder.
To display an individual workflow
Select the All Repository Items box, expand the Workflows folder, and then select the desired workflow.
To display a group of workflows
Select the All Repository Items box, expand the Workflows folder, and then select the desired folder that contains a group of workflows.
To display workflows that contain a specific object or group of objects
Select the All Repository Items box, expand the folder where the object resides (that is, Tasks, Processes, or Conditions folder), and then select the desired folder that contains a group of objects or select the individual object.
 Event
details
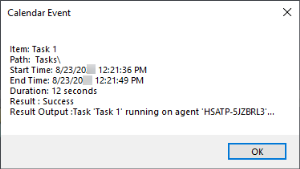
Hovering your mouse cursor over an event displays general information, including last runtime/next runtime, task name and the name of the computer in which it resides. To drill down to further details, simply double-click the desired event. Doing so will display a dialog titled Calendar Event containing details about the given event (as shown below).
Available event details
The information that's displayed by the Calendar Event dialog may differ depending on the event status (whether success, failure or scheduled). The following table describes the list of details that appear.
| Event Detail | Description |
|---|---|
| Item | The name of the workflow item that generated the event or is scheduled to execute in the future. |
| Path | The path of the workflow item that generated the event or is scheduled to execute in the future. |
| Start Time | The date/time the specified event started or is scheduled to start. |
| End Time | The date/time the specified event ended. If a scheduled workflow is selected, this event detail will return N/A. |
| Duration | The total duration of execution, from start to finish. If a scheduled workflow is selected, this event detail will return N/A. |
| Result | The execution results (Success, Failure or Scheduled). |
| Result Output | A description of the result. For example, if result was Failure, this parameter displays the error message. If a scheduled workflow is selected, this event detail will return blank. |
 Retrieving
& sharing calendar events
A way for you to share your Automate calendar events with others is to simply copy the data to the clipboard, then paste the clipboard contents onto any window or application that accepts text. You can also export calendar content in order to back up your data, share calendar events with others or to display the data in a report. You can dictate what type of data to include or omit by using the available calendar filters. Copied or exported data is also determined by your calendar view settings. For example, if currently set to Week view, the data to be exported will include events that occurred within the last 7 days.
To copy/paste calendar data
-
Right-click the main calendar view and select Copy Events.
-
Right-click the window or application you wish to paste the data onto and select Paste.
To export calendar data
-
Use the available filters to control precisely which data to export.
-
Right-click inside the main calendar viewing area and select Export Events.
-
In the dialog that appears, select the path, file name and extension (either .csv or .txt) of the file in which to export data onto. It can then be written to a database or opened/read using the appropriate application.
Copyright © Fortra, LLC and its group of companies.
All trademarks and registered trademarks are the property of their respective owners.
24.2.0 | 202408121109 | August 2024


