 Agent Groups
Overview
An Agent Group is a collection of agents placed together to form a distinct unit. This group contains properties which are used to dictate how agents interact with one another in the context of an automation object embedded within a workflow. Groups are identified by a unique name, though the name itself is not used internally as its identifier, but rather a unique ID. As a result, multiple agents that normally interact with one another or share common goals or objectives can be easily assigned to a group, allowing for improved administration and distribution of workflow objects within a multi-tiered environment.
Behavior
An Agent Group’s behavior in a running workflow is determined primarily by the type of object it is assigned to. Distinct characteristics such as object deployment to an agent as well as error handling and processing may vary depending on the automation object being executed. In addition, Agent Group Distribution enables control over the behavior of individual agents that belong in a group by providing support for process coordination and task assignment between agents. By default, Agent distribution properties are assigned to allow execution to be performed simultaneously on all agents within a given group. Alternatively, distribution can be set to run sequentially on each agent, run on each agent until a successful result or run only on agents that meet the performance criteria specified.
Related Topics
 Creating
& managing Agent Groups
When you create an Agent Group, you select the agents that are assigned to the group and specify additional group settings, such as permissions levels and custom notes (if applicable). Selecting the Agent Groups folder under the System tab displays all available Agent Groups. Here, you can create new Agent Groups, set permissions, and manage the properties of existing Agent Groups.
To create an Agent Group
-
On the Server Management Console's navigation bar, select System.
-
Select the Agent Group folder.
-
Select NEW, or right-click the Agent Group folder and then select New Agent Group.
-
To enter a custom name for the new group, right-click the New Agent Group icon and then select Rename.
To assign/remove an agent to/from a group
-
Select the Agent Groups folder.
-
Select the group's icon, and then select EDIT. You can also right-click the group's icon, and then select Edit. The Modify Agent Group dialog appears.
-
Select the agent from the Available Agents list, and then select Add. The agent will move to the Agents in Group list.
NOTE: You can add an agent to multiple Agent Groups. -
To change an agent's position in the Agents in Group list, select the agent, and then select Move Up or Move Down.
NOTE: The position of each agent in the Agents in Group list may impact other Agent Group-related properties, such as Agent Group Distribution. The first (top-most) agent displayed in the Agents in Group list automatically becomes the primary agent. -
To remove an agent from the Agents in Group list, select the desired agent and then select Remove.
-
Select Update.
To assign an Agent Group to a workflow object
-
From the Workflow Designer's Objects/Repository panel, drag a new or existing condition, task, or process object and then drop it onto the main workspace. The newly created/added object is assigned to Default Agent.
-
Double-click the agent currently assigned to display a list of available task agents, Agent Groups, and system agents (as shown below).
-
Select the desired Agent Group.
 Agent Group General Properties
To view or edit an Agent Group's General Properties
Each Agent Group includes a set of General Properties which allows you to view specific details, enter custom notes, and assign permissions for that particular group.
To access an Agent Group's General Properties, do the following:
-
On the Server Management Console's navigation bar, select System.
-
Select the Agent Group folder.
-
Select the group's icon, and then select MORE > Properties. You can also right-click the group's icon, and then select Properties. See the following links for more information:
 Examples
Several workflow scenarios are illustrated below; each explaining Agent Group behavior when applied to a specific workflow object. To avoid confusion, we will assume that Agent Group Distribution is set to its default parameter, whereby, execution is performed simultaneously on all agents within a given group.
| Scenario 1 - Agent Group assigned to a task | |
|---|---|
| Description:
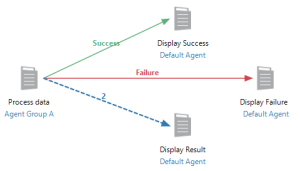
When an Agent Group is assigned to a task object, the task is executed on all agents that belong in the group simultaneously. Workflow execution suspends at the task object until task execution on all agents are completed. The task must complete successfully on all agents within the group in order for the Success arrow extending from the task to proceed. If the task fails on one or more agents in the group, the Failure arrow (if present) proceeds. A task object’s result is determined by the outcome of the task that runs on the default (first) agent in the group. Using the workflow illustrated below, assume Agent Group A consists of Agent 1, Agent 2 and Agent 3 (in that order). In this case, the Process Data task will execute simultaneously on Agent 1, Agent 2, and Agent 3. The workflow waits until the task completes on all three agents. The table below describes how the workflow proceeds in several cases. |
|
| Result | Workflow Progression |
| The Process Data task completes successfully on all agents in the group. | Workflow progression follows the Success (green) arrow which executes the Display Success task. |
| The Process Data task fails on all agents in the group. | Workflow progression follows the Failure (red) arrow which executes the Display Failure task. |
| The Process Data task completes successfully on Agent 1 and Agent 2, but fails on Agent 3. | Workflow progression follows the Failure (red) arrow which executes the Display Failure task. |
Additional notes
Additionally, If the Process Data task is set to also return a result based on the AMTask.Result dataset (a dataset that returns the execution result of a task). Success returns 1. Failure returns 2), the corresponding Result (blue) arrow matching AMTask.Result as set by Agent 1 is followed regardless of whether or not the task completes successfully on all agents. This is because only Agent 1’s result (being the default agent in the group) is considered when evaluating Result arrows in a workflow.
For example, if Agent 1 populates AMTask.Result with2 (failure) but the task fails on all other agents in the group, both the Failure and Result (with the value of 2) arrows would be followed. Conversely, if Agent 2 sets AMTask.Result to 2 but Agent 1 does not, and the task fails on all agents in the group, only the Failure arrow would be followed.
| Scenario 2 - Agent Group assigned to triggering condition | |
|---|---|
| Description:
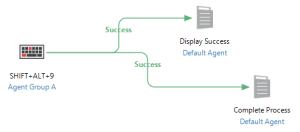
If an Agent Group is assigned to a triggering condition (which triggers workflow execution when a specific condition is met), the workflow starts when the triggering condition becomes active on any of the agents in the group. The AMTrigger dataset (used to determine properties of the object that triggered execution) is populated relative to the agent that the triggering condition occurred on. This allows one trigger condition to be assigned to multiple agents in a workflow. Using the workflow illustrated below, assume Agent Group A consists of Agent 1, Agent 2 and Agent 3 (in that order). Once a user presses Shift+Alt+9 on either Agent 1, Agent 2 or Agent 3, the workflow will proceed to the Success arrow and run the Display Success task. Note that the Failure and Result arrow (with the value of 2) would never be followed in this workflow since triggering conditions do not return failure or result values. Agent Grouping tied to triggering conditions is especially powerful when coupled with workflow runtime properties. |
|
| Result | Workflow Progression |
| A user presses SHIFT + ALT 9 on the workstation assigned to Agent 1. | Workflow execution starts and flow proceeds
to both Success (green) arrows which executes
the Display
Success and Complete Process tasks. NOTE: A triggering condition can only return Success
at the time the monitored condition takes place, therefore,
it can only be followed by a Success arrow. Attaching a Failure
(red) or Result (blue) arrow would be inappropriate
since triggering conditions never return failure or result
values. Agent Grouping tied to triggering conditions is especially
powerful when coupled with workflow runtime properties. |
| A user presses SHIFT + ALT 9 on the workstation assigned to Agent 2. Another user presses the same key combination on the workstation assigned to Agent 3 exactly 2 minutes later. | Workflow execution starts for each time the monitored key combination is pressed within any agent in the group. In this situation, workflow execution proceeds to both Success (green) arrows which executes the Display Success and Complete Process tasks and does it again 2 minutes later. |
| Scenario 3 - Agent Group assigned to a non-triggering condition | |
|---|---|
| Description:
When an Agent Group is assigned to a condition object that is not a triggering condition, the condition is successful if it evaluates to TRUE for one or more agents in the group and fails if the condition evaluates to False for all agents. The first agent that evaluates the condition to TRUE is used to populate the AMCondition dataset (which can determine specific system states or characteristics about the condition that was used as a wait or conditional element). All other agents that evaluate to TRUE are ignored. This allows the workflow to wait for and/or examine for a condition to be true on any one computer in the group. Using the workflow illustrated below, assume Agent Group A consists of Agent 1, Agent 2 and Agent 3 (in that order). In this situation, once the Delicious task completes successfully, the Wait 10s for Notepad condition begins. Because an Agent Group is assigned to the condition, the workflow will wait up to ten seconds on each agent in the group for the Notepad process to start. The table below details how the workflow proceeds in several cases: |
|
| Result | Workflow Progression |
| Notepad starts within ten seconds on Agent 2. Notepad does not start on Agent 1 or Agent 3. | The workflow proceeds to the Success (green) arrow which runs the Display Success task. The AMCondition dataset is set with the result data from Agent 2. |
| Notepad starts within ten seconds, first on Agent 3, then Agent 1 and Agent 2. | The Success arrow is followed once the result from Agent 3 arrives, and the Display Success task executes. The AMCondition dataset is set with the result data from Agent 3. The remaining results are discarded. |
| Notepad does not start within 10 seconds on any agent in the group | The Failure arrow is followed, and Display Failure task executes. |
Copyright © Fortra, LLC and its group of companies.
All trademarks and registered trademarks are the property of their respective owners.
24.2.0 | 202408121109 | August 2024


