 Result Arrow
Overview
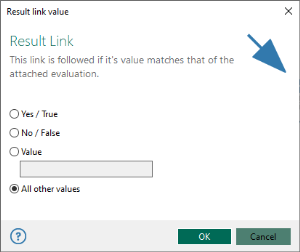
The Result arrow is color coded blue and primarily stems from an Evaluation Object to determine the course of a workflow depending on the evaluation result. Unlike the Success and Failure flow control arrows, the Result arrow contains properties to permit specific result values to be selected or entered (as shown below). The path that a workflow will follow is dependent on which Result arrow matches the value of the Evaluation object it stems from.
To link an evaluation object with a result arrow
Unlike other workflow arrows (for example, Success, Failure arrows) the Result arrow contains specific properties to allowing it to detect the contents of an Evaluation object. Follow the instructions below to link the Evaluation object with a Result arrow:
- Add existing objects from the Repository (that is, pre-existing tasks, conditions, sub-workflows) or create new objects to add to the workspace that will be used to link the Evaluation object to.
- Drag the Result arrow from the Available Objects panel onto the workspace.
- Drag the side opposite the tip of the arrow to the Evaluation object and point it to the desired task, condition or other available object.
- Double-click the Result arrow to show its properties. Doing so will open a dialog titled Result (as displayed below).
- Select from the available options (specified in the table above).
- SelectOK to save changes and close the properties dialog.
- Repeat the above steps to link another Result arrow (containing different results) to a separate workflow object.
During execution, the path that the workflow will proceed to will now depend on the Result arrow matching the results of the prior Evaluation object.
Parameters
The Result arrow’s properties are as follows:
| Parameter | Description |
|---|---|
| Yes/True | The workflow will proceed to the object followed by a Result arrow with a YES or TRUE value matching that of the Evaluation object it stems from. |
| No / False | The workflow will proceed to the object followed by a result arrow with a NO or FALSE value matching that of the Evaluation object it stems from. |
| Value | The workflow will proceed to the object followed by a result arrow with a Value parameter matching that of the Evaluation object it stems from. |
| All other values. | The workflow will proceed to the object followed by a result arrow if no other Result arrows are followed. |
Examples
The following examples will illustrate the basics of incorporating an Evaluation object and Result arrows onto an automated process. For additional, more complex examples, see Workflow Logic.
Example 1 - Yes/true
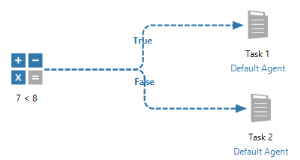
In the example workflow diagram below, an Evaluation object holds the expression 7<8 (which amounts to TRUE) and uses 2 separate Result arrows, one set to TRUE that points to Task 1 and another set to FALSE that points to Task 2. At runtime the expression 7<8 will be evaluated to determine the workflow's course. Since the evaluation is true, the workflow will follow the TRUE result and execute Task 1.
Example 2 - No/false
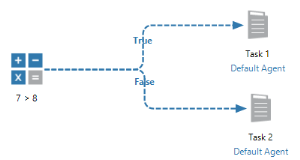
The example below is almost identical to sample 1. However, in this example, the Evaluation object holds the expression 7>8 (which amounts to FALSE). At runtime the expression will be evaluated to determine the workflow's course. Since the evaluation is false, the workflow will follow the FALSE result and execute Task 2.
Example 3 - Value
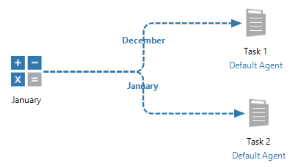
In the example workflow diagram below, an Evaluation object holds the value January and is connected to 2 separate Result arrows, one with the Value parameter set to December which points to Task 1 and another with the Value parameter set to January which points to Task 2. At runtime, the workflow will proceed to the object followed by a result arrow with a Value parameter matching that of the Evaluation object it stems from, therefore, will execute Task 2.
Example 4 - All other values
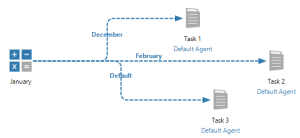
In the example workflow below, an Evaluation object holds the value January and is connected to 3 separate Result arrows:
- Result arrow with the Value parameter set to December which points to Task 1.
- Result arrow with the Value parameter set to February which points to Task 2.
- Result arrow that points to Task 3 which is set to the parameter All other values (titled Default).
At runtime, since there are no matching results, the workflow proceeds to the object followed by the Result arrow set to All other values and runs Task 3.
Example 5 - "And" condition
You can also add multiple Evaluation objects per branch to create an "AND" condition. For example, in this example, a rule is created whereby the workflow runs Task1 only if both Evaluation1 and Evaluation2 results to TRUE.
Additional notes
There are some basic practices to follow when using arrows to link from one object to another:
- The Result arrow should only be used to link from an Evaluation object to other objects because only the Evaluation object can provide an answer (that is, the result) to a question (that is, the evaluation).
- Along with a Result Arrow, an Evaluation object can also be followed by a Success or Failure arrow. This is because Evaluation objects treat a True Result as a Success and a False Result as a Failure.
- Do not use a Failure arrow to link from event objects (for example, Schedule and Key events). Only the Success arrow should be used to link from events to other objects because events are designed primarily to trigger workflow execution. Unlike conditions, events lack behavioral properties that allow it fail.
- If a condition is used as a triggering object at the start of a workflow, it should only be linked to a Success arrow and not a Failure arrow. This is because the Behavior tab settings of a triggering condition is set to Wait for condition and Indefinitely. In other words, it will wait for the specified condition to occur indefinitely, therefore, has no possibility to fail.
