SharePoint Browser |
Overview
Automate's SharePoint action comes equipped with the SharePoint browser, a user friendly tree-based interface that enables connection to a SharePoint site in order to view or select specific contents. You can create and configure multiple connections which are automatically stored so you can conveniently re-connect to the SharePoint site of your choice by simply selecting from a list of pre-configured connections. In addition, the browser uses its own session, therefore, you can always browse the site even while Automate SharePoint activities are being performed.
Accessing the SharePoint Browser
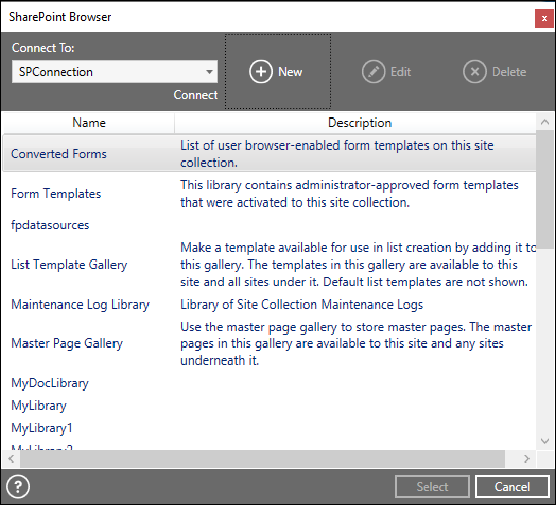
The SharePoint browser can be accessed within the properties of any SharePoint activity that requires connection to a SharePoint site in order to perform actions on items such as files, folders, and attachments. Clicking the folder icon located on the right side of a given parameter opens the SharePoint browser window (as shown below).
Using the SharePoint Browser
The SharePoint browser is a tool used during task development to provide a way for you to view remote SharePoint items or select items that a specific SharePoint activity should perform operations on during task execution. In order to view SharePoint items, you must first establish a connection to the server.
To Create a New Connection
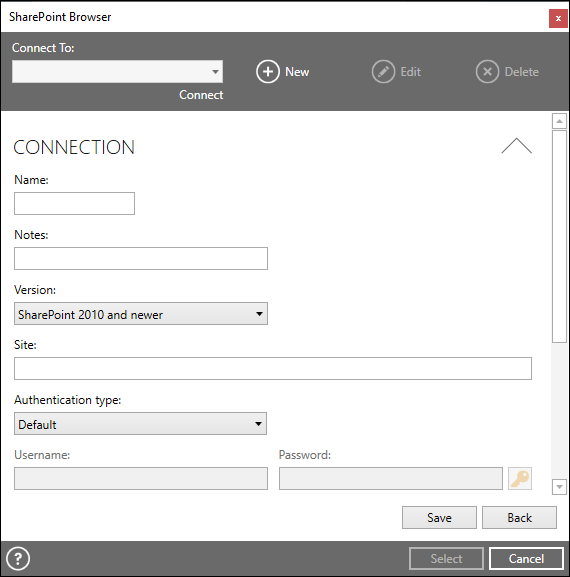
- Click New.
- For the Connection properties,
enter or select the following:
- Name -A unique name for the connection. Names are used to reference any saved connections.
- Notes - Any notes you wish to convey about the connection.
- Version -The desired SharePoint version to use with the connection.
- Site - The URL for the SharePoint site (for example, http://testserver/sites/unittests).
- Authentication type - The method of authentication to utilize. The Username, Password, and Domain fields become enabled and required, based on the type selected.
- Username - A valid SharePoint username.
- Password - The password that corresponds with the username entered in the Username parameter.
- Domain - The domain of where the username belongs.
- Certificate - The (DER encoded) certificate to use for SharePoint authentication.
- Ignore invalid server certificate - If selected, specifies that invalid server certificates that are detected will be automatically ignored (disabled by default).
- Timeout (seconds) - The total number of seconds allowed to connect to the SharePoint server, otherwise a time out error is generated.
- For the Proxy properties, enter or select the following:
- Proxy type - The proxy protocol to use. Required for SharePoint connections that pass through a proxy server. If you are unsure of the value to use in this parameter, contact your network administrator.
- Use authentication - If selected, specifies the connection to the proxy server requires authentication (disabled by default).
- Proxy server - The host name (server.domain.com) or IP address (xxx.xxx.xxx.xxx) of the proxy server.
- Proxy username - The proxy username to use to authenticate with proxy server. This parameter is available only if the Use authentication parameter is enabled.
- Proxy port - The port number to use to connect to the proxy server (the default is 808).
- Proxy password - The proxy password to use that corresponds with the username entered in the Proxy username parameter.
- Click Save to save the connection. The unique name you entered for this connection will appear in the Connect To drop-down combo box.
- Repeat these steps for any additional connections.
To Edit/Remove an Existing Connection
- Click the down arrow under the Connect To parameter to display a list of existing connections.
- Select the connection you wish to edit or delete.
- Click the Edit button to edit the properties of the connection or click the Delete button to permanently delete it.
To Connect and Browse SharePoint Items
- Select the desired connection from the Connect To drop-down combo box, and then click Connect.
- After establishing a successful connection, the SharePoint browser displays a list of remote files along with their description.
- To select a file, do one of the following:
- Double-click on the file in the file list.
- Single-click on the file in the file list, and then click Select .