Attachments |
Attachments allow files of any type to be embedded within a task so that third-party elements can be incorporated for greater portability. At runtime, attachments are automatically "unwrapped" to the local temp directory where they can be accessed by the task. For example, you can create a task that plays a unique sound when a particular event occurs by attaching the associated sound (.wav or .mp3) file to it. When deploying or exporting this task to other Automate clients, the addition of the sound file as an attachment ensures that it will always be present and accessible on any system.
Adding Attachments
Attachments are added and managed by way of the Task Builder's Attachments Debug Panel. It displays any files that are currently attached to the task along with their original file name and extension.
To Attach a File to a Task
- Do one of the following to open the Attachment Explorer window:
- Right-click anywhere inside the Attachments debug window and select Addfrom the context menu.
- Click Add Attachment from the Insert command group of the ribbon.
-
Click Add Attachment from the Insert command group of the ribbon.
-
From the Attachment Explorer window, navigate to, and select the file you want to attach, then click Open. This attaches the file to the task and the attachment properties (described below) are displayed in the Attachments debug window.
-
From the Attachments debug window, view or enter the following information:
- Name
- The name of the attachment (required). The name you enter will be used as a placeholder
for the file during runtime, therefore, the following rules apply
when specifying attachment names:
- Names must contain only alphanumeric characters.
- Must begin with a letter.
- Cannot contain any spaces.
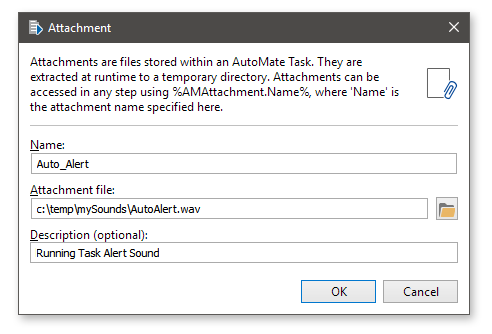
- Attachment - The file name of the attachment file. Use the folder icon to browse to the file you wish to attach.
- Description - A user defined description of the attachment (optional).
- Attached - The date and time the file was initially attached to the task (this value is read-only).
- Name
- The name of the attachment (required). The name you enter will be used as a placeholder
for the file during runtime, therefore, the following rules apply
when specifying attachment names:
-
Upon completion, click OK. The new attachment and its properties are displayed in the Attachments Debug panel.
Accessing Attachments
Once an attachment is added to a task, it can be accessed in any step by entering:
%AMAttachment.Name%
Where [Name] is the name of the attachment specified in the Name parameter of the Attachment dialog. For example, assume you created an attachment identical to the one displayed above. In order to play the attachment file c:\temp\mySounds\AutoAlert.wav using a Play Audio activity during runtime, simply enter %AMAttachment.Auto_Alert% in the Audio files to play parameter of this activity.
AMAttachment.Name is essentially an Automate dataset used as a placeholder for the attachment file during runtime. The file itself is unwrapped and saved to the local temp directory. This directory may vary depending on the operating system. On Windows 10, this directory is C:\Users\[username]\AppData\Local\Temp\attachmentFile.txt.