Along with the ability to edit the Properties
of individual task steps, many adjustments can be performed on any step
once they are added to the Task Builder's Steps
panel. You can move, indent, disable or delete one or more existing
steps. You can perform cut/copy/paste commands as well.
Commands are conveniently located on the Ribbon
or by way of a context menu that appears when right-clicking a specific element. Certain
ribbon commands become active only when items they apply to are selected,
making it easier for you to distinguish relevant commands and avoid selection
of unrelated ones.
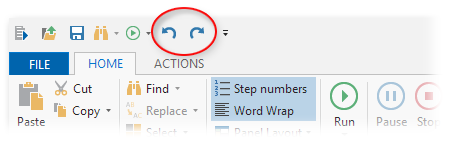
The Quick Access Toolbar contains Undo
and Redo commands that apply to
all edit operations allowing you to undo one or more incremental sequence
of changes in case you make a mistake or redo them in case you change
your mind.
The properties of any task step can be easily viewed or modified
once it is added to Task Builder's Steps panel. For convenience, step
properties can be accessed in various ways.
To View or Modify the Properties of a Step
- In the Steps panel of Task Builder, select the
step that contains the properties you wish to modify and double-click on the step.
- Perform the desired changes in the properties
dialog box that appears, and then click OK to save changes.
Steps can be moved freely within the Steps panel. You can modify
the sequence at which steps execute by moving them above or below
other steps. Task Builder supports movement of multiple sequenced
steps (for example, steps 3, 4, and 5) as well as multiple non-sequenced steps
(for example, steps 3, 6 and 8). For convenience, such operations can be performed
in various ways.
To Move Steps
Using Up & Down Command
- In the Steps panel of Task Builder, select the
steps you want to move up or down the step sequence. To select
more than one step, hold down CTRL during selection.
- From the ribbon, click the Move
Up or Move Down arrow. Each click is equivalent
to a single line of movement.
To Move Steps Using Cut & Paste
- In the Steps panel of Task Builder, select the
steps you want to move up or down the step sequence. To select
more than one step, hold down CTRL during selection.
- From the ribbon, click Cut (you can also use CTRL+X)
.
- Select a desired location in the Steps panel
and click Paste
from the ribbon (you can also use CTRL+V).
To Move Steps
Using Drag & Drop
- In the Steps panel of Task Builder, select the
steps you want to move up or down the step sequence. To select
specific steps or a block of steps, hold down CTRL during selection.
- Hold down the left mouse button while dragging the
highlighted steps to the desired location, then release the
mouse button to complete the operation.
You can increase or decrease indentation of one or more steps as
a way to organize your steps. Task Builder supports indentation of
multiple sequenced steps (for example, steps 3, 4 and 5) as well as multiple
non-sequenced steps (for example, steps 3, 6 and 8).
To Increase or Decrease Indentation
- In the Steps panel of Task Builder,
select the steps to increase or decrease their current indentation. To select a block of sequenced steps
or specific non-sequenced steps, hold down CTRL during selection.
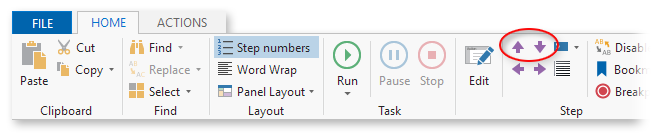
- To increase indentation, click the arrow pointing right in the ribbon's Step command group (you can also use CTRL+ right arrow key). To decrease indentation on an indented step, click the arrow pointing left (you can also use CTRL + left arrow key). See image below.
NOTE: Left justification
of an indented step is based on the parent step (if relevant)
and the default indentation settings applied by way of Task Builder
Options - Formatting.
To Reset Indentation
- In the Steps panel of Task Builder,
select the steps that should be reverted back to their original
indentation level. To select a block of sequenced steps or specific
non-sequenced steps, hold down CTRL during selection.
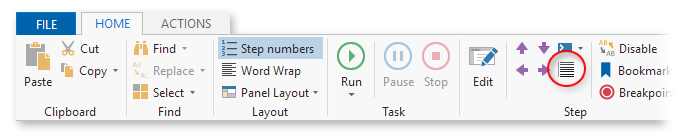
- From the ribbon, click the Reset Indent (see image below). Hold down the left mouse button while dragging the highlighted
steps to the desired location, then release the mouse button
to complete the operation.
You can reset one or more steps to their default indentation level.
From the ribbon's Step command
group, click the Format Steps
command. This enables/disables auto-formatting of steps. When enabled,
blocks of steps contained within a conditional (If) statement or Loop
process are formatted (indented) to improve distinction (this command
is enabled by default).
Steps of a task can be disabled or re-enabled to use
or test different versions of the same task. The Disable
button on the ribbon or context menu acts as a toggle to disable an
enabled step or re-enable a disabled step. When a step is disabled,
it is grayed out by default in the Steps panel and it is treated as
a comment and ignored when the task runs.
To Disable or Enable a Task Step
- In the Steps panel of the Task Builder,
select the steps you want to disable. To select more than one
step, hold down CTRL during selection.
- Click
the Disable button
on the ribbon under the Home tab (you can also right-click on the steps, and then click Disable).
NOTE: To re-enable, follow the
same instructions.
To Delete a Step
- In
the Steps panel, select the step or steps you wish to delete.
To select more than one step, hold down CTRL during selection.
- Right-click on your selection, and then click Delete (you can also use the Delete key).
By default, the Steps panel displays numbers to represent each step
in the task are displayed for each step in the Task Builder's Steps
panel along with an icon designating the type of action used. Also
the text (or AML code) that appears in this panel is word wrapped
by default allowing all text to be visible in the window regardless
of its size. Nonetheless, these options can be customized according
to each user's preference.
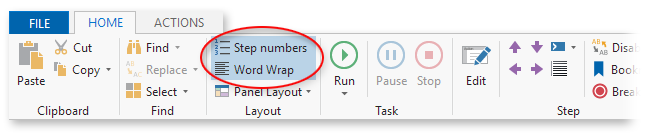
To Turn Word Wrap on/off
- From the Ribbon, click Home.
- From the Layout
command group, click the Word
Wrap button to toggle Word Wrap on/off (see image below).
To Disable/Enable Step Numbers
- From the Ribbon, click Home.
- From the Layout
command group, click Step
numbers to toggle step numbers on/off (also
shown below).
The Task Builder offers two ways in which to view the steps of a
task. The default appearance displays a plain-English, easy to comprehend
text description of each step. They can also be displayed in AML
(Automate Markup Language) format, which is the internal program
language encompassed in Automate. When set to this view, those who
understand AML can edit their code directly from the Task Builder's
Steps panel
or copy the code onto an external text editor such as Notepad.
To Switch from Plain Text to AML or AML to Plain Text
- From
the Ribbon, click Home.
- In the View
command group, select AML
to switch to AML code view or Visual
to switch to plain text view (see image below).
To Edit Code in AML View
- From the Steps panel, select the step to edit.
- Click the step again to make the code editable.
- Make the desired changes.
To enable task development to be as simple and painless as possible,
an Undo and Redo command is included on the Quick Access
Toolbar. Undo reverses the last action you performed, and Redo undoes
the last Undo action, in case you change your mind. Task Builder keeps
track of all previously performed actions, therefore, you can reverse
the actions you performed one action at a time, in reverse consecutive
order, up to and including the first action.
To Undo Changes
Click the Undo
command on the Quick Access Toolbar or press CTRL + Z. Undo reverses
the last editing action. If you delete one or more steps, you
can use Undo to restore them and all their properties.
You can perform as many Undo actions as you like.
To Redo a Change After an Undo
Click the Redo
command on the Quick Access Toolbar or press CTRL + Y. This restores
the last action you performed if no other actions have occurred
since the last Undo. The Redo
button is normally inactive and becomes active only if an Undo is performed.
 Editing
Step Properties
Editing
Step Properties