Creating a Scan
You can create scans in beSECURE using either of the following methods:
-
Quick - Create New Scan link at the top of the - Provides a simplified interface to allow a scan to be created and run quickly.
-
Extensive - Scan List page- Provides access to all scan parameters at the time of creation.
Create New Scan link
-
Log in to beSECURE.
-
In the upper-left corner of the Home page, select Create New Scan.
-
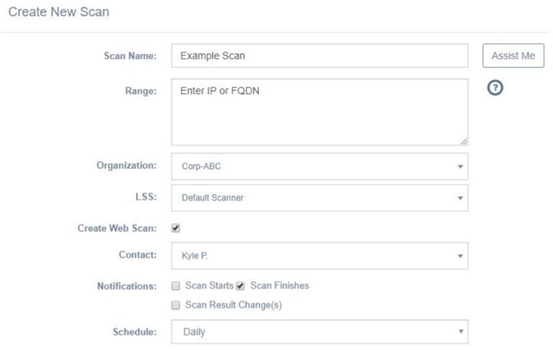
In the Scan Name box, enter a name for the scan.
-
In the Range box, enter the IP address(es) and/or hostname(s) to scan.
NOTE: Hostnames/IP addresses provided must be unique for the specified Parent Organization, two different Scans assigned to the same organization should have no common target hosts. Use a comma or a new lines to separate different IPs or Hostnames. Use network dividers such has /8 (A-class) or /24 (C-class) to define subnets. Use '-' to define ranges (For the last digits only, i.e. 192.168.1.100-120). -
In the Organization box, select an organization registered in your beSECURE account to scan.
NOTE: Do not select an organization you could also register your SOC/ IT / Production as your company’s organization. -
In the LSS box, select the desired local scanning server (LSS) to use with the scan.
-
To perform scans on the application layer (that is, the 7th OSI layer), leave the Create Web Scan check box selected.
-
In the Contact box, select a contact registered in your beSECURE account to receive notifications regarding the scan.
-
To send real-time email notifications regarding the scan to the Contact selected, leave the Scan Starts, Scan Finishes, and Scan Result Change(s) check boxes selected in the Notifications group.
-
In the Schedule box, select if you want the scan to run Immediately, Daily, Weekly, or Monthly.
-
If you selected Daily, Weekly, or Monthly for the Schedule parameter, in the Every or Every day box, select the number of day(s), the day of the week, or calendar day, based on the corresponding scanning schedule.
-
Click Create.
From the Scans List page
-
Log in to beSECURE.
-
In the upper-left corner of the Home page, select DevOps.
-
Select Scans > Scans List.
-
Select the New
 button.
 -
On the Scan Details page, under the Main tab, configure the following parameters:
-
In the Scan Name box, enter a name for the scan.
-
In the LSS box, select the desired local scanning server (LSS) to use with the scan.
-
In the Organization box, select an organization registered in your beSECURE account to scan.
NOTE: Do not select an organization you could also register your SOC/ IT / Production as your company’s organization. -
In the Hostname / IP Address Range box, enter the IP address(es) and/or hostname(s) to scan. Optionally, click Import to import a CSV file, or Resolve to resolve the host.
NOTE: Hostnames/IP addresses provided must be unique for the specified Parent Organization, two different Scans assigned to the same organization should have no common target hosts. Use a comma or a new lines to separate different IPs or Hostnames. Use network dividers such has /8 (A-class) or /24 (C-class) to define subnets. Use '-' to define ranges (For the last digits only, for example, 192.168.1.100-120).
-
-
If the scan requires Windows authentication, click the Authentication sub-tab and configure the following parameters (skip to step 6 if WIndows Authentication is not required):
-
In the Stored Credentials box, select credentials from the Credentials Storage section of your beSECURE account to use with the scan, or manually enter your credentials in the Windows Username, Windows Password, and Windows Domain boxes.
-
To add SSH Authentication, click Host List to select from existing hosts registered in your account, or click Add New Host to enter a Hostname and Port to use with this scan.
-
-
Click the Hostname / IP Address Range tab and configure the following parameters:
-
In the Include box, enter the IP address(es) and/or hostname(s) to include in the scan. Optionally, click Import to import a CSV file containing hostnames and/or IP addresses, or Resolve to resolve the host.
-
In the Exclude box, enter the IP address(es) and/or hostname(s) to exclude from the scan. Optionally, click Import to import a CSV file containing hostnames and/or IP addresses, or Resolve to resolve the host.
-
-
Click the Additional Settings sub-tab and configure the following parameters:
-
By default, the Ping Host check box is selected. See note before you opt to clear this setting.
NOTE: Disabling Ping Host(s) causes the scan to skip the first phase where it attempts to detect live hosts in the range provided. This causes the scan to run on hosts that do not answer the Scan Setting ping and do not listen to standard ports. This is beneficial when scanning high-security Scan Settings like a DMZ. However, clearing this check box may also cause the scan to run much longer due to all of the possible Scan Settings in the range being scanned, even if there are no actual machines configured to the IP address. -
In the Port Range box, enter the desired range of ports to scan, or select the Full Port Range check box to enter the full range of ports (1-65535).
-
Optionally, in the Exclude Ports box, enter any ports to exclude from the scan.
-
In the SNMP Community Name box, enter the desired SNMP name to use with the scan.
-
In the Scanning Profile box, select a profile to use with the scan.
-
Optionally, in the Tests to Exclude box, enter any tests to exclude from the scan.
-
Optionally, in the Tests to Include box, enter any tests to include with the scan.
-
-
Click the Permissions tab and assign the contacts who need rights to access and modify this scan by clicking on each desired contact name in the Available box to move it to the Assigned box.
NOTE: A scan without assigned owners is automatically owned by any Scanning or Administrator Account User in the account. -
Click the Reporting tab and configure the following parameters:
-
In the Contact Person box, select a contact registered in your beSECURE account to receive notifications regarding the scan.
-
To send real-time email notifications regarding the scan to the selected Contact Person, leave the Scan Starts, Scan Finishes, and/or Scan Result Change(s) check boxes selected in the Notifications group.
-
In the Customization Name box, select a preconfigured report stored in your beSECURE account (if any), or select New to create a new report.
-
In the Format box, select PDF or XML for the report's format.
-
In the Report Type box, select Complete (full report), Filtered (results filtered by way of vulnerability name), or Differential (compares results from two different scans) for the type of report to generate.
-
If Format is set to PDF, in the PDF User Password box, optionally type a password to password protect the report once it is generated.
-
In the Report Style box, select the style of report to view the scan results in. For a description of each Report Style, see Report Styles.
-
To hide the Host Information section of the report when it is generated, select the Hide Host Information section check box.
-
If the Report Type box is set to Filtered, configure the parameters in Filtered Report group:
-
In the Vulnerability box, enter a name for the vulnerability
-
-
-
Click the Other tab and if desired, enter a comment regarding the scan in the Comment box.
-
Select Create to save the scan and add it to the Scan List.