Managing Scan Settings
Scan settings are available to Scanning Users and Administrators. The Scans area allows these users to:
- Create entries containing specific scan setting information
- Modify existing scan setting information
- Delete scan setting information
- Undelete scan setting information
- Modify a scan’s schedule
- Enable a scan
- Disable a scan
Creating a Scan Setting Entry
To create an entry containing specific scan setting information:
- Log in to beSECURE with administrative privileges.
- Make sure the DevOps mode is selected.
- Click Scans.
- Click Scan Settings. A list of existing scans will appear (if any).
- Click the plus sign
 button at the bottom right.
 - Fill out the form on the Settings tab (default).
The required fields on the Main sub-tab are:
Field Description Scan Name (required) A name for the scan. LSS (required) The LSS to use for the scan. Organization (required) The organization associated with the scan. Hostname/IP Address Range (required) The name or IP address range for the host to scan. Use the Import button to import a CSV file, or the Resolve button to resolve the host. NOTE: Hostnames/IP addresses provided must be unique for the specified Parent Organization, two different Scans assigned to the same organization should have no common target hosts. Use a comma or a new lines to separate different IPs or Hostnames. Use network dividers such has /8 (A-class) or /24 (C-class) to define subnets. Use '-' to define ranges (For the last digits only, i.e. 192.168.1.100-120).- Click on the Authentication sub-tab to enter a Windows username, Windows password, and Windows domain (optional).
- Click on the Hostname / IP Address Range sub-tab to import a CSV file of IP address ranges or resolve the IP addresses to include and exclude (optional).
Click on the Additional Settings sub-tab to enter a port range, SNMP community name, scanning profile type, and tests to exclude (optional).
NOTE: Unchecking the “ping hosts” check box on this sub-tab will cause the scan to skip the first phase where it attempts to detect live hosts in the range provided. This will cause the scan to run on hosts that do not answer Scan Setting ping and do not listen to standard ports. This is beneficial when scanning high security Scan Settings like a DMZ. However, unchecking this box may also cause the scan to run much longer. This is because all of the possible Scan Settings in the range will be scanned, even if there are no actual machines configured to that IP address.
- Click on the Permissions tab to assign additional managers for the scan setting entry (optional). Click on an email/address name under the Available section to move it to the Assigned section. This will assign that user as a manager for the scan setting. A scan setting without assigned owners will automatically be owned by any Administrator account in the system.
-
Click on the Reporting tab to configure settings for reports. Available settings include:
Field Description Contact Person (required) The contact person who should receive reports and notifications. Notifications The notifications to send. Values are Scan Starts, Scan Finishes, and Scan Result Change(s). Customization Name A saved report customization. Report Name The name of the report to send. Format The format for the report. Report Type Values are Complete, Filtered, and Differential. Report Style Values are Regular, SOX, PCI (compliance), HIPAA, ISO 27001/2, OWASP, CIS, Remediation, Microsoft Patches, Penetration Test, Top Level Report, and Executive Summary. - When finished, click Create.
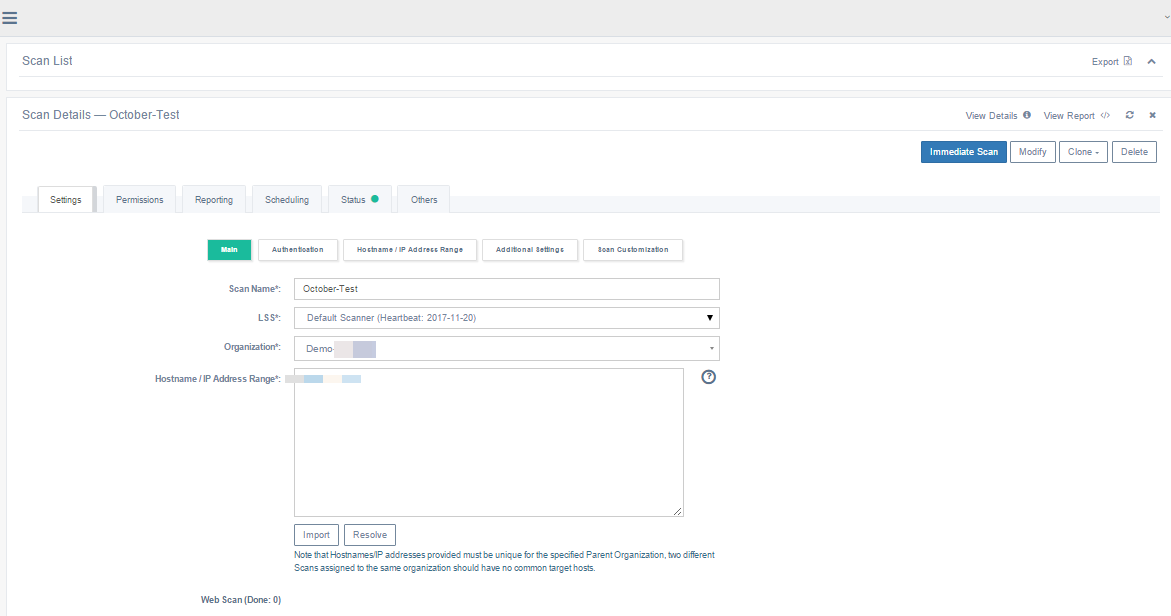
The Scan Details page.
Creating a new scan setting only registers it on the IS. A request to register the Scan Setting on the selected scanning device will occur on the next synchronization or communication cycle between the IS and LSS. Until the LSS accepts the registration request, the following message will appear in the Scan Setting details: “The scan has not yet been confirmed by the scanner. You cannot modify its scan setting until it is confirmed.”
Once the LSS has accepted the scan setting registration, a new section in the scan setting details form will appear. This section will allow the user to configure the scanning routine and to enable the scan on the remote scanning device.
If the scanning device is changed once the original scanning device has accepted the registration, a warning will be generated saying: “Changing a scanner will cause the scan to be disabled on the original scanner and a new scan will be created on the new scanner.”
Creating a Schedule for a Scan Setting Entry
Adding a scanning schedule to a scan setting entry allows you to run automated scans on a periodic basis. A schedule consists of a reference date (the date the schedule is calculated) and a routine, which can be daily, weekly, monthly or once (a one-time scan). In order to provide a schedule for a Scan Setting entry, you must create the scan setting first, then go back and modify it.
- Log in to beSECURE with administrative privileges.
- Make sure the DevOps mode is selected.
- Click Scans.
- Click Scan Settings.
- Enter text in the search box at the top right to search by Scan Name, or click the arrow in the search box to run an advanced search.
- Select the Scan Settings entry you want to add a schedule to.
- Click the Scheduling tab.
- Enter the schedule details. The Scheduling tab includes the following fields:
Field Description Date Last Scanned The date and time this scan setting was last used, if applicable. Next Scheduled Scan The date of the next scheduled scan. Will be null if a schedule hasn’t been added to the scan setting yet. Last Scan Number The ID number for the last scan. The scan number for the first scan of a target will be 1, the second scan will have the scan number 2, and so on. Scan Duration The duration of the last scan. Scan Timezone (required) The time zone associated with the scan. Reference Date The date the schedule is based on. Routine Values are Unscheduled, Daily, Weekly, Monthly, and Once. For more information, see the 14.8.2.1. About Routines section below. Time Range The hours during which the scan can be initiated. Time Range Behavior The behavior of the time range. For example, you can use this field to specify that a scan shouldn't run during the hours in red, and that scans should resume during the hours in green. By default, green indicates the start time and active period, while red is the inactive period. -
Click Modify Schedule.
About Routines
For daily and weekly routines, you must also enter an integer in the field below your choice. This number represents the interval. For example, to scan every 5 days, select Daily, then enter the number 5 in the next field.
There are two options for the monthly routine. You may choose to scan on a certain day of the month, or the first, second, third, or fourth Sunday, Monday, etc. of the month. For the Once routine, the specific date for the scan should be entered. For example, you would enter 2018–03–05 to scan on March 5, 2018.
Each scan has a starting time that is determined by a matrix of 24 hours. If it is marked by green, the scan can begin at that time. If it is marked in red, it cannot begin at that time. There are two parameters affecting the scan start time: the fixed time frame and the number of scans that can be conducted simultaneously by the LSS. If the time frame does not allow for a scan because the maximum number of scans is being conducted on the LSS, the system will generate an alarm.
Modifying a Scan Setting Entry
To modify the settings for a scan:
-
Log in to beSECURE with administrative privileges.
- Make sure the DevOps mode is selected.
-
Click Scans.
-
Click Scan Settings.
-
Enter text in the search bar at the top to search by Scan Name, or click the arrow in the search box to open the advanced search options. Select Show Deleted in the advanced search options to include deleted scans in your search. You may also use the navigation buttons at the bottom to page through the list of scan setting entries.
- Click on a scan in the results list.
- Edit the scan details. For tab and setting details, see the Creating a Scan Setting Entry section of this user guide.
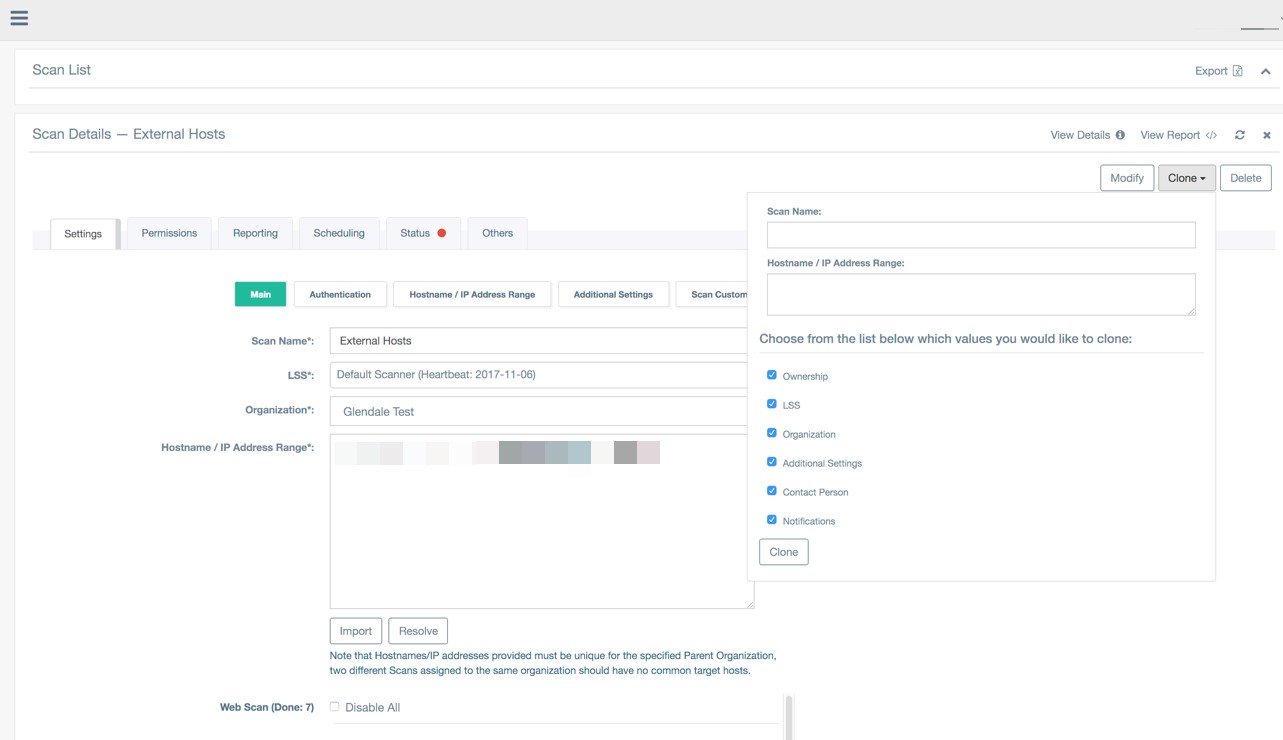
You can also click Clone to clone the settings associated with another scan, either by Scan Name or Hostname / IP Address Range. The fields that can be cloned include Ownership, LSS, Organization, Additional Settings, Contact Person, and Notifications.
-
Click Modify.
The Scan Details page.
The user who creates a new scan setting entry is automatically authorized to manage it, and to add other managers. To view a list of the accounts authorized to manage an entry, click the Permissions tab. Authorized managers appear under Owned By › Assigned. To add a new manager, click on the email address/name for the manager under Available. The manager will now appear under Assigned. To remove an existing manager, click on the email address/name for the manager under Assigned to move it back to the Available section.
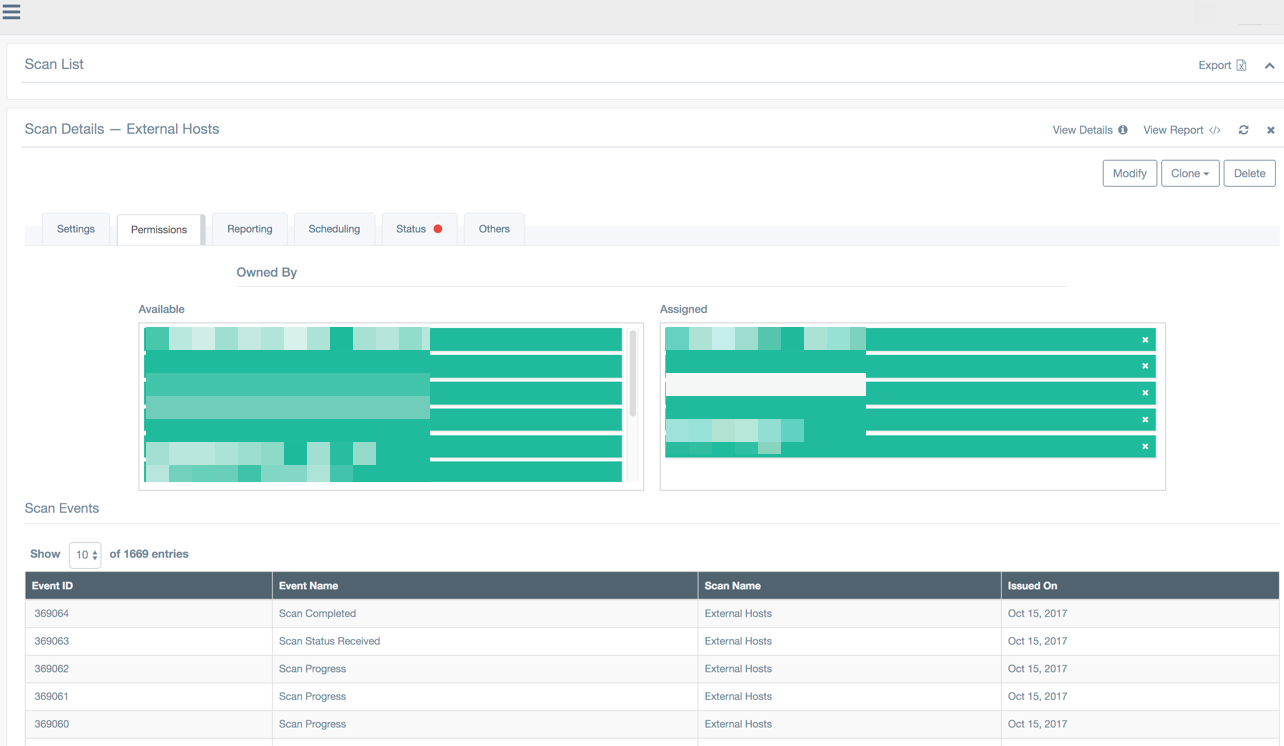
The Permissions tab of the Scan Details page.
When a new scan setting is created, the LSS must confirm its creation. The scan cannot be enabled or scheduled for scanning without this confirmation. As soon as confirmation is given, two additional actions are made available. These are Modify Schedule and Enable/Disable Scan. The Scan Setting default is disabled and doesn’t have a schedule. To activate a scan, it must be enabled and a schedule must be provided.
Cloning a scan
Cloning a scan is an option made for your comfort - Create a scan in a way that's even faster than the "Create new scan" widget. Just click on a scan, clone it and inherit all its settings.
-
Select the DevOps mode.
-
Click Scans > Scans list.
-
Select a preexisting scan on the Scans List page.
-
Click the Clone button the upper-right corner of the Scans Details page.
-
Enter a name for the scan in the Scan Name box.
-
Enter an IP address, a range of IP addresses, or FQDNs in the Hostname / IP Address Range box. To include multiple entries, separate each with a comma (for example, 192.168.0.100,192.168.0.200).
-
Optionally, disable any value(s) you do not want to include in your scan clone.
-
Click Clone.
-
Click Scan List from the side navigation pane to access your newly cloned scan.
Deleting a Scan Setting Entry
To delete a scan settings entry:
- Log in to beSECURE with administrative privileges.
- Make sure the DevOps mode is selected.
- Click Scans.
- Click Scan Settings.
- Enter text in the search bar at the top to search by Scan Name, or click the arrow in the search box to open the advanced search options. You can also use the navigation buttons at the bottom to page through the list of scan setting entries.
- Click on a scan in the results list.
- Click Delete.
Restoring a Scan Setting Entry
To restore a scan setting that was deleted by mistake:
- Log in to beSECURE with administrative privileges.
- Make sure the DevOps mode is selected.
- Click Scans.
- Click Scan Settings.
- Click the drop-down arrow in the search box to open the advanced search.
- Select Show Deleted.
- Click Search.
- Select the appropriate deleted item from the list of results.
- Click Undelete.