Auto Learn
One of beSTORM's main strengths is the ability of the user to construct a complex protocol and have beSTORM fuzz all its variations. Therefore, it is imperative that beSTORM provides the ability to create a module, or at least a basic module structure.
While it remains true that creating/extending a beSTORM module may be done using any XML editor and following the beSTORM grammar which is described in Custom Modules, this may become difficult if, for example, if the complete protocol specifications are missing, or if the module contains unknown/uninteresting sections).
beSTORM provides functionality that tries to resolve this difficulty. This by providing a simple to use graphic interface that allows the user to create beSTORM modules from provided data blocks.
This interface allows the user to load different types of data that describes the data sets we are interested in analyzing with beSTORM. beSTORM uses these data sets to determine how the protocol or file is built.
These input types can be network traffic that beSTORM captured, or a file sample containing the network traffic, which was captured using other means or a syntax describing an API you want to fuzz.
Once the input data is being loaded into beSTORM, you can analyze it in the relevant screen, depending on the type of data being used (Binary / Textual / API syntax).
Network File Specification Auto Learn
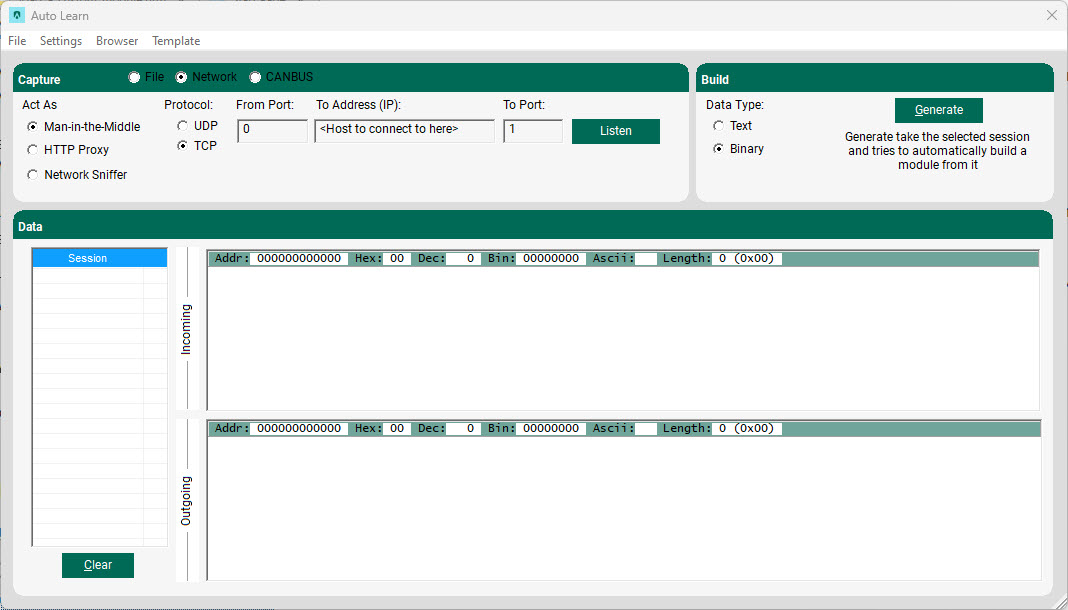
Upon choosing Network/File Auto Learn from the beSTORM menu, or by choosing Learn in the wizard, you arrive to a screen with three action options:
Capture network traffic using the Man-in-the-Middle option
-
To set up this option, specify the incoming port that beSTORM will listen to and act as a server on, the protocol type (TCP or UDP), the IP address beSTORM and the destination port to relay to. Configure your 'Client'/Script to transfer network to the beSTORM machine's IP address and incoming port, as specified.
-
After selecting Listen, beSTORM starts to capture network traffic. Once data is being sent, beSTORM captures both incoming network traffic (from client/script) and the server response (referred to as outgoing traffic).
-
Once the collecting process is done, select Stop. At this point you can go over the captured data (divided into sessions) and choose which part of the traffic (incoming or outgoing) interests you.
-
Even though beSTORM attempts to determine whether the data it collected is binary or textual, make sure the correct option is selected and then click Generate to proceed to the editing stage.
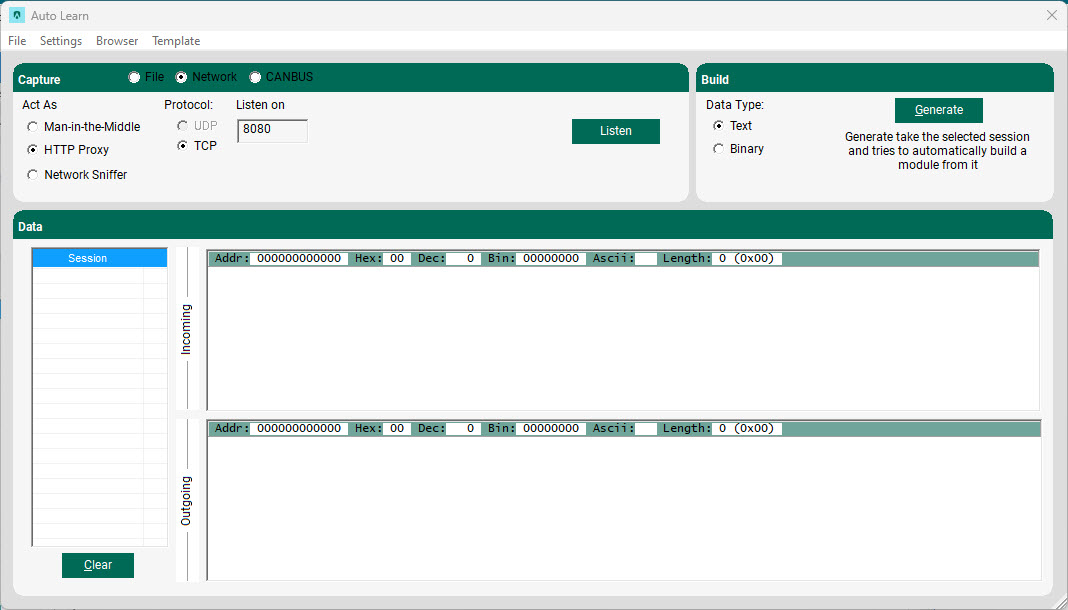
Capture network traffic using beSTORM as an HTTP proxy of your web browser
-
To set up beSTORM as an HTTP proxy you need to specify the listening port, and then select Listen.
-
After configuring your web browser to connect by way of HTTP proxy with beSTORM's IP address and listening port (as specified earlier), start navigating the web. beSTORM will capture both requests and responses, which are divided into sessions.
-
Once you are satisfied with the captured session, select Stop and then select the relevant data.
-
Even though beSTORM attempts to determine whether the data it collected is binary or textual, make sure the correct option is selected and then select Generate to proceed to the editing stage.
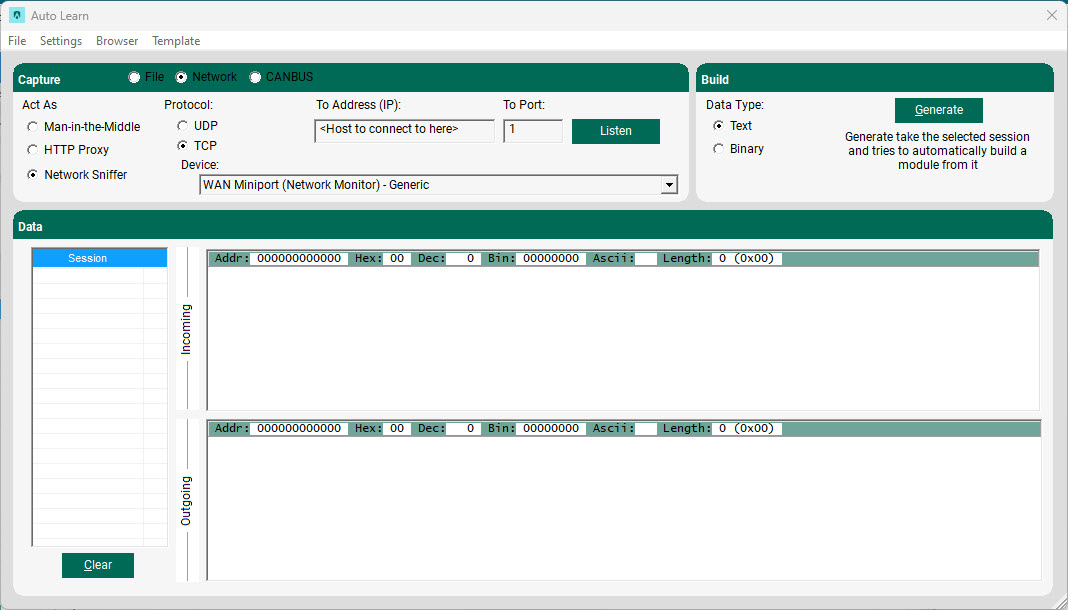
Capture Network data using a Network Sniffer
-
To set up beSTORM as a Network Sniffer, specify the desired hostname/IP and port number to capture data from/to, and then select Listen. beSTORM captures both requests and responses, which are divided into sessions.
-
Once you are satisfied with the captured session, select Stop and then select the relevant data.
-
Even though beSTORM attempts to determine whether the data it collected is binary or textual, make sure the correct option is selected and select Generate to proceed to the editing stage.
Import a file (PCAP Capture, packet dump, or file sample)
-
Choose the file you wish to edit. After loading the file, you can view it in the hex editor on the right side of the screen.
-
Even though beSTORM attempts to determine whether the data it collected is binary or textual, make sure the correct option is selected and press the Generate button to go on to the editing stage
Generation (editing the output into a beSTORM module):
Once you select Generate, beSTORM checks whether you treat the data as binary or textual. For binary data, beSTORM begins an automatic analysis process in attempt to determine the module's structure. In the end of this report, beSTORM suggests a list of relevant options. For textual data, beSTORM launches the Textual editor process which allows you to easily break down a sample into fuzzing parts, according to the text's structure.
Binary data
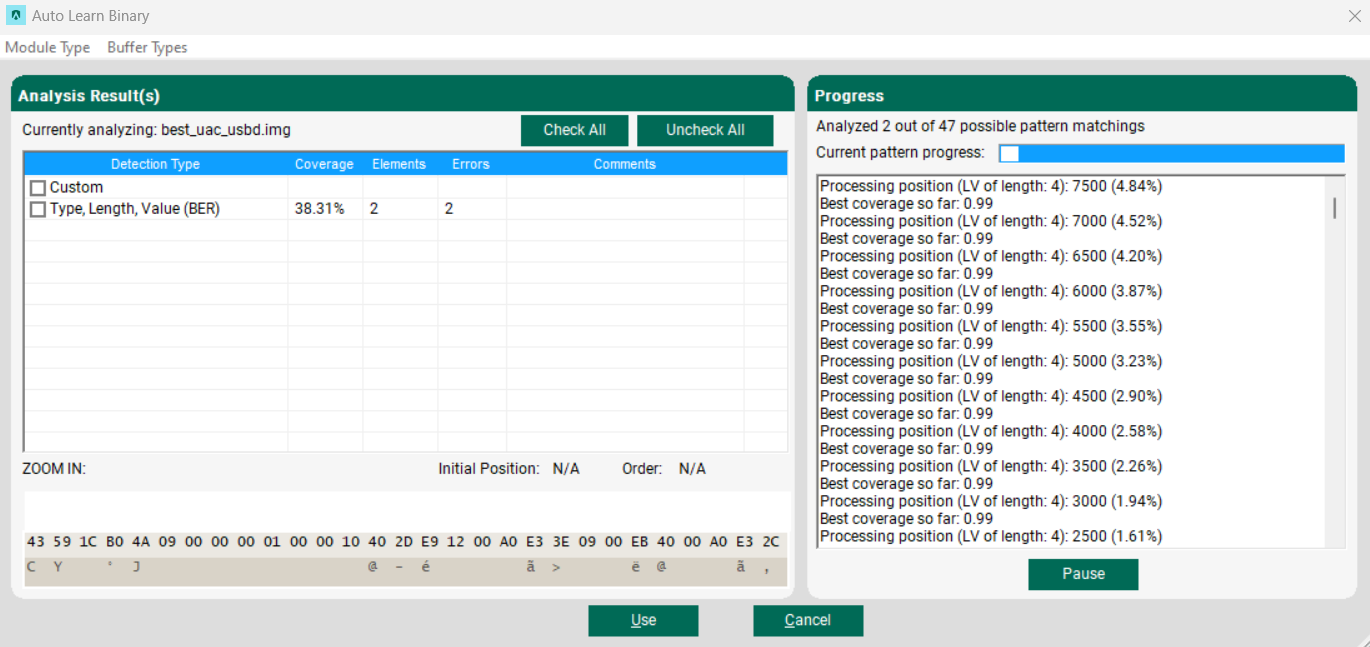
You may select any of the options, or all of them and proceed by clicking Use.
beSTORM gives some statistical information about each analysis output to aid you in selecting the most relevant options. The information consists of the total coverage of the packet beSTORM was able to match, the number of different elements found and the number of blocks that strictly differ from the tested pattern.
If you choose to select more than one option, beSTORM would perform all relevant options, in a prioritized order. This allows you to have beSTORM begin working on a protocol, even if you have no hint on its structure.
If you own some knowledge on the protocol structure, and it seems that beSTORM is unable to cover its specific unique form, it is possible to manually assist beSTORM in building the module. To do so, select Custom from the Detection Type list.
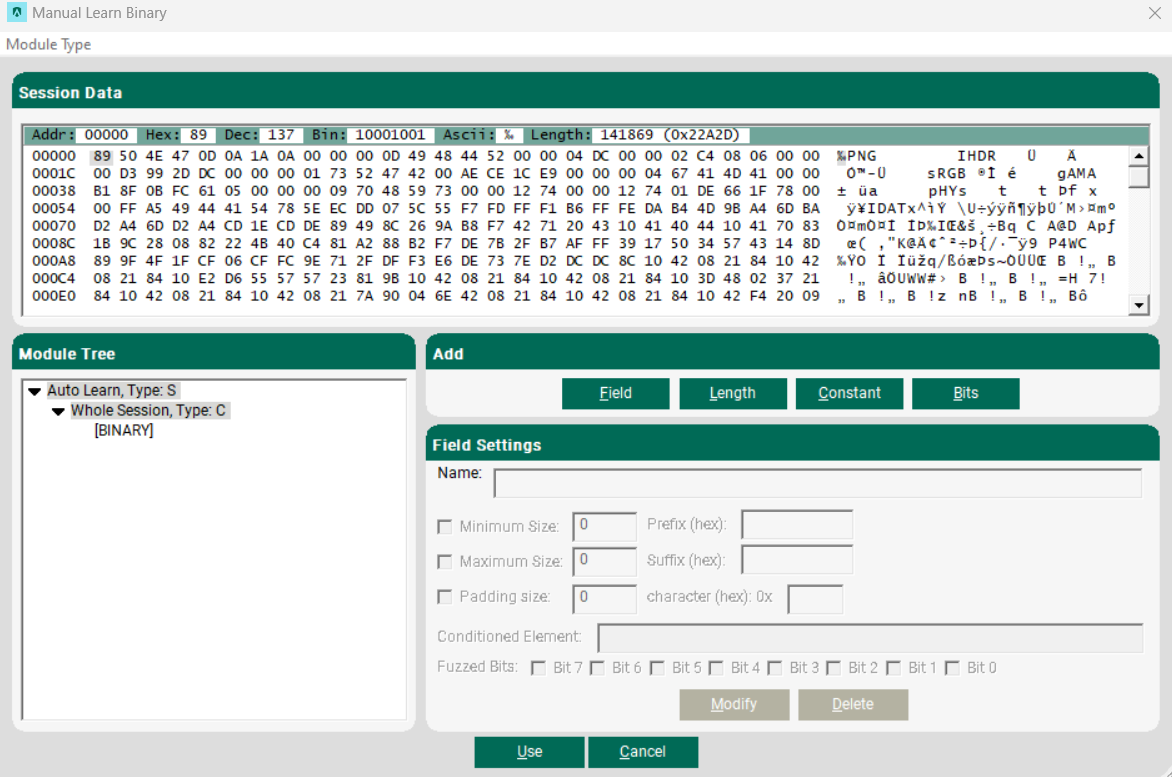
- At the binary data editor, you can see a list of sessions on the top right of the screen (in case you wish to edit a different session), a hex and textual representation of the data in the top right side of the screen and the editing options/results on the bottom part of the screen.
- Notice the Module Tree on the bottom left side of the screen. This part consists of your new module. Pressing on any of the branches would show its specific data on the Hex/Textual representation at the top right of the screen. Clicking the root would show the basic packet (no fuzzing of the data is shown) the module represents.
- To mark a part of the packet to be Fuzzed, you need to select the relevant part in the Hex/Textual view (top right side of the screen), and then select Add Buffer. You can assign an indicative name for this part and configure the maximum/minimum size in bytes of this part and padding information (if needed).
- Often, parts of the protocol are influenced by other parts, such as length of a buffer, number of appearances or actual content. This interface allows you to create element types that are affected by length. To do so, choose the location of the length part inside the module, and then select Add Length. A new dialog appears with the list of Buffers already added. Choose the buffer you want to bind the length to, and then select OK. Notice that the Buffer must be created before the Length.
- You can also add constant data outside of the packet if necessary, by selecting Add Constant.
-
After you finish building your module, select Use to use this module with beSTORM.
Textual data
The textual editor can be used by selecting the data as Textual in the Auto Learn screen (the one where the data input was selected) and then select Generate.
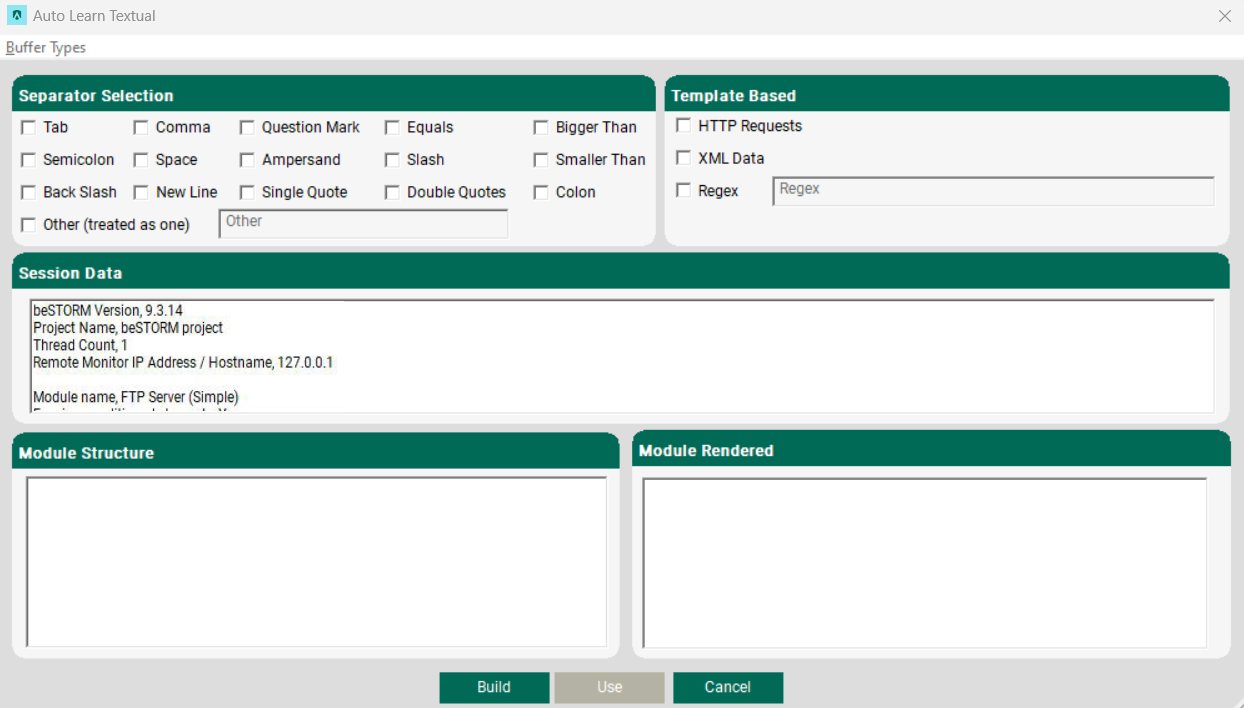
- In the textual data editor, you can see the list of sessions on the top right of the screen (in case you wish to edit a different session) and a list of delimiters. choose the relevant delimiters or choose 'HTTP Request' if this is the case and use our predefined delimiters for HTTP.
- Select Build to automatically create your module.
- After your module finishes building, select Use to use this module with beSTORM.