Managing Entities
In addition to the automated functions of the Entity View panels, there are several operations that can be performed manually in order to better manage the data and organize your penetration targets.
The steps provided here will apply across all view panels.
Adding Entities Manually
In the entity view panels, you can manually add entities.
Follow these steps to manually add a new Email:
- Activate the Client-side View.
- Right-click on the Emails folder.
- Select New, then select Email...
- In the Module Parameters window, enter the new email address and user name.
- Click the OK button.
The new Email entity will appear in the Client-side view. Follow these same steps to manually add entities to the Network and Web Views.
Grouping Entities
The display of entities allows management and organization through its columns. You can right-click on column headers to obtain options for adding or removing columns or to control entity grouping based on existing attributes. You can also click and drag the columns to re-sequence them to your preference.
To control the entity display, right-click on one of the columns and you will see the following menu.
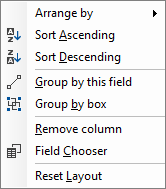
The menu provides the following visual controls for the entity list:
- Use the Arrange by menu to quickly arrange the entities by one of their attributes. With this menu, you can use the Show in Groups option to have the entities grouped by a selected attribute.
- The Sort Ascending / Sort Descending options change the direction of the list's sort. You can also simply click on a column header to change the sort order.
- The Group by this field option will group the entities by the attribute on which you right-clicked.
- The Group by box option will open a box into which you can click and drag column headers. This feature allows you to achieve a multiple grouping layout.
- Select Remove Column to hide a column from the entity list.
- Use the Field Chooser to add columns to the view. When the field chooser appears, simply click and drag the new columns to the desired location among the existing column headers.
- Click Reset Layout to return the view to its default setup.
Entity Tags
In order to facilitate the management and organization of your target information, Core Impact allows you to add custom tags and apply them to entities. Once you assign a tag to your entities, you can quickly view all entities that contain that tag.
To create a new tag in the Network View:
- Activate the Network View.
- Right-click on Tags.
- Select New, then select Tag...
- In the Module Parameters window, enter the Tag value.
- Click the OK button.
The new Tag will appear under the Tag heading. You now will need to assign that tag to one or more entities.
To assign a tag to one or more Network entities:
- Activate the Network View.
- Click the Hosts folder to view all available Network entities.
- In the list of Network entities, select the entity(ies) that you wish to tag (use the Ctrl or Shift keys to select multiple entities).
- Right-click on a selected entity.
- Select Tags, then select the new tag value.
The selected entity(ies) will now be tagged with your custom tag. Subsequently, if you want to view only those entities with a specific tag, you simply select the tag and a filtered list of entities will appear below.
Each entity view panel contains its own distinct list of tags.
Entities can be tagged with more than one tag.
Adding Comments to an Entity
You can add custom text to an entity in any of the views using comments. Comments are automatically saved within the active workspace. To add or edit an entity's comment, right click on it in the Entity View Panel and select from the context menu.
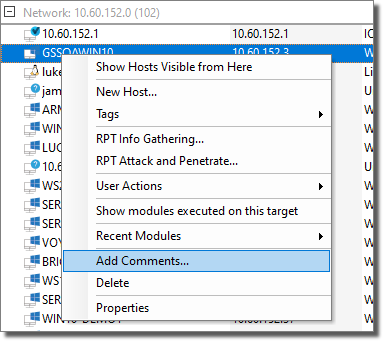
figure 33 - Adding a comment to an entity.
You edit comments in the Entity comments Dialog Box that appears. After you edit them, the comments are added to the entity database as a new entity property (see the section called “Entity Properties”).
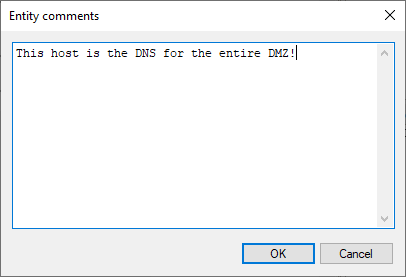
figure 34 - Entity comments Dialog Box
Entity Search
Each Entity View includes a Search Bar that you can use to filter entities by specific criteria. Filtering by condition allows you to quickly create a new "view" within the entity view. For example, in the below images, the string "sample" is entered into the search bar in the Client Side view. This action quickly filters all Emails, showing only those that contain the string "sample". The second image shows further search filtering made available by clicking the options arrows ( ) to the right of the search bar. The example shows that the list was filtered further by searching for those emails that contained the string "index" in the Name field.
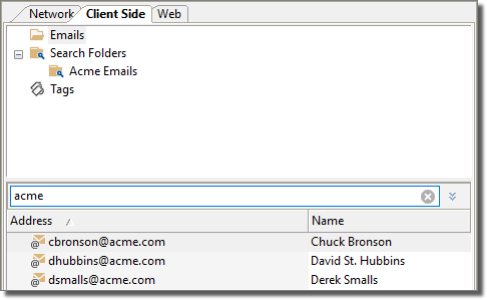
figure 35 - Entity Search Examples
To close the search results, click on a folder or tag in the view panel or click the reset button ( ) at the right side of the search bar.
Search Folders
Search folders are a powerful feature that allow you to view a dynamic list of entities based on custom-specified characteristics.
To create a new Search Folder:
- Activate the desired view.
- Right-click on Search Folder.
- Select New, then select Search Folder...
- In the Module Parameters window, enter the Name of the search.
- From the Add Criteria drop-down menu, select as many search criteria as needed.
- Then enter the search data for all selected criteria (to remove a criterion, click the remove button (
 ) on the right).
 - Click the OK button.
The new search folder will appear below the Search Folder heading. To activate your search folder, simply click on it and the dynamic results will appear in the entity list below.
Deleting Entities
To delete an entity from the entity database (in any view), right-click on it and select from the context menu.
Deleting a host will effectively delete all the entities in and below its visibility level. Note that since these deleted entities will include agents, the tasks performed by these agents will no longer be included in future reports.
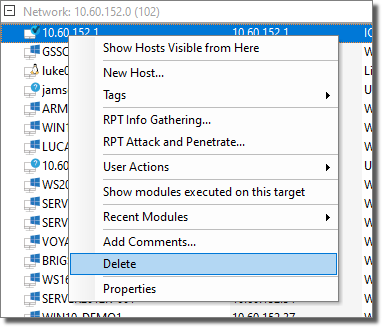
figure 36 - Deleting an Entity from the Database.
Viewing all Modules Run on an Entity
You can easily learn which module(s) have been executed on a specific Entity (Host, E-mail, etc.). To do this, right-click on the entity and select Show Modules Executed on this Target. The Executed Modules panel will update to show only those modules that have been executed on target you selected.
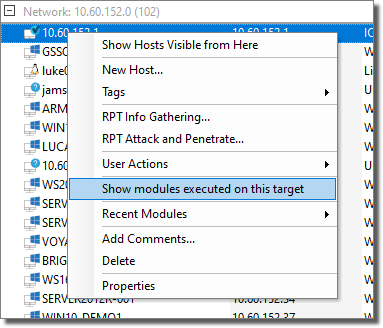
figure 37 - Show modules executed on this target