One-step RPT
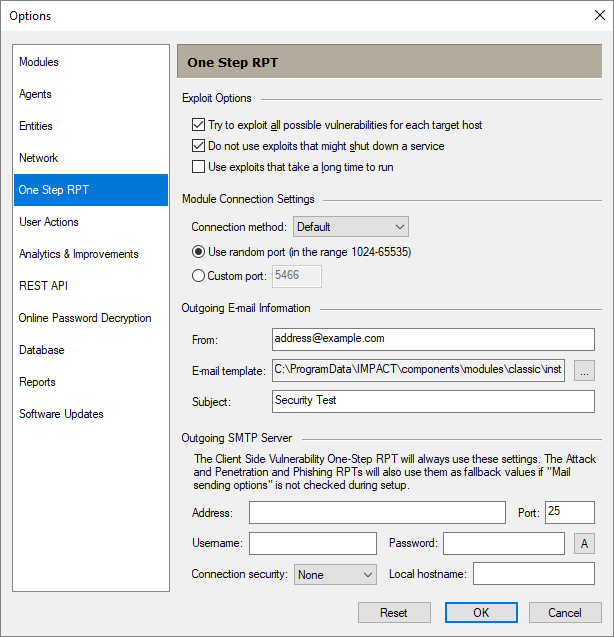
The One-step RPT Panel of the Options Dialog Box configures the One-step RPTs. Follow these steps to set One-step RPT options:
- Select the Tools > Options command from the main menu.
-
Click the One-Step RPT category to review or edit the available options.
-
Press OK after making any changes.
Exploit Options
Try to exploit all possible vulnerabilities for each target host - If this option is not checked, the One-Step RPT will stop testing a designated target as soon as an exploit is successful.
Do not use exploits that might shut down a service - Check this option to prevent the One-Step RPT from running any exploits that could potentially either stop or restart the service or application being targeted.
Use exploits that take a long time to run - If this option is not checked, the One-Step RPT will only run exploits that will take less than 10 minutes to complete.
Module Connection Settings
Connection method - When the One-step RPT successfully exploits a target computer, an agent is deployed on that target. An agent is a temporary piece of code that runs in the target computers RAM and communicates back to Core Impact. The Connection Method setting determines how the deployed agent and Core Impact connect to one another:
Default: Core Impact will try to use each exploit's default connection method.
Connect To: Core Impact will initiate a connection to the agent on the target system. The target system will listen on the port specified below. You might select this method if there are network or firewall restrictions on traffic sent to the Core Impact machine.
Connect From: Core Impact will wait for a connection from the target system's agent. The Core Impact host will listen on the port specified below. You might select this method if there are network or firewall restrictions on traffic sent to the machines to be tested.
HTTP Channel: Core Impact will act as a web server and accept incoming connections from the target system to TCP port 80. This method only applies for Client-side Vulnerabilities tests. If this method is selected and a you run a Network Vulnerabilities test, the Default Connection Method will be used.
HTTPs Channel: Core Impact will act as a web server and accept incoming connections using SSL from the target system to TCP port 443. This method only applies for Client-side Vulnerabilities tests. If this method is selected and a you run a Network Vulnerabilities test, the Default Connection Method will be used.
Use random port (in the range 1024 - 65535) - Check this option to allow Core Impact to randomly select a port for it or target systems to listen on (depends on the Connection Method selected).
Custom port - Check this option (and enter a port number) to manually define the port on which Core Impact or target systems will listen on (depends on the Connection Method selected).
Regardless of the connection method you choose, it will be important for you to ensure that your Core Impact machine and the target machine(s) can communicate to one another using the designated ports. If you elect to use a random port, then make sure all ports in the high range are open. If the high range of ports are limited or restricted, then set a custom port number and ensure that Core Impact machine and the target system(s) can communicate on that port.
Outgoing E-mail Information (for Client-side Risk Assessment)
From - The address you enter here will appear as the From: address in the email Client-side Risk Assessment.
E-mail template - Use a template that contains the body of your email. Click the ellipsis button  to browse for and select a template file. You will see several sample template files included in your Core Impact installation. These are located in the
 \data\templates directory of your Core Impact installation.
Subject - The text entered here will appear as the Subject of the e-mail.
Outgoing SMTP Server (for Client-side Risk Assessment)
Address and Port - In order for Core Impact to send email (in either a Client-side test or to send post-test reports), you must provide the address and port of an active SMTP server.
Username and Password - Add this information if the server requires authentication.
Connection Security - Use the drop-down list to select a connection security type.
Local Hostname - Specify this if the fully qualified domain name (FQDN) of the machine where Core Impact is running doesn't work with the SMTP server.
