WiFi Attack and Penetration
Once you have identified wireless devices, you can continue to take steps to illustrate the specific risks involved with a wireless breach:
Fake Access Point
MiTM attacks are most effective when the attacker is connected to the same network as the victim. If you are unable to join a found access point, or if you prefer to target beaconing wireless devices, you can create a Fake Access Point and target any devices that connect to it. With this method, Core Impact is literally in the middle - between a victim and the network applications and site from which they are requesting data. This creates more reliable opportunities to manipulate the user's experience, discretely capture sensitive data from them, or to exploit a vulnerability on their machine and install an OS agent.
In order to use the Fake Access Point Wizard or Fake Access Point module, first install Core Impact's 3rd party package which includes the TAP-Win32 Adapter driver. Additionally, in order to create a Fake Access Point using Core Impact, you must use a Pineapple Mark VII (https://shop.hak5.org/products/wifi-pineapple) wireless network auditing tool.
To create a Fake Access Point, use the Fake AP Wizard module:
- Ensure that the Network Entity tab is active, then click the Modules view.
- Expand the WiFi folder and locate the Fake Access Point Wizard module.
- Double-click the Fake Access Point Wizard module and, when the wizard opens, click the Next button.
- Begin by clicking the ellipsis (
 ) button and selecting your Wifi Pineapple Interface.
figure 16 - WiFi Pineapple Interface Setup
Then click the Next button.
-
On the Access Point Setup page, set the identifying details of your fake access point.
ESSID: The name of the Access Point. Leave this blank if you set Karma Attack to "true".
Pineapple Username: The username for the Pineapple device.
Pineapple Password: The password for the Pineapple device.
Karma Attack: If "false", the Access Point will use the name entered in the ESSID parameter. If "true", the Access Point will use whatever name the target device is beaconing for.For newer Pineapple devices, this setting correlates to the Allow Associates option of the PineAP module.
Add Hosts: Set this parameter to "true" if you want any connected devices to be added to the Hosts folder of the Network entity database for further testing possibilities.
Stop after: Set to Hours, Minutes, Packets, or Seconds to set a stop-after limit for the module.
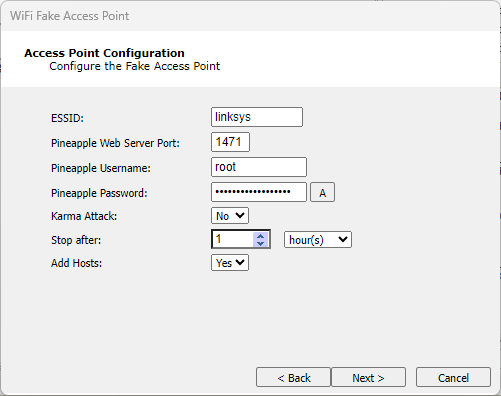
figure 17 - Access Point Configuration
Then click the Next button.
-
On the Connectivity Setup page, you can select whether your fake access point will provide Internet connection sharing (ICS) or not:
ICS: Select this option if you want to share an Internet connection with any users who connect to your fake access point. You will have additional configurations that correspond to this selection.
Offline: Select this option if you don't want to share an Internet connection with users who connect to your fake access point.
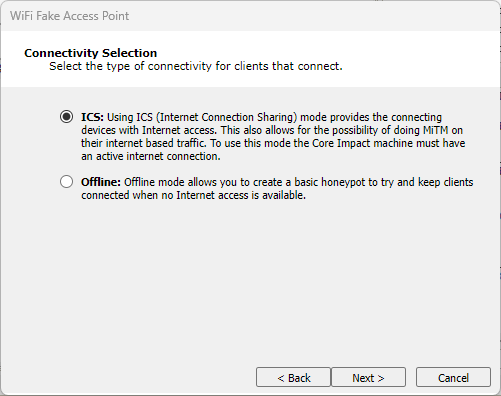
figure 18 - Connectivity Selection
Then click the Next button.
-
If you selected ICS in the previous step, click the ellipsis (
) button and select the Network Interface through which connected clients will gain Internet access.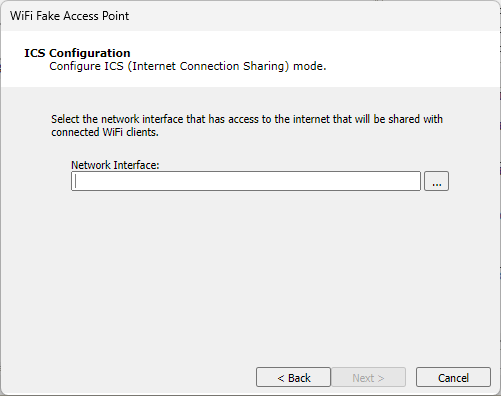
figure 19 - ICS Configuration
Then click the Next button.
-
If you selected ICS, you can further configure the fake access point to perform one or several MiTM actions:
HTTP Image Replacement: This option replaces all SRC URLs for images in an HTML file with a SRC URL that you specify in the next step of the wizard.
HTTP Client-side Exploit Injection: This option sniffs for HTTP traffic and returns the requested page after injecting a web browser agent (WBA) which will open a small iFrame on the page and launch the Client Side exploit of your choice within that iFrame.
HTTP Phishing (Web Form Impersonation): This option sniffs for HTTP traffic and, when it detects a web form, injects some JavaScript that will cause the form data, once submitted by the user, to be copied back to the Core Impact module in addition to the source web site.
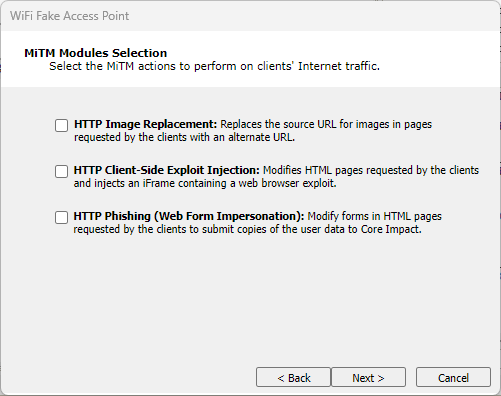
figure 20 - MiTM Modules Selection
Then click the Next button.
-
For each of the MiTM actions you selected in the previous step, enter additional details:
- HTTP Image Replacement
Image URL: Enter the URL for the image that you would like to replace images requested by a connected client.
Target URL Filter: Optionally add a filter so that the HTTP Image Replacement only occurs for requests that match the filter.
- HTTP Client-side Exploit Injection
Exploit Module: Click the Change button and select the exploit module you would like to run on machines who request data through your fake access point.
Target URL Filter: Optionally add a filter so that the HTTP Client-side Exploit Injection only occurs for requests that match the filter.
- HTTP Phishing (Web Form Impersonation)
Save Submitted Data: Select whether or not to save the submitted data.
Target URL Filter: Optionally add a filter so that the HTTP Phishing only occurs for requests that match the filter.
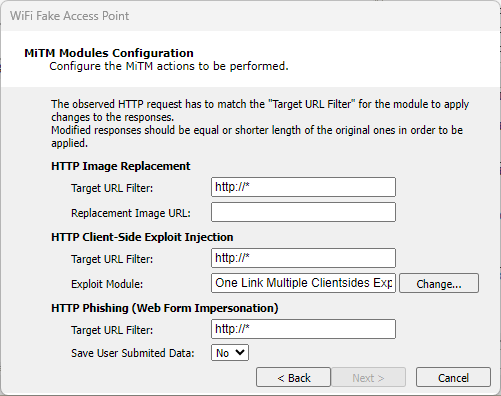
figure 21 - MiTM Modules Configuration
Then click the Next button.
- HTTP Image Replacement
-
For both ICS and Offline Fake Access Points, you can create fake services that the Access Point will simulate. Check the services you want to enable and configure them in the next step of the Wizard.
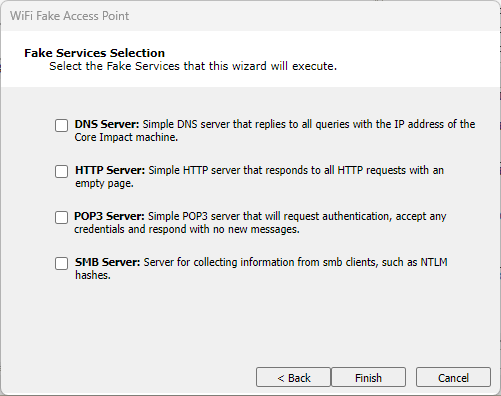
figure 22 - Fake Services Selection
Then click the Next button.
-
For both ICS and Offline Fake Access Points, configure the fake services that you enabled in the previous step.
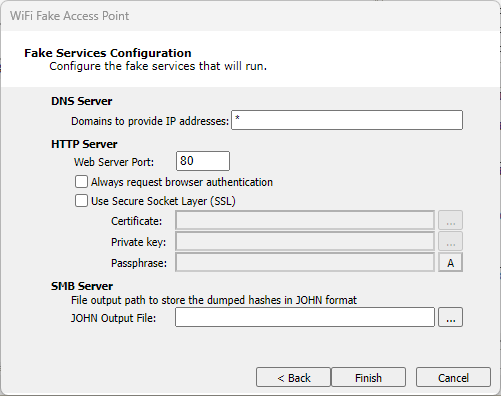
figure 23 - Fake Services Configuration
Then click the Finish button. The module will run and you can view its progress in the Module Log pane.
The Fake Access Point Wizard facilitates setting up a fake access point but you can also configure and run the Fake Access Point module manually to accomplish the same task.
When the module completes, you should see your Fake Access Point in the WiFi folder of the Network Entity tab. If any wireless devices connect to it, you will see them below your fake access point.
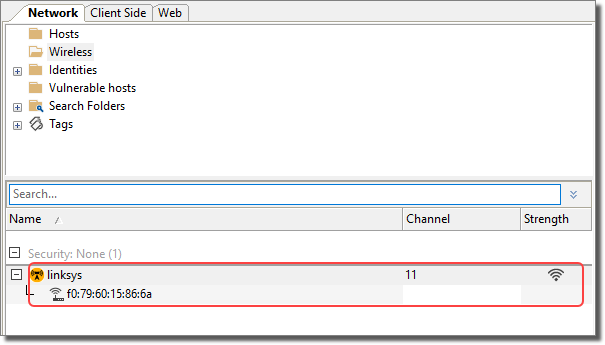
figure 24 - WiFi Fake Access Point in Entity Database
The following modules are specifically designed to perpetrate MiTM attacks when you have wireless devices connected to a Fake Access Point.
- Fake AP HTTP Client-side Exploit Redirection: This module sniffs for HTTP traffic and responds to the requester with client-side exploit of your choice.
- Fake AP HTTP One Link Multiple Client-side Exploits Redirection : This module sniffs for HTTP traffic and responds to the requester with a page that initiates the One-Click exploits.
- Fake AP HTTP Web Page Replacement: This module sniffs for HTTP traffic and responds by sending a single HTML file of your choice.
- Fake AP HTTP Replace Links with Client-side Exploit Redirection: This module sniffs for HTTP traffic and returns the requested page after injecting a web browser agent (WBA) which alters any hyperlinks within the page. Altered links will point to a page that contains a client-side exploit of your choice.
- Fake AP HTTP Client-side Exploit Injection: This module sniffs for HTTP traffic and returns the requested page after injecting a web browser agent (WBA) which will open a small iFrame on the page and launch the Client Side exploit of your choice within that iFrame.
- Fake AP HTTP One Link Multiple Client-side Exploits Injection: This module sniffs for HTTP traffic and returns the requested page after injecting a web browser agent (WBA) which will attempt to install an agent on the victim's machine by cycling through all available client-side exploits until one is successful.
- Fake AP HTTP Phishing (Web Form Impersonation): This module sniffs for HTTP traffic and, when it detects a web form, injects some JavaScript that will cause the form data, once submitted by the user, to be copied back to the Core Impact module in addition to the source web site.
- Fake AP HTTP Image Replacement: This module replaces all SRC URLs for images in an HTML file with a SRC URL specified by the Core Impact user.
Some of these modules employ a Web Browser Agent (WBA). The use of a WBA is a method whereby Core Impact intercepts a page being sent back to the victim, and then injects some JavaScript into the page before sending it along to the victim. Because the page is originating from the legitimate application or web site, the victim's browser will consider the script to be trusted and the Core Impact code that is injected can function without the victim being alerted.