PCI ASV Guide for Alert Logic Customers
Your Alert Logic account has been migrated to use the self-service PCI Approved Scanning Vendor (ASV) capabilities available in Fortra Vulnerability Management (Fortra VM) including external network scanning (VM), web application scanning (WAS), PCI disputes, and PCI Compliance reports.
-
Your users must authenticate to Fortra VM using Fortra identity provider (FIDP) credentials and configure their browsers to allow exceptions for third party cookies.
-
Your active "External - PCI" scan policies in the Alert Logic console were transferred over to Fortra VM with their status and most settings retained.
This document provides guidance and detailed instructions in the following areas for Alert Logic customers after being migrated to Fortra VM for PCI ASV scanning:
PCI ASV Process Overview
PCI ASV Scans
PCI ASV Disputes
PCI ASV Compliance Reports
Accounts and Users
Recommended Process
The following is the recommended process for Alert Logic customers to maintain PCI compliance using the self-service PCI ASV capabilities in Fortra VM.
-
Use scan groups to schedule and run PCI scans.
IMPORTANT: The VM and WAS scans for PCI ASV scanning in Fortra VM will originate from the following IP address ranges specifically for Alert Logic customers:- US = 3.146.42.96/27
- EU / UK = 13.50.164.192/27
-
Review PCI scan results for potential compliance issues.
- Add special notes as required for specific vulnerabilities.
-
If your PCI scans are not compliant:
- Remediate PCI relevant vulnerabilities in your environment.
- Submit disputes for vulnerabilities that may inaccurately reflect your PCI status and provide supporting evidence or documentation requested from the Fortra PCI Analyst.
- Re-run your PCI scan once all failed vulnerabilities have been addressed.
- Create PCI Compliance report for certification workflow.
- Submit official PCI compliance report with ASV certification stamp and PCI compliance documentation.
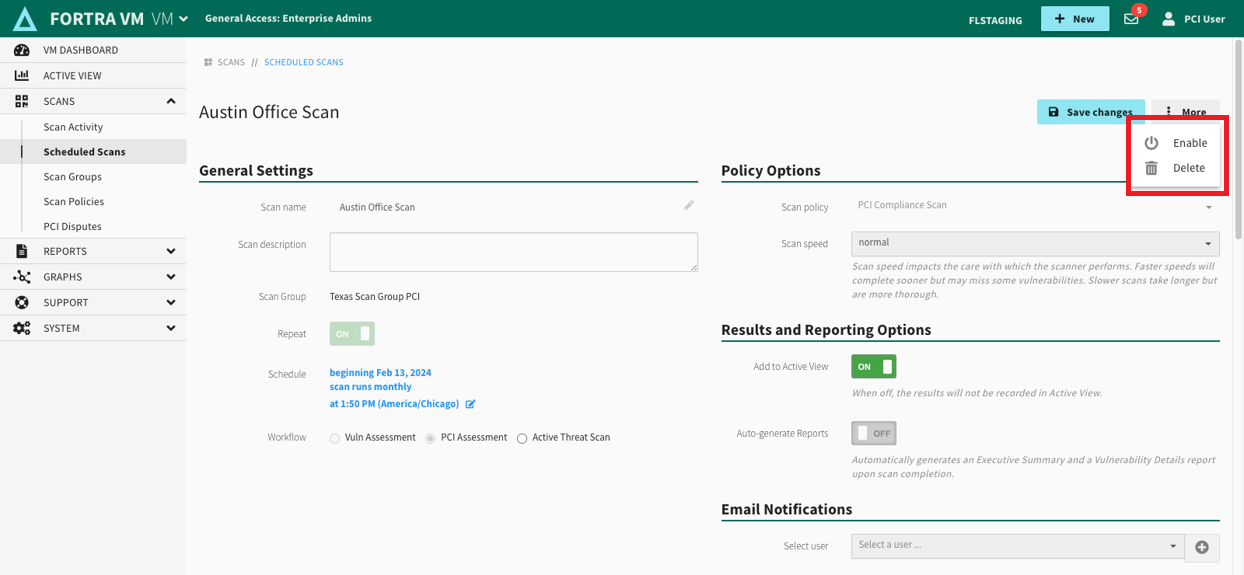
Manage Scan Schedules
All your active PCI ASV scan policies in Alert Logic were transferred to Fortra VM and their settings and status were retained. Scan policies that were enabled in Alert Logic are enabled in Fortra VM and will run based on the specified scan interval and start time. Scan policies that were disabled in Alert Logic are disabled in Fortra VM and will not run until they are enabled.
View scan schedules:
-
From the Scheduled Scan page, view the scheduled scans individually.
- Schedules that do not have a Next date and have a hollow circle are disabled.
- Other icons are displayed to indicate if the scan schedule is recurring or attached to a scan group.
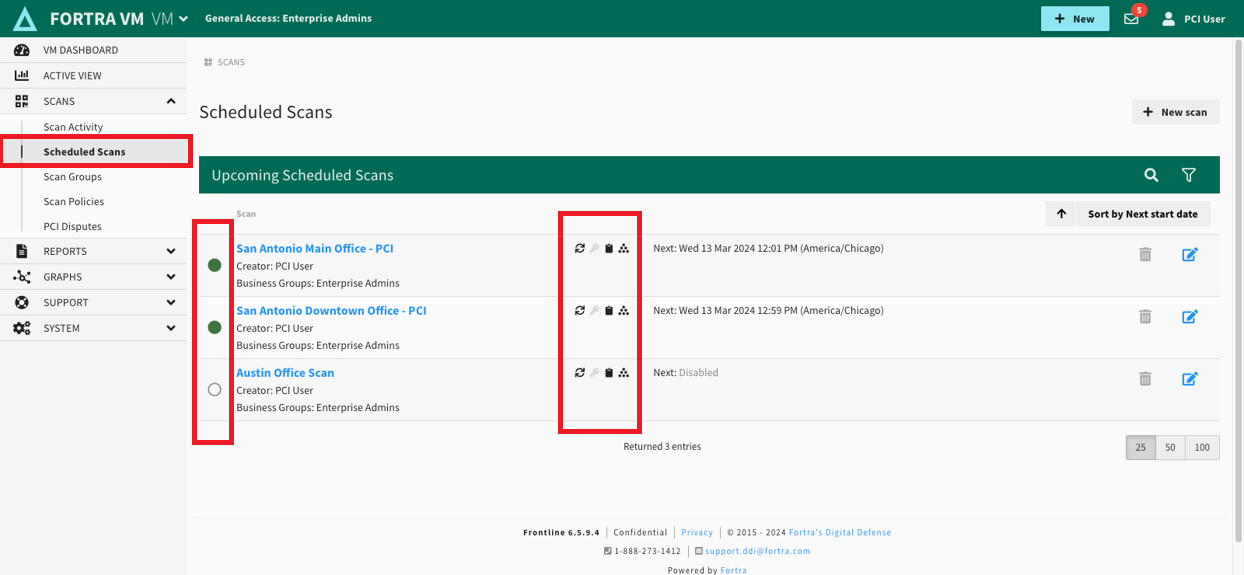
Enable a scan schedule:
-
Open the disabled scheduled scan from the Scan Activity page.
-
Click on the More button in the upper-right corner.
-
Select Enable in the drop-down.
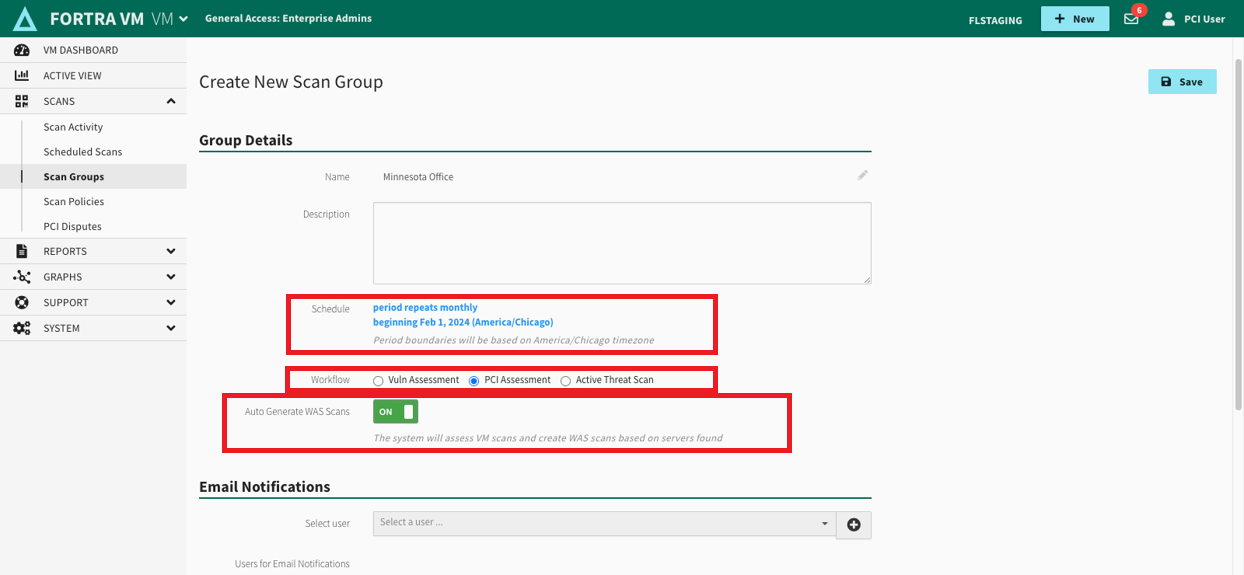
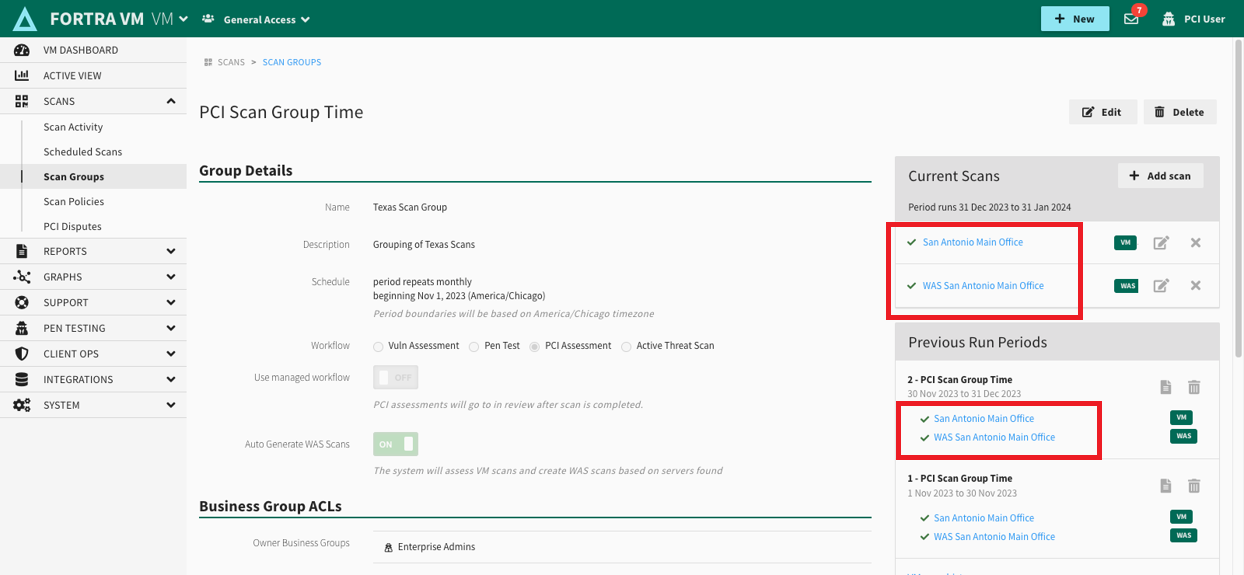
Use Scan Groups for PCI Scans
Scan groups utilize schedules to automatically run selected scans and simplify report creation by pre-selecting the scans originating from the scan group. Your Alert Logic PCI scan policies were transferred into Fortra VM as scan groups with the “Auto Generate WAS Scans” option enabled. The “Auto Generate WAS Scans” option ensures that scans are executed in the same manner as Alert Logic.
Alert Logic customers are encouraged to use scan groups:
-
From the Scan Groups page, select the + New scan group button.
-
Select PCI Assessment for Workflow designation.
-
Switch Auto Generate WAS Scans to the ON position. This will ensure that the external VM scan runs first, and the results are used to automatically define the target scope and initiate the web application scan.
IMPORTANT: If Auto Generate WAS Scans is turned OFF, then you must manually add a WAS scan to the scan group with the required target scope.
-
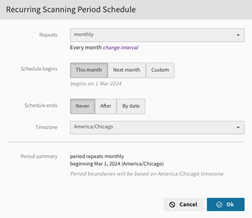
Click on the schedule to adjust configuration settings for repeat interval, start and end dates / times, or time zone. Click the OK button to commit any changes.
 TIP: Both the schedule and period need to match. A weekly schedule cannot run monthly scans, but weekly scans can be set to run on different days of the week.
 -
Complete the Name, Email Notification, and Reporting Options and Save the scan group.
-
Use the + Add scan button to attach individual VM scans to the scan group. This will allow all selected scans to run concurrently with the prescribed schedule for your scan group.
NOTE: You cannot edit the scan groups settings once it has scans associated with it.
-
Scan Speed is set to normal by default. This is approximately 450 packets per second and maximum of 6 concurrent CVCs per host.
TIP: For information on the difference in scan speed settings, see Scan Configuration documentation. - Scroll down the page to the Scan Targets section.
- Select from a list of dynamic or defined Asset Groups.
- Enter IP addresses to include or exclude.
- Enter DNS hostnames to include or exclude.
- Click the Create and run button to save the VM scan.

- US = 3.146.42.96/27
- EU / UK = 13.50.164.192/27
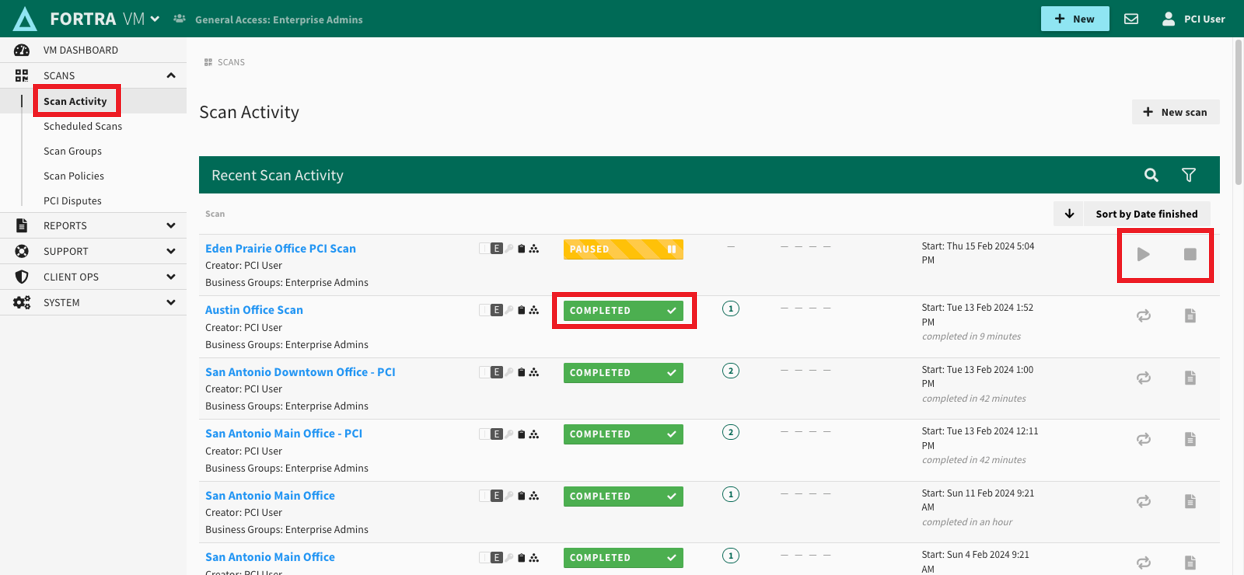
Manage Scan Activity
Both VM and WAS scans are executed based on the configuration and settings of your scan groups. Visibility into scan activity is available including the status of scans that are currently running or recently have completed. In addition, there are options to take actions such as pausing, stopping or resume scans.
Pause or stop a running scan
-
Select Fortra VM or Fortra WAS in the upper-left corner of the master header.
-
From the Scan Activity page, locate the running scan in the list.
-
Click the
 icon on the right side to pause the scan or click the
  icon to stop the scan.
  IMPORTANT: A running scan automatically pauses if it conflicts with a blackout period and it resumes once the blackout period ends.
Resume a paused scan:
-
Select Fortra VM or Fortra WAS in the upper-left corner of the master header.
-
From the Scan Activity page, locate the paused scan in the list.
-
Click the
 icon on the right side to resume the scan.
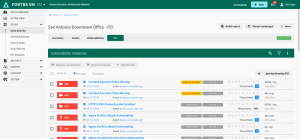
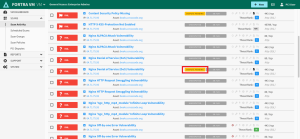
View PCI Scan Results
The results of completed PCI scans must be reviewed for potential compliance issues.
-
From the Scan Groups page, click on the scan group name or Edit icon.

-
You can view results by clicking on the scan name in the Previous Run Periods section or in the Current Scans section if a check mark is displayed.
-
On the Scan Activity page, select the PCI tab.
-
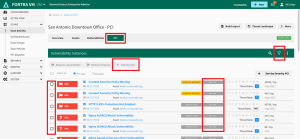
All vulnerability results will be listed and designated with a green “PASS” or red “FAIL” badge. All failing vulnerabilities must be resolved and rescanned to show a PASS status for compliance.
- A right-click on each vulnerability provides options for filtering and addressing vulnerability disputes.
- A left-click expands the vulnerability to show comments and notes from your PCI Analyst.

Run your PCI scan again, once all failed vulnerabilities have been addressed, to fulfill PCI requirements for a compliant result.
Add 3b Special Notes
Some items are not failing but require a note. These are notes designated as "Special Note to Scan Customer" and are required to be disclosed when the presence of certain software or configurations are detected that may pose a risk to your environment, rather than an exploitable vulnerability.
This special note (3b) must include evidence of the removal of the caustic software or a declaration of the need of the software for business. If the software is required for business operations, include information stating the business need for the software, evidence of software's implementation of security controls, and supporting actions to secure software with details of controls.
To submit a special note (3b):
-
On the Scan Activity page, select the PCI scan in questions and go to the PCI tab.
-
Click the funnel icon to add a new filter.
-
Select Vuln: PCI Requires Special Note (3b) and True from the New filter drop-down.
-
Click the + Add button.
-
Use the checkbox to select vulnerabilities with the yellow “3B REQUIRED” flag from the list and click the + Add 3b note button.
-
Enter the special note declarations that will appear in Section 3b of the official PCI Compliance report.

-
Click the Save button to apply the note to all selected vulnerabilities.
-
The yellow "3B REQUIRED" flage will be replaced with a green "3B PROVIDED" flag.
NOTE: A Fortra PCI analyst will validate the relevance of any special note declaration before a passing scan report can be issued.

Dispute Vulnerabilities
PCI scans may detect vulnerability findings that you would like to dispute. All requested PCI vulnerability disputes are required to be documented as Exceptions, False Positives, or Compensating Controls for further details.
-
Exception: There are only four exceptions provided to the NVD scoring guidance that qualify to supersede CVSS scores. Examples of qualifying exceptions include incorrect or inconclusive findings due to scan interference, or if the CVSS base score is disputed. Supporting evidence must be submitted to prove there is not a risk to Cardholder Data environment.
-
Compensating control: If a vulnerability cannot be remediated due to business or technical constraints, but the risk can be mitigated through other measures, a compensating control may be considered.
-
False positive: If a reported vulnerability does not apply to the host with sufficient evidence, a dispute may be submitted for the PCI analyst to review and confirm the occurrence of a false positive.
In these situations, you can submit a request to dispute the vulnerability. The process for disputing VM and WAS vulnerabilities in Fortra VM are the same.
-
From the Scan Groups page, click on the scan group name or Edit icon.
-
You can view results by clicking on the scan name in the Previous Run Periods section or if a check mark is presented in the Current Scans section.
-
On the Scan Activity page, select the PCI tab.
-
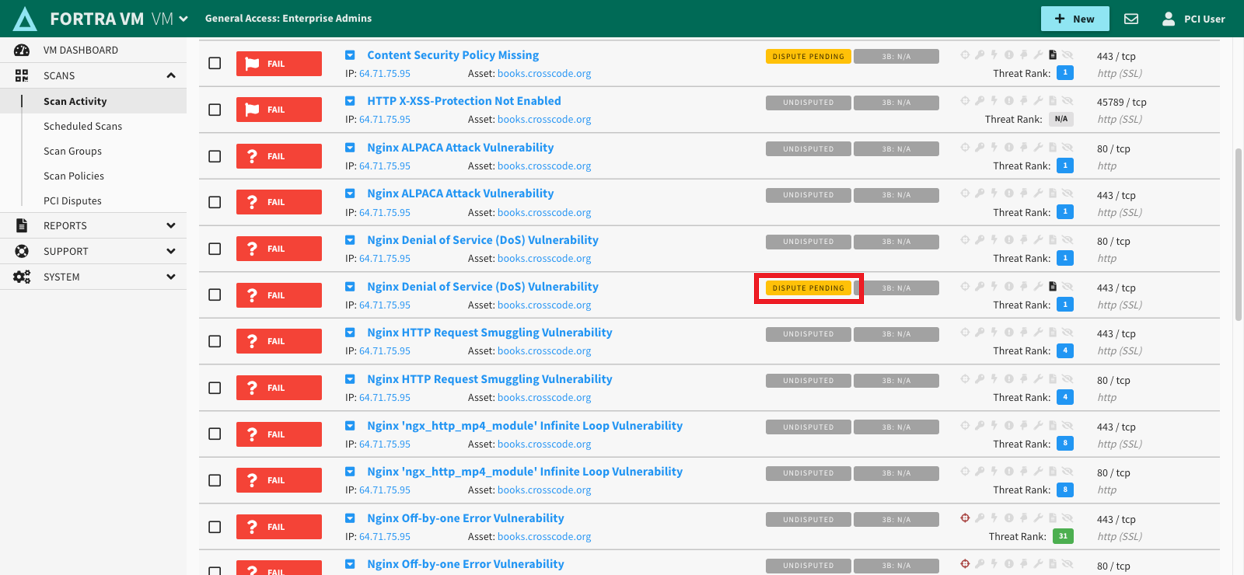
View each vulnerability listed with a red "FAIL" badge.
-
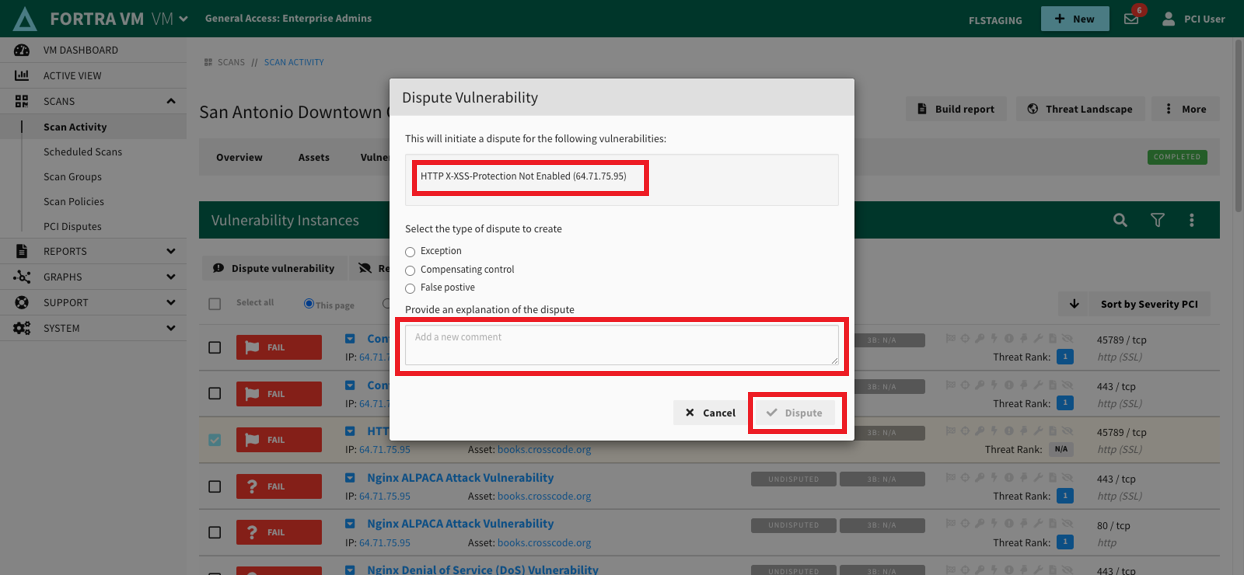
Select the checkbox for the failing vulnerability and select Dispute vulnerability button to open the Dispute Vulnerability form.
-
Complete the dispute request by selecting the appropriate type of dispute and use the comment field to provide an explanation of the dispute for the Fortra PCI analyst to review.
After all fields are complete, submit the form by clicking the Dispute button.
-
The vulnerability will be marked with a yellow “DISPUTE PENDING” flag while it is under review by the Fortra PCI analyst.
-
After completing the review, the Fortra PCI analyst will either:
-
Reject the dispute if it does not sufficiently fulfill the requirements. The rejected vulnerability will retain the FAIL status. You can resubmit the dispute with additional information for the Fortra PCI analyst.
-
Accept the dispute if the requirements are fulfilled. The accepted vulnerability will move from FAIL to PASS, the green “PASS” badge and “Accepted” flag will be displayed, and the vulnerability status will be updated in the scan results.
IMPORTANT: Accepted disputes will expire at the end of the current quarter or 90 days from the scan, whichever is less.
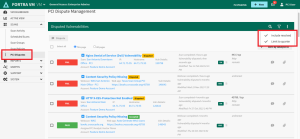
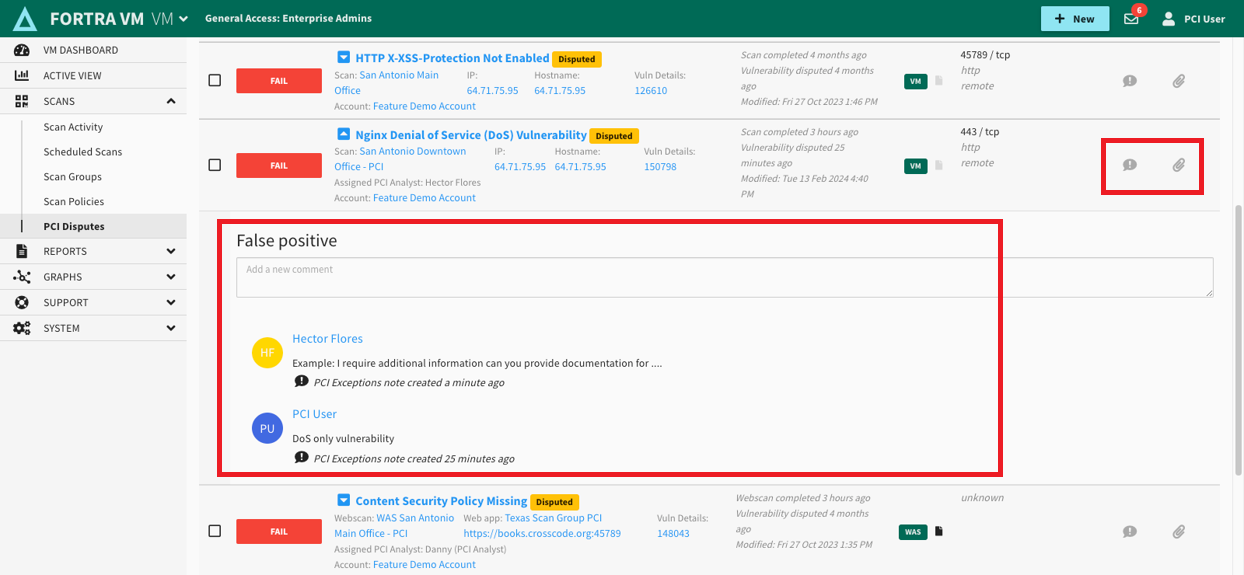
Manage Disputes
As the Fortra PCI analyst conducts their review, there will be comments and questions posted to the vulnerability that may require a response or supporting files. A consolidated view is available to manage all disputed PCI vulnerabilities from both Fortra VM and WAS scans.
-
Select PCI Disputes from the Scans menu.
-
Use the filters from the drop-down to specify your preference to include or exclude resolved disputes in the list.
-
Click the
 icon to expand the disputed vulnerability and see comments or inquiries from the Fortra PCI analyst.
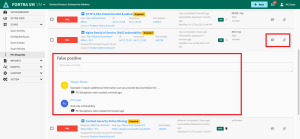
-
Use the text box to add your comments.

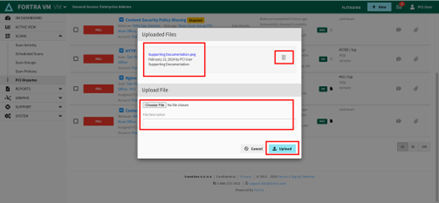
Upload Files for PCI Disputes
The Fortra PCI Analyst may request that you provide supporting evidence or documentation for a disputed vulnerability.
-
Select PCI Disputes from the Scans menu.
-
Use search and filter options to find specific disputed vulnerabilities in the list.
-
Click the
 paper clip icon for a disputed vulnerability.
 -
View or remove existing files that were previously uploaded.
-
Select the file to upload and enter a description.
-
Click the Upload button.
Re-dispute Vulnerabilities
Accepted disputes will expire at the end of the current quarter or 90 days from the scan, whichever is less. If the same vulnerability is detected during PCI scans in the next quarter, then there is an option to easily submit the same information from the expired dispute.
-
On the Scan Activity page, select the PCI tab.
-
Expired disputes will display with a yellow "DISPUTE EXPIRED" flag next to the vulnerability name.
-
Select the checkbox for the vulnerability and click the Dispute vulnerability button to open the Dispute Vulnerability form.
-
Select True for the “Redispute using last submission” option.
-
Click the Dispute button.
Manage PCI Dispute Notifications
Preset notification profiles are available to alert users on changes during the PCI dispute workflow including new disputes, comments, approvals, and rejections. Users can manage their PCI Dispute notification preferences.
-
Click your username in the upper-right corner of the master header.
-
Select Manage Notifications from the drop-down menu.
-
Locate these two options on the Notifications tab of the My Profile page:
-
Disputed Vulnerability Status: An individual alert email sent for each workflow change.
-
Disputed Vulnerability Digest: A single email with all PCI dispute workflow changes that occurred during the day.
-
-
Enable the notification by switching to the ON position or disable by switching to the OFF position.
TIP: The Disputed Vulnerability Digest notification is recommended for Alert Logic customers.
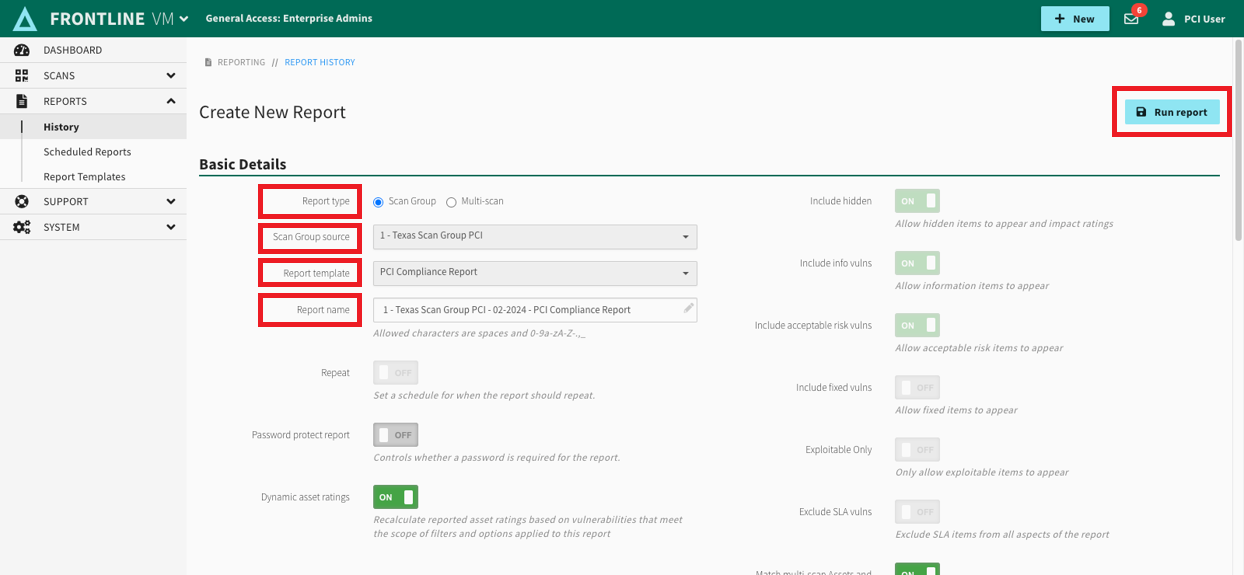
Create Official PCI Compliance Report
There is more flexibility to select specific scan groups or multiple scans when generating the PCI Compliance reports. In addition, warnings are presented with reasons on why the report will be considered passing.
-
Select History from the REPORTS menu.
-
Click the + New report button to open the Create New Report form.
-
In the Report type options, select Scan Group.
-
Select the relevant scan from the Scan Group source drop-drown.
-
From the Report template options, select PCI Compliance Report.
-
Enter a Report Name.

-
Select any other desired options and click the Run report button.
-
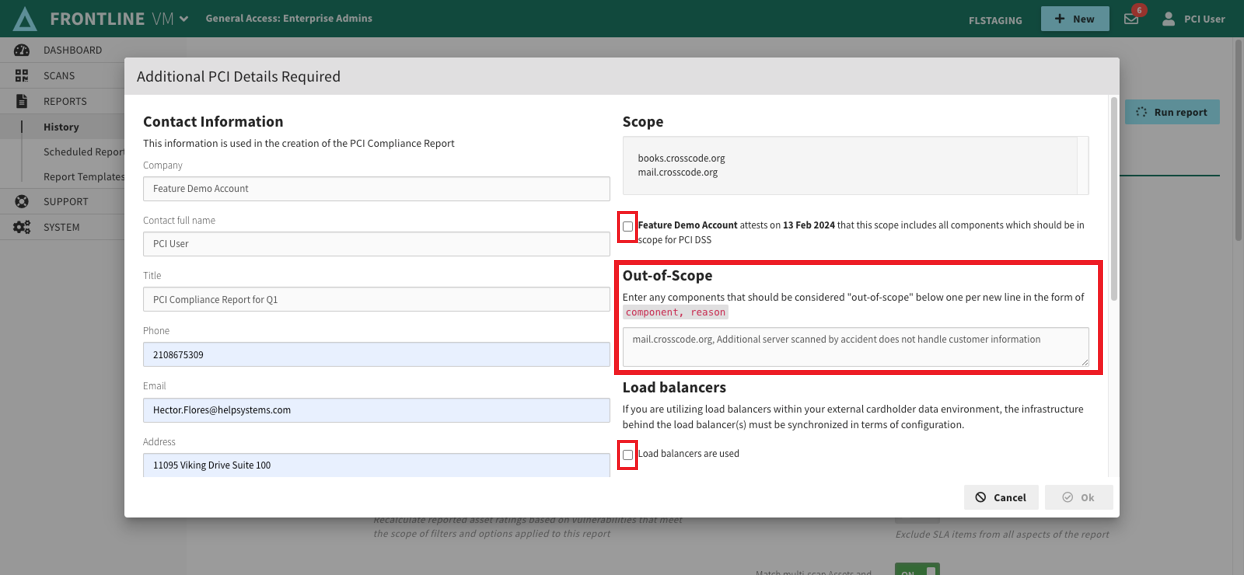
A box will display for Additional PCI Details Required.

-
Fill out the Contact information fields.
-
Under Scope section, check the box to attest to the validity of the scope (required).
-
Out-of-Scope items can be declared in the designated field.
-
Check the Load balancers box only if you need to affirm that they are used and are synchronized.
-
Review the Official Certification for warnings and important information.
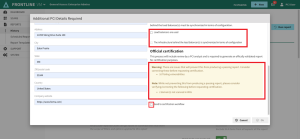 IMPORTANT: The Official Certifications warnings will detail all the reasons why this PCI Compliance Report will not be considered passing (e.g. failing vulnerabilities, missing domains). You can generate as many PCI compliance reports you want, but to generate the official report including the ASV certification stamp it must be sent to the certification workflow.
 -
Select Send to certification workflow.
-
Click OK button.

Access PCI Compliance Reports
Visibility into PCI Compliance report requests is available including the status of reports that are currently running or recently have completed.
-
Select History from the REPORTS menu.
-
View the status of PCI Compliance Reports.
 IMPORTANT: Reports that are experiencing errors, still generating, or being reviewed by Fortra PCI analysts will be listed but cannot be downloaded.
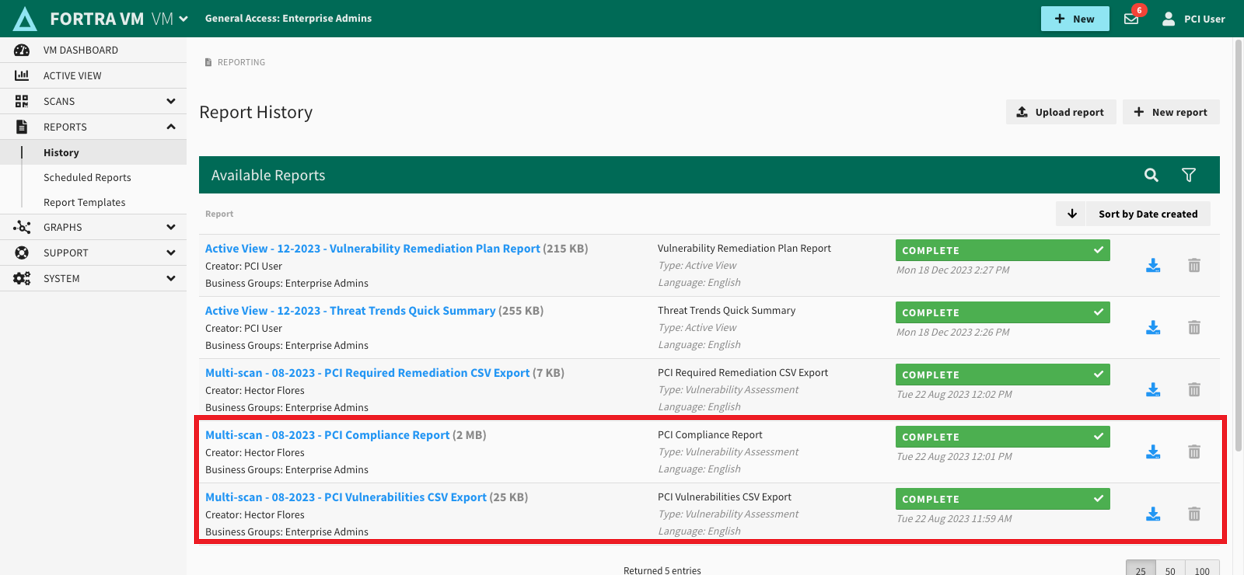
-
Click the
 icon for a report with green COMPLETE status flag to download the PCI Compliance Report. You will be provided with a compressed file containing the following five report documents:
-
•ASV Attestation of Scan Compliance (PDF)
-
ASV Scan Report Summary (PDF)
-
ASV Scan Vulnerability Details (PDF)
-
ASV Scan Consolidated Compliance Report (PDF)
-
PCI Vulnerabilities CSV Export (CSV)
-
Switch Active Context
The Active Context is displayed in the uppermost left corner. If your user has access to multiple accounts (for example, parent account with multiple child accounts) then you can switch between accounts that you want to access or manage.
-
Select CLIENT OPS > Accounts, and a list of all available accounts will be displayed.
TIP: These icons allow for searching and filtering within the account list for specified results.
-
Click on the Account Name and the Account Profile page will open showing the account specific information.
-
Navigation from this point will display selected account’s Dashboards, Scans, Reports, Menus, and Account Information.
Manage Users
Users can only perform PCI ASV tasks in Fortra VM with the necessary permissions or role assignment. For Alert Logic customers, the current user role configured in the Alert Logic console dictates the user role assigned in Fortra VM.
-
Administrator user assigned Alert Logic PCI Administrator role in Fortra VM.
-
Owner user assigned Alert Logic PCI Administrator role in Fortra VM.
-
Owner user assigned Alert Logic PCI Scan User role in Fortra VM.
-
Support use assigned Ready-Only role in Fortra VM.
-
Read Only user assigned Read-Only role in Fortra VM.
IMPORTANT: Users with the Notification Only user role in Alert Logic were not migrated to Fortra VM.
Fortra VM user role permissions:
-
Alert Logic PCI Administrator user role in Fortra VM includes these permissions:
-
Asset group administration
-
Scan administration
-
Scanner administration
-
Scan policy administration including Scan Groups
-
Notes administration
-
Report administration (including PCI reports)
-
PCI ASV dispute administration
TIP: Only assign the Alert Logic PCI Administrator role to users that can dispute vulnerabilities.
-
-
Alert Logic PCI Scan User role in Fortra VM includes these permissions:
-
Asset group administration
-
Scan administration
-
Scanner administration
-
Scan policy administration including Scan Groups
-
Report administration (including PCI reports)
-
Change user role:
-
Login to the Alert Logic console and navigate to the User Management page.
-
Follow the instructions provided in the Modify a user account section of the Alert Logic console documentation.
Change or Reset password:
-
Login to the Alert Logic console and navigate to the User Management page.
-
Select the user for the list and click the Fortra Account Console link on the Account Details tab to change your password.
-
Click the CHANGE PASSWORD button in the Basic Authentication section of the Authentication page.
Manage MFA devices:
-
Login to the Alert Logic console and navigate to the User Management page.
-
Select the user for the list and click the Fortra Account Console link on the MFA tab to manage your MFA devices.
-
Click the ADD APPLICATION or REMOVE button in the Two-factor Authentication section of the Authentication page.