Cisco® ISE
Integration between Cisco ISE and Fortra VM adds FVM scan data as additional contextual asset information to the Cisco ISE system. This enables the Cisco ISE to take policy action based on asset and vulnerability information from Fortra VM.
Integration Requirements
- Cisco ISE
- Cisco ISE internal CA generated certificate
- Cisco ISE.zip Integration Package
- Fortra VM API Key
- Linux machine with Python3 and pip
To integrate with Cisco ISE, perform the following (see below for detailed instructions):
- Generate a Fortra VM API Key
- Generate Certificate in Cisco ISE
- Cisco ISE.zip Integration Package
- Set up and install script
- Run Integration
- Connect to pxGrid Web Client
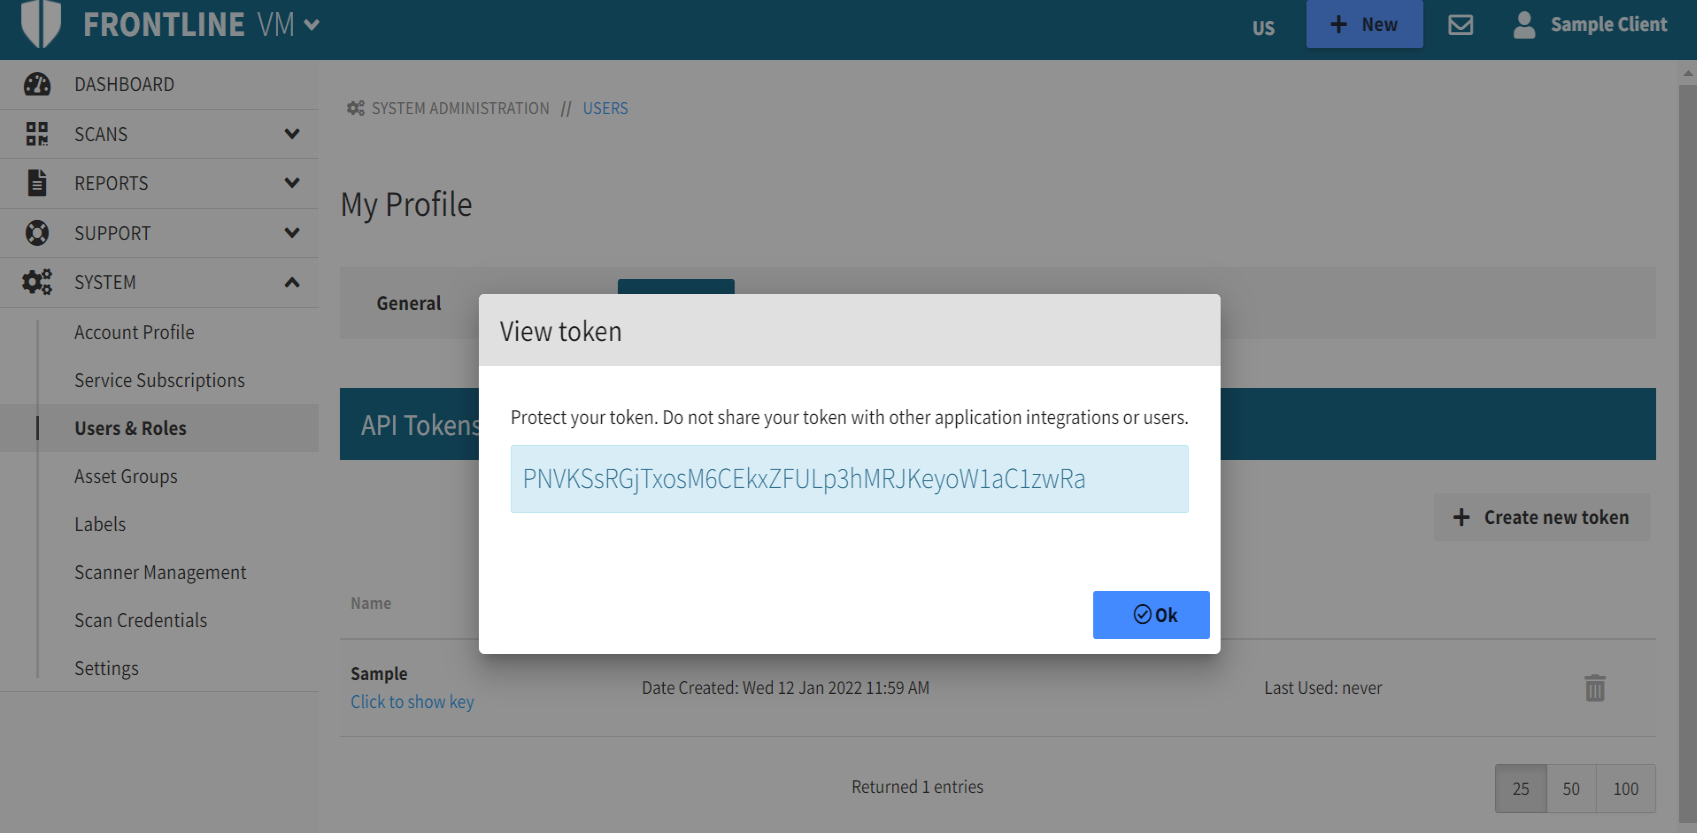
Generate a Fortra VM API Key
-
Log in to Fortra VM.
-
In the site heater, select your name and choose My profile.
-
On the API Tokens tab, select Create new token.
-
In the Add New Token dialog, type the token name and select OK.
-
Below your token name, selecting Click to show key displays your API Key.
Generate Certificates in Cisco ISE
The integration uses certificates generated by Cisco ISE’s internal CA to communicate with ISE/pxGrid. The following steps detail the generation of the script in this manner. Fortra recommends generating certificates utilizing ISE’s internal CA for this integration. If you prefer to generate certificates with an external CA, please follow this guide: Using an external Certificate Authority (CA).
- Navigate to Administration > pxGrid Services > Certificates and fill in the following fields:
- Place the extracted certificates in the Certificates directory of the extracted archive in step 3 - Cisco ISE Configuration.
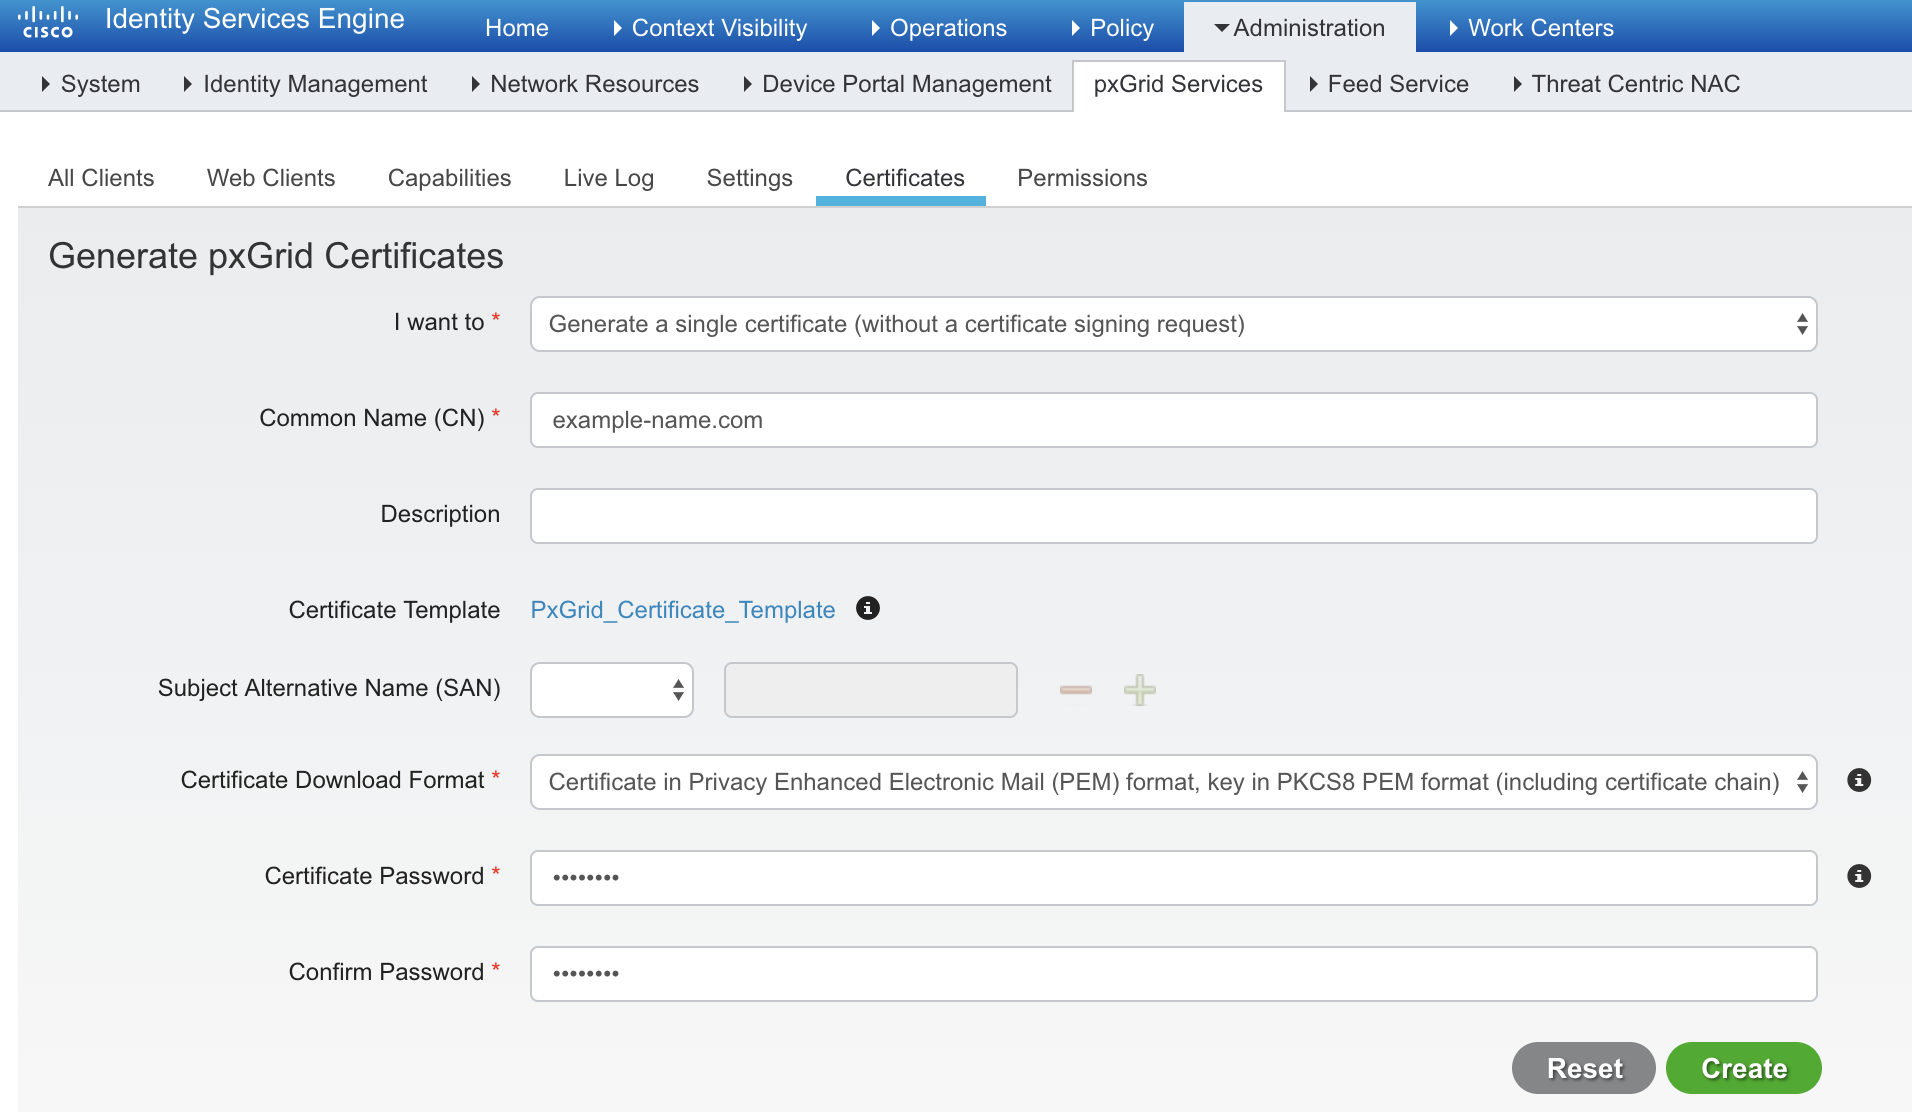
Create and download the generated certificate.
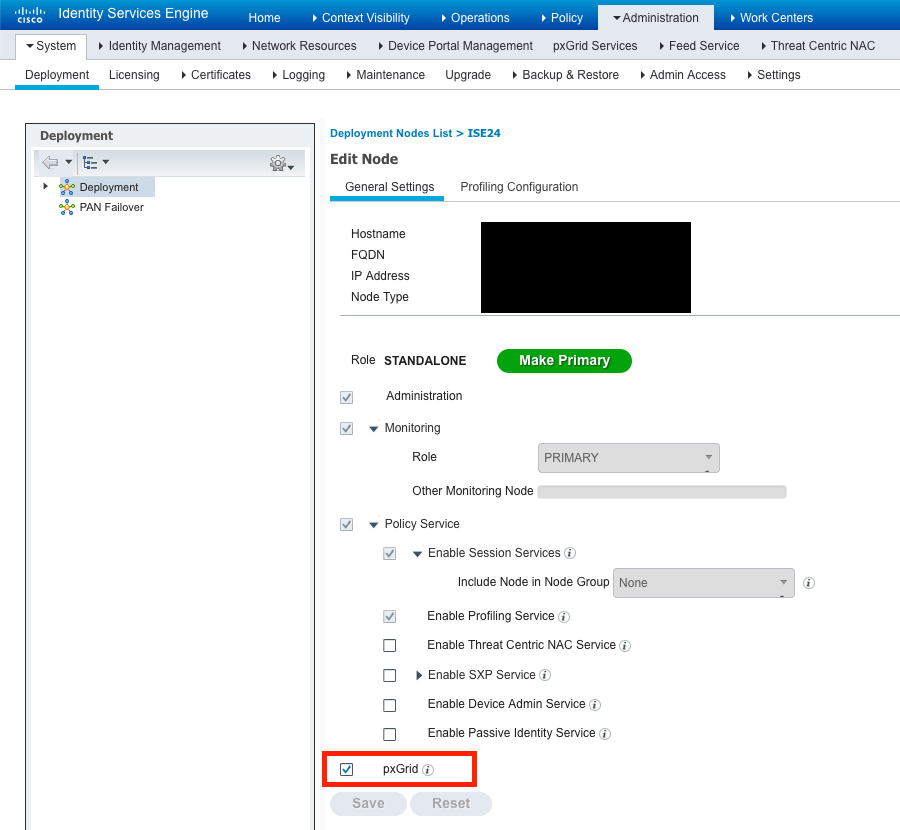
Cisco ISE Configuration
To enable Platform Exchange (pxGrid):
- Navigate to Administration > System Deployment > Edit Node > Enable pxGrid.
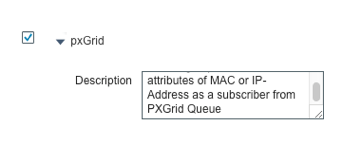
- Enable pxGrid as a Subscriber for Profiling:
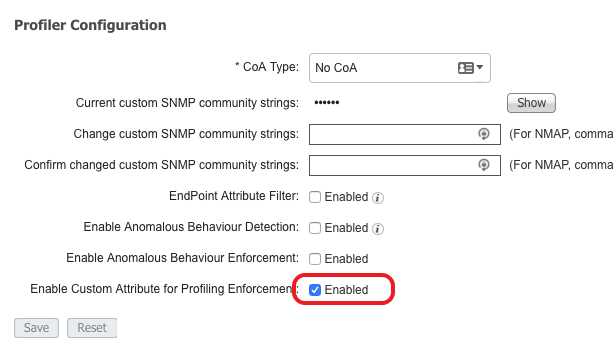
Navigate to: Administration > System > Deployment > Edit ISE Node > Profiling Configuration > Enable pxGrid. - Enable Custom Attributes:
Navigate to: Administration > System > Settings > Profiling > Enable Custom Attribute. - Navigate to: Administration > Identity Management > Settings > Custom Endpoint Attributes.
- Set the following Endpoint Custom Attributes:
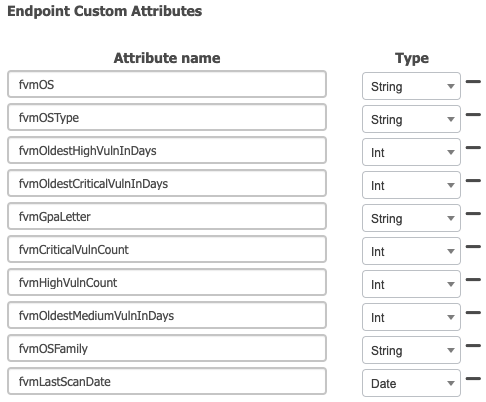
Custom Attribute Descriptions
fvmOS: An asset’s operating system (e.g.: Windows Server 2013)
fvmOSType: An asset’s operating system type (server, client, etc.)
fvmOSFamily: An asset’s operating system family (Windows, Mac, etc.)
fvmLastScanDate: The date on which this asset was last scanned by Fortra VM
fvmGpaLetter: An asset’s Security GPA in letter form
fvmCriticalVulnCount, fvmHighVulnCount: The number of critical vulnerabilities the asset has
fvmOldestMediumVulnInDays, fvmOldestHighVulnInDays, fvmOldestCriticalVulnInDays: The age of the oldest medium, high, and critical vulnerabilities of the asset
Download and Deploy the Frontline-ISE connector
The Frontline-ISE connector OVA can be downloaded here.
To deploy:
- Connect the virtual image to your network, where it can reach your ISE instance(s).
- Copy the certificates generated in the previous step, onto the machine. The certificates must be placed in the /
home/cisco_ise/fvm_ise_client/certificatesdirectory of the connector. You can do this viascp. You may first need to place them in the ise-connector accounts directory, then log in as root via thesudo -icommand to then copy them to the certificates directory.
ssh to the Frontline-ISE connector with the following default credentials:
user: ise-connector
password: fvm-conn3cT
E.g.:
ssh ise-connector@<ip_address>
Set Up the Configuration File
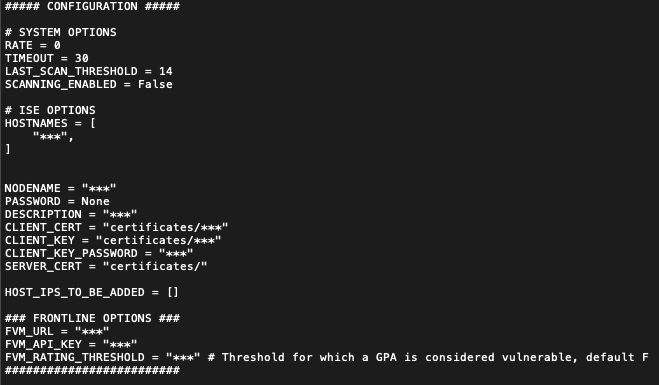
- Edit the
config.pyfile located in the /home/cisco_ise/fvm_ise_client directory. - Configure the following fields by replacing all *’s with the appropriate value.
- RATE: This is the cadence (in seconds) at which the integration script will publish to ISE and check for unknown hosts to scan.
- TIMEOUT: The time in seconds that the integration script will try to reconnect to an ISE node if the connection is lost.
- LAST_SCAN_THRESHOLD: If scanning is enabled, a scan will be launched if an asset has not been scanned in this number of days
- SCANNING_ENABLED: If True, the integration will launch scans for assets unknown to Fortra VM, or assets that have not been scanned within LAST_SCAN_THRESHOLD days.
- HOSTNAMES: Contains the hostname(s) of your Cisco ISE Instance(s).
- NODENAME: The name of the pxGrid client as it will appear in ISE.
- PASSWORD: Please leave as None. Currently certificates are only supported for authentication.
- DESCRIPTION: Description of the pxGrid client. E.g.: FVM Integration Client.
- CLIENT_CERT: File path to the client certificate.
- CLIENT_KEY: File path to the client key.
- CLIENT_KEY_PASSWORD: Password to the client key.
- SERVER_CERT: Path to the folder containing the server cert(s).
- HOST_IPS_TO_BE_ADDED: This can be used for debugging. Any IPs added to this list will be only the assets added or updated in ISE.
- FVM_URL: URL to Fortra VM.
- FVM_API_KEY: Your Fortra VM API Key.
- FVM_RATING_THRESHOLD: The integration will not pull assets from Fortra VM with a GPA higher than this value. This can help reduce noise in ISE if you only want apply access control to devices below a certain GPA.
Example of the Configuration File (without key passwords):
Running the Integration
To start the integration, you must launch the cisco-ise-integration service.
- Ensure you are logged in as root (you can do this by running
sudo -i). - Run the following two commands:
systemctl enable cisco-ise-integrationservice cisco-ise-integration start -
The integration should now run as a service. You can check the output by checking the journalctl log with the following command:
journalctl -f. - To approve, navigate to: Administration > pxGrid Services > Select your client > Approve.

- The client name is the value configured in
config.py
for NODENAME. - The script (client) checks every 60 seconds to see if it has been approved. Once it sees approval, it will continue running as expected.
- The client name is the value configured in
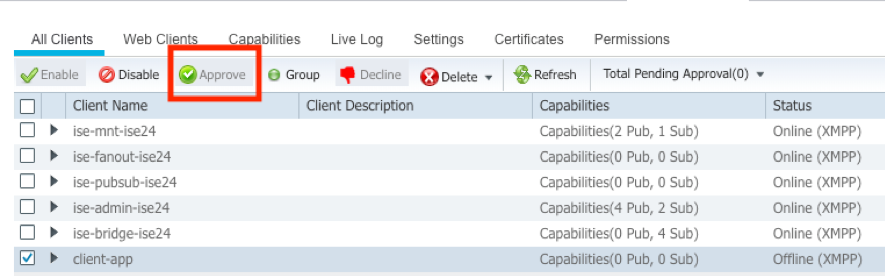
The script is now running, and will continue to do so until a shutdown signal is sent. Usually, this is simply Ctrl + C.
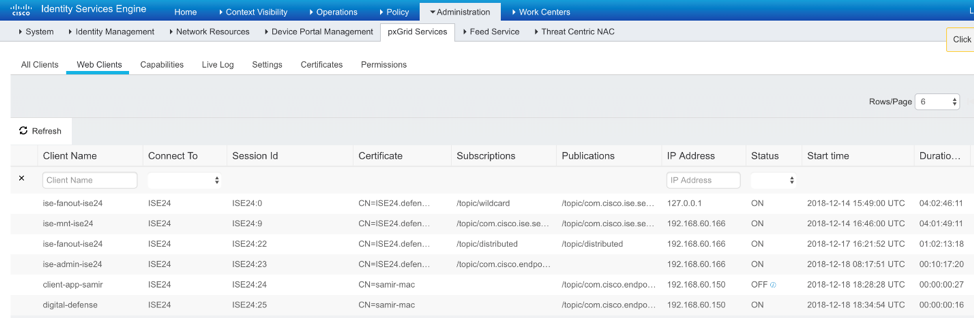
Connecting to pxGrid Web Client
Navigate to Administration > pxGrid Services > Web Clients in order to see the connection.
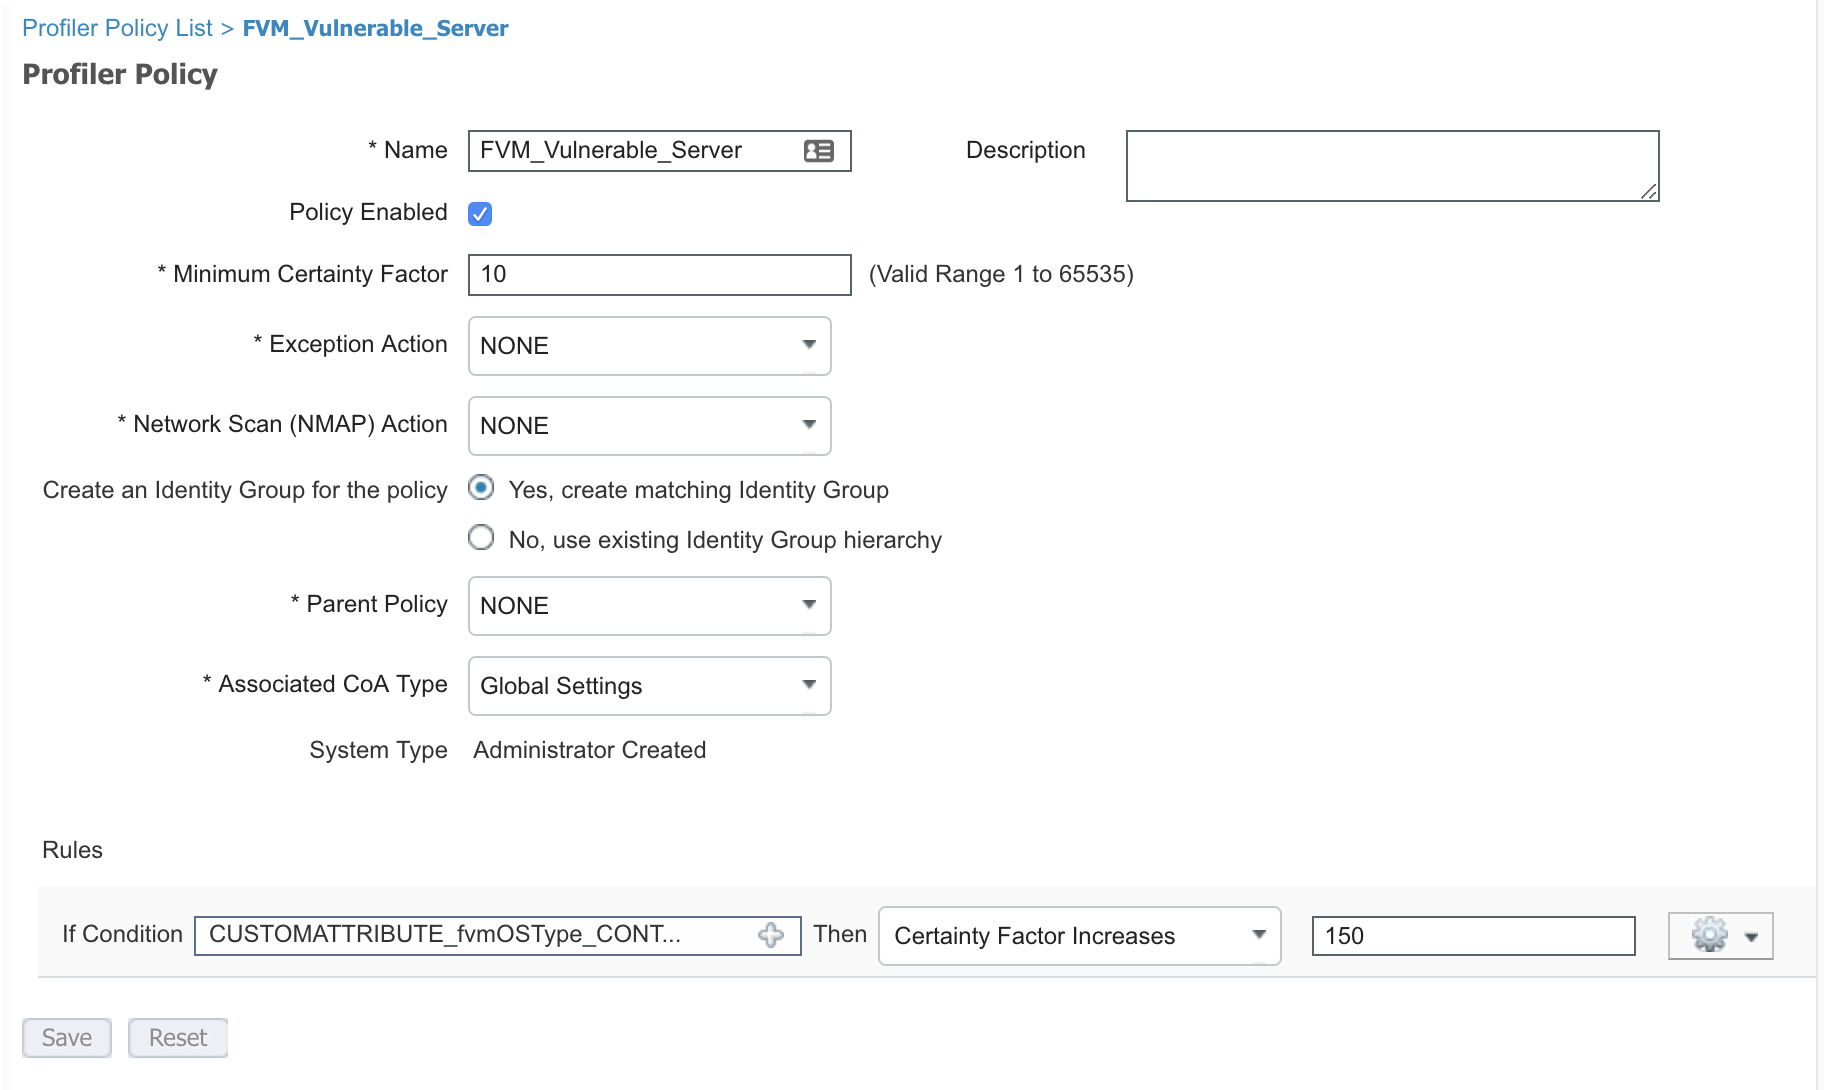
Example of Cisco ISE Profiling
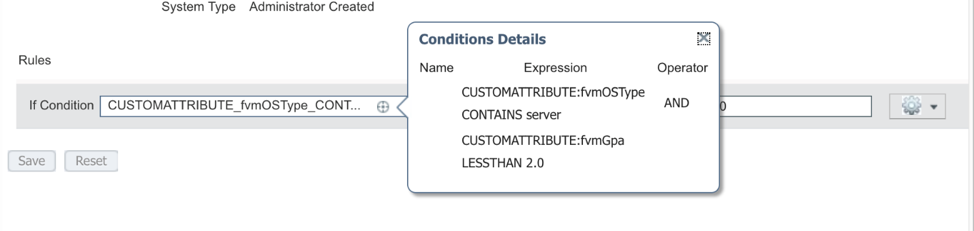
The following is an example of a Cisco ISE profile using two of the integration’s custom attributes fvmOSType and fvmGpa.
It checks if the asset is a server AND has a GPA of less than 2.0. If so, the exampled asset takes on the FVM_Vulnerable_Server profile. This profile can then further be used in logical profiles and authorization policies.
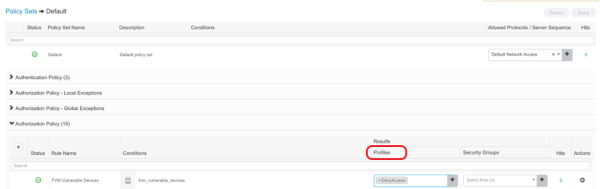
Example of Cisco ISE Authorization Policy Sets
In Cisco ISE, clients can create Authorization Policies that use our custom attributes to create conditions for their endpoints. This section contains three examples of conditions clients can create.
Create these Authorization Policies by selecting: Policy > Policy Sets. Modify the existing Default policy set, or create a new one. Click on a policy set’s View arrow on the far right of the screen to modify Authentication Policies and Authorization Policies.
The following custom attributes keep track of the oldest medium, high, and critical severity vulnerabilities present on the endpoint in terms of days. fvmOldestMediumVulnInDays, fvmOldestHighVulnInDays, fvmOldestCriticalVulnInDays
If a client doesn’t want a device on their network with old vulnerabilities, they can create a condition to perform one action on these devices.

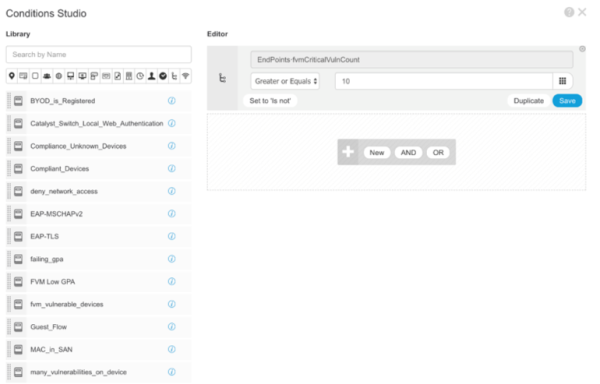
The following custom attributes keep track of how many critical and high severity vulnerabilities are present on the endpoint.
fvmCriticalVulnCount, fvmHighVulnCount
The following custom attributes keep track of the endpoint’s GPA in Fortra VM. If the endpoint has many high severity vulnerabilities, it will have a low GPA. The lower the GPA, the more the endpoint is at risk.
fvmGPA

After defining these conditions, choose an action to perform on these endpoints by selecting Profiles under the Results column shown below.