LogRhythm
Fortra VM integrates with LogRhythm SIEM to provide additional vulnerability assessment data allowing for more informed detection and response action to neutralize cyberthreats. Contextual Fortra VM asset and vulnerability data enriches the entire LogRhythm XDR stack, including AnalytiX, DetectX and RespondX.
Requirements
From LogRhythm Installation:
- Enabled Syslog Server
- MPE Rule and MPE Policy Options
- LogRhythm Third Party Application API Token
From Fortra VM:
- API Key
- Fortra VM Integration Application
- Fortra VM Connector Console
From the System Monitors tab choose Deployment Manager.
Double click the agent that will receive the custom DDI Common Event Format (CEF) syslogs, or open up the agent’s properties window by right clicking the agent and selecting Properties.
Select the Syslog and Flow Settings tab.
Select the Enable Syslog Server check box on the top left.
Add the Syslog Relay host (IP Address of host / agent sending the custom DDI CEF syslogs).
Click OK.
Log Source Types are used to classify logs and improve processing performance with rules for that type. Each Log Message Source is assigned a Log Source Type. Create a new Log Source Type for LogRhythm to ingest and classify DDI custom CEF syslogs.
Access the Log Source Type Manager and create a custom DDI Log Source Type.
- On the main toolbar, click Deployment Manager.
- On the Tools menu, click Knowledge, then select Log Source Type Manager.
- Add a Log Source Type by clicking the green plus icon on the top left.
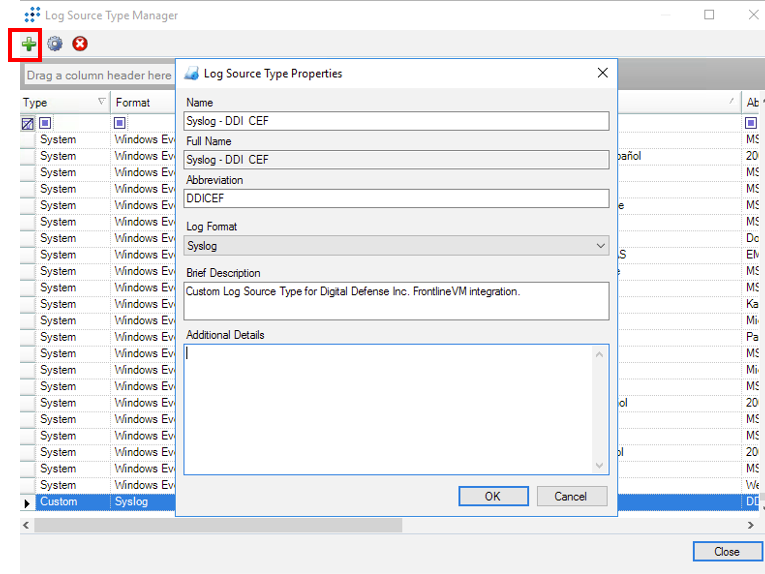
- Complete the Name and Abbreviation fields.
- Select “Syslog” as the value for Log Format.
- Click OK and close the Log Source Type Manager.
Create New MPE Rule
- On the Tools menu, select Knowledge, and then choose MPE Rule Builder.
- Select the New icon, and then choose Yes to create a new rule.
- Within the “General” section, enter a Rule Name.
- Select the Common Event icon button to associate this new rule with a Common Event.
In the Common Event Manager, we suggest searching for “General Information” within the Text Filter and selecting “Operations: Information: General Information”.
- Select OK.
- Select the Rule Status you want, and write a brief description (optional).
Log Message Source Type Associations
Select the log message source type to associate with this MPE rule.
- Expand Custom Log Source Types.
- Select the custom DDI Log Source Type you've previously created.
Base-Rule Regular Expression
- Copy the regular expression provided by the Fortra Integration Team.
- Paste this regular expression in the Base-rule Regular Expression Window.
- Click the save icon on the upper left main toolbar to save the newly created MPE Rule.
Test this MPE rule with sample logs to ensure the log ingestion, parsing, and mapping are correct. Use the Test Center tab to test the provided regular expression on log samples.
Within the Test Center window:
- Right click and select “Import Log Messages Manually”.
- Within the Test Log Importer window, paste a sample log provided by the Fortra Integration team and select OK.
- Select “Test All” after importing the log messages manually
- From the Rule Builder Test Results window, ensure the Total Logs Matching Rule percentage is 100% (all logs matched correctly). Also ensure that the LogRhythm fields from the sample log are all mapped correctly.
A policy is a collection of MPE Rules designed for a specific Log Source Type. When enabling MPE Processing we need to select a policy and create a MPE policy that will allow our DDI Log Sources to be processed by the MPE.
Create MPE Policy
On the main toolbar, navigate to Deployment Manager and then select the Log Processing Policies tab.
- Click the New (plus) icon on the toolbar.
- Select Custom from the “Record Type Filter” window.
- Select the custom DDI Log Source Type created earlier, and select OK.
- Within the MPE Policy Editor window, Name the new policy.
- Select Apply.
A log source is a unique source of log data that is collected from a Host. A log source is needed to associate the custom DDI logs for LogRhythm to determine the origin of the log message.
Log Source Configuration
Configure the log source with the custom Log Source Type, MPE Rule, and MPE Policy.
Navigate within LogRhythm under the Deployment Manager > Log Sources tool bar, and select the log source specific for DDI Log Messages.
- Right click on the log source and select Properties to open the Log Message Source Properties window.
- Under Actions select Change Log Source Type to bring up the Log Source Type Selector window.
- Ensure the Collection Agent is the same agent sending the custom DDI logs.
- Select the custom DDI Log Source Type you created earlier as the Log Message Source Type.
- For Log Message Processing Engine (MPE) Policy, select the custom DDI MPE Policy you created.
- Select OK to save.
- Log into the Client Console as a Global Administrator.
- On the main toolbar, select Deployment Manager.
- Choose the Third Party Applications tab.
- Right-click the blank area of the grid, and then click New. The Third Party Application Properties dialog box appears.
- Type an Application Name (e.g. Fortra VM Integration) and Description. The Application Name must be unique.
- Select OK. The application is saved.
- Right-click the newly created application, and then choose Properties.
- Change the number of days for which you want the token to be valid (Optional) .
- Select Generate Token. The Credentials dialog box appears.
- Enter the password for the user, and then select OK. A Client ID, Client Secret, and token are generated for the application.
- Copy and save this token. You will need it later.
The Integration Application must be installed on a Windows or Linux host. Download the appropriate version of the Integration Application below.
Download Windows App
Download Linux App
This Integration Application routinely pulls host and vulnerability data from Fortra VM as configured in the Fortra VM Connector console and transforms the data into CEF log format to be consumed by the LogRhythm data collector.
Configuration
After unzipping the integration application on the selected host, navigate to its folder.
- Locate the config.ini file in the top level of the directory.
- Open the file with any text editor and change the following values:
- logrhythm_url – Replace the text here with the URL for your LogRhythm instance. This is used in the integration to make API calls.
- logrhythm_agent_ip – Replace the text here with the IP address of the System Monitor you wish to use. If there is a System Monitor on the host you are installing this application on, use the host IP address.
- fvm_token – Replace the text here with the FVM API token you created earlier.
- lr_token – Replace the text here with your LogRhythm third party application API token.
- Save the file.
- Run the Integration Application file on the host using frontline_logrhythm_integration.exe
The Fortra VM Connector Console is where configuration of criteria for desired data to be pulled into the integration occurs. Access the appropriate Connector Console by selecting the Fortra VM instance for your account.
Login with your Fortra VM account email and the API token created earlier.
The Connector Console dashboard will display the current status of the integration, when the integration will next pull data along with host and asset criteria to be pulled. These settings can be modified using the Edit button.
Following the successful run of the integration, data pulled from Fortra VM can be viewed in the LogRhythm platform and utilized in queries and workflows.