After designing the basic layout, you may decide to group the records by certain fields or other criteria to make the report easier to read. Grouping allows you to separate groups of records visually and display introductory and summary data for each group. The group break is based on a grouping expression. This expression is usually based on one or more recordset fields, but it can be as complex as you like.
Groups are also used for sorting the data, even if you do not plan to show the Group Header and Footer sections.
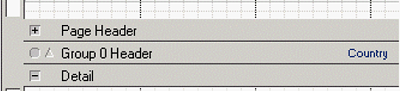
The bar across the top of each section (Page Header, Group Header, Detail) contains some useful tools and information about the section.
The indented box with a minus sign ![]() or a plus sign
or a plus sign ![]() to the left of the section is used to collapse
and expand the section. This feature is useful when you are designing
the report to allow you to see a group's header and footer on the same
screen without scrolling. Collapsing or expanding a section has no effect
on how it is rendered in the report.
to the left of the section is used to collapse
and expand the section. This feature is useful when you are designing
the report to allow you to see a group's header and footer on the same
screen without scrolling. Collapsing or expanding a section has no effect
on how it is rendered in the report.
An
indented circle ![]() indicates that the section currently has zero height.
You can drag the divider line down to increase the section's Height property.
indicates that the section currently has zero height.
You can drag the divider line down to increase the section's Height property.
The
triangle ![]() to the left of Group Header
indicates the group's sorting order. You can click this icon to
open the Sorting and Grouping dialog box.
to the left of Group Header
indicates the group's sorting order. You can click this icon to
open the Sorting and Grouping dialog box.
The labels to the right of the icons are the section name and, for group headers, the value of the group's GroupBy property (in this example, Country).
To add, edit, reorder, or delete groups in the report
Click the Sorting and
Grouping icon ![]() ,
click View > Grouping
Window, or click the triangle
,
click View > Grouping
Window, or click the triangle ![]() to the left of the group header. The Sorting and Grouping dialog box appears.
to the left of the group header. The Sorting and Grouping dialog box appears.
Use this dialog box to create, edit, reorder, and delete
groups.
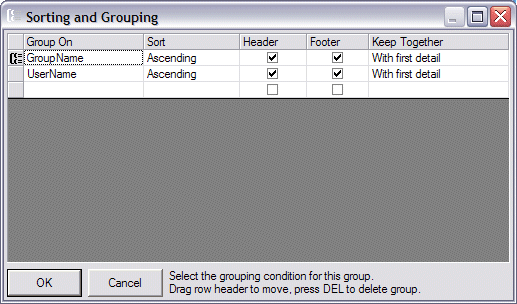
To create a new grouping condition
In the Group On column, click an empty row and type a name. For complex grouping, type an expression instead of a simple field name. For example, you could use "Country" to group by country or "Left(Country, 1)" to group by country initial.
In the Sort column, click the drop-down arrow to select the sort order you want to use for grouping the data (Ascending, Descending, or None).
In the Header, Footer, and Keep Together columns, specify whether the new group will have visible Header and Footer sections, and whether the group should be rendered together (No, With first detail, or Whole Group) on a page.
|
|
You cannot use memo or binary (object) fields for grouping and sorting. This is a limitation imposed by OLEDB. |
After you enter some data for the first group, a new blank row is appended to the list, so you can keep creating new groups. If you add more groups, you can change their order by clicking on the left-most gray cell in the row and dragging the row to a new position. This will automatically adjust the position of the Group Header and Footer sections in the report.
To delete a field in the group, select it, then press DELETE.
Click OK. The changes appear in the Designer.