

You can customize the Designer's "look and feel." You can select a customized font and color scheme, and specify the behavior while running and debugging Workflows using the Designer.
To configure Designer preferences
On the Designer main menu, click Tools > Editor Options. The Preferences dialog box appears.
On the General tab, configure the general preferences as needed.
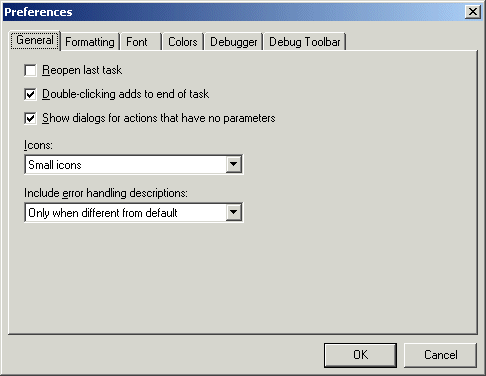
Reopen last Workflow check box: Cleared by default. Select the check box to display the last Workflow you were working on when you last closed the Designer. If multiple Workflows are open when Designer is closed, the active/selected Workflow is the one that will re-open. This option works only when the Designer is started manually from the Start menu.
Double-clicking adds to end of Workflow check box: Selected by default. When selected, double-clicking an Available Action adds the new step to the end of the Workflow. Otherwise, the step is inserted above the currently selected step. (This setting does not affect ability to drag actions to the Step pane.)
Icons: Specify whether to display Small, Large or No icons. Small icons are displayed by default.
Include error handling descriptions: Specifies when the Steps pane displays descriptive text about each step's error handling together with descriptive text about the step itself. Every step performs default error handling if the step fails.
Only when different from default: Appends descriptive text about the step's error handling only when an error handling option has been set that is different from the default. This will cause the error description to be omitted in the majority of cases because the default error handling is sufficient for most steps. (This is the default setting.)
Always: Always appends the error handling description to each step. This can cause extra, redundant text to be displayed in the Steps pane.
Never: Never append the error handling description. When selected, the error handling can only be viewed by editing the step.
On the Formatting tab, configure the formatting preferences as needed.
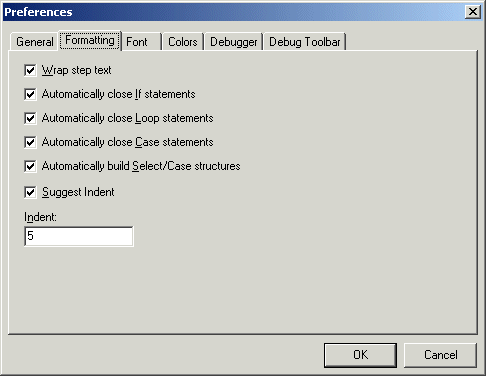
Wrap step text check box: Selected by default. Wraps step text so the entire text is visible in the steps pane. When the step text is not wrapped, a step's description or AML code can extend past the viewable right-hand margin. Use the horizontal scroll-bar to view the step in this situation. Clear the check box if you do not want the text of the step to wrap to the dialog box.
Automatically close If statements check box: Selected by default.
Automatically close Loop statements check box: Selected by default.
Automatically close Case statements check box: Selected by default.
Automatically build Select/Case structures check box: Selected by default.
Suggest Indent check box: When a step is added to a Workflow, the area between a Loop Action and an End Loop, or between an IF, an End If and/or Else step can be indented automatically using spaces to make the code more readable. This does not affect the runtime performance of the step. You can also indent steps or remove indents by clicking the arrow icons or the Format Steps icon, or by pressing CTRL+Right arrow or CTRL+Left arrow on the keyboard.
Indent: The number of spaces to insert ahead of a step when indenting. 5 is the default. Does not affect Workflow execution.
On the Font tab, configure the font preferences as needed.
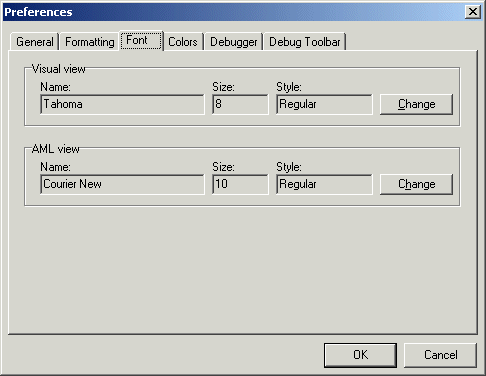
The default font used in the Designer interface is Tahoma 8 pt. regular. A variety of other fonts is available. For the best appearance, use True Type fonts.
Click Change to select a new font.
On the Colors tab, configure the color preferences as needed.
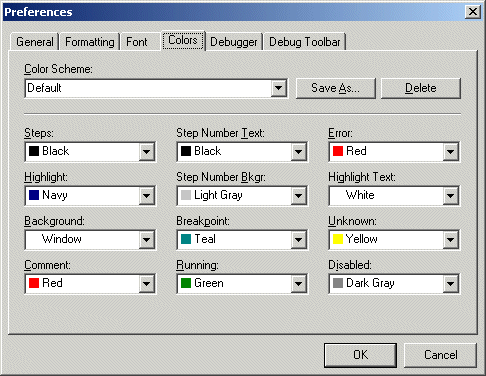
The Designer can be configured to use color schemes, which are collections of colors used for various steps and conditions in the Steps Window. A color scheme allows different users of the Designer to create their own custom "look and feel" when editing Workflows.
Color Scheme: The name of the currently active color scheme. Click the drop-down list to specify a different color scheme. Click Delete to remove a scheme from the drop-down list of available schemes. Click Save As to save the current color selections as a new color scheme. A prompt appear to name the new scheme. Schemes cannot be edited. Instead, the old scheme must first be deleted, then add the new color scheme with the same name.
Steps: The color of an active, recognized step. A step is executed at runtime. (Black by default.)
Line No. Text: The color of the line numbers. Line numbers appear in a column along the left edge of the Steps pane. (Black by default.)
Error: The background color to use when highlighting a step that has caused an error. When debugging a Workflow, this color will highlight the step that caused the Workflow to fail. (Red by default.)
Highlight: The background color of a highlighted, or currently selected, step. This is typically a color that contrasts with the Highlight Text color. (Navy by default.)
Line No. Bkgr: The background color of the line numbers column. The line number column can be toggled on and off by clicking View > Line Numbers. (Light Gray by default.)
Highlight Text: The text color of a highlighted, or currently selected, step. This should be a color that contrasts with the Highlight color. (White by default.)
Background: The background color of the Steps pane. (Window by default; that is, the color is the same as the Window color.)
Breakpoint: Text color of a step that has a breakpoint set on it. (Teal by default.)
Unknown: The color of text displayed in the Designer that is unrecognized. Text displayed in this color should be investigated as a possible problem with the Workflow. (Yellow by default.)
Comment: The color of a comment. (Red by default.)
Running: The background color of the currently executing step when a Workflow is running. This color allows easy tracking of the step currently being processed while debugging a Workflow in the Designer. (Green by default.)
Disabled: The color of a disabled step. Disabled steps are not executed at runtime. (Dark Gray by default.)
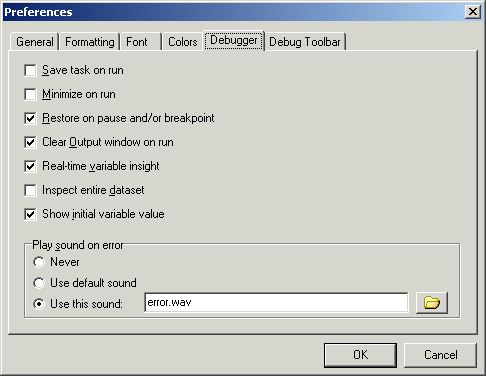
On the Debugger tab, configure the debug preferences as needed.
When you test a Workflow that includes interaction with a window, Workflow Builder minimizes to allow the steps to proceed. To aid in testing the Workflow, the Debug toolbar displays in a separate window while the Workflow runs. There is also a set of shortcut keys that can be used when testing a Workflow. These are listed in the Debug toolbar options page, and are active only while a Workflow is being run/tested in Designer. You can change the shortcut keys to any key combinations not already in use, and you can change the position of the Debug toolbar on the screen.
Save Workflow on run: Saves any changes made to a Workflow before the Workflow starts running. If the Workflow has not been saved yet, you will be prompted for a filename before running. Cleared by default.
Minimize on run: Minimized the Designer to the system tray before starting the Workflow. When the Workflow ends or pauses at a breakpoint, the Designer restores itself and highlights the current step or displays "Finished" in the step status in the status bar. Cleared by default.
Clear output window on run: Clear the contents of the Output pane before the Workflow starts executing. If not selected, new debugging output is appended to information accumulated from the previous Workflow run. Selected by default.
Real-time variable insight: The Designer maintains a list of variables in the current Workflow that can be viewed on the Variables tab. At runtime, the view also shows the current value of these variables. When this option is selected, the variable view is updated after each step is executed to show the current variable value. When this option is cleared, the variable view is updated only when the Workflow is paused (by clicking the Pause button or when a breakpoint is encountered), while stepping through the Workflow, and when the Workflow ends. Selecting this option could cause Workflows to execute somewhat slower while debugging. It does not affect execution speed when not debugging, however. Selected by default.
Inspect entire dataset: Datasets contain a number of properties that are not usually displayed on the Variable tab, such as the date/time the dataset was created, the total number of rows in the dataset, etc. Select the check box to display these extended dataset properties in the Variables tab when the Workflow is run. Cleared by default.
Play sound on error: Specifies whether to play a sound when the Workflow stops as a result of an error. Regardless of this setting, a step that fails is always colored using the Error color set in the Color Options (red by default), Workflow execution stops, and the error is written to the Output tab.
Never: Do not play a sound when an error occurs
Use default sound: Use the default system error sound, as specified in the Window's Control Panel.
Use this sound: Specify a valid path and filename of a .wav file to use. Designer comes standard with error.wav, but you can use any standard .wav file.
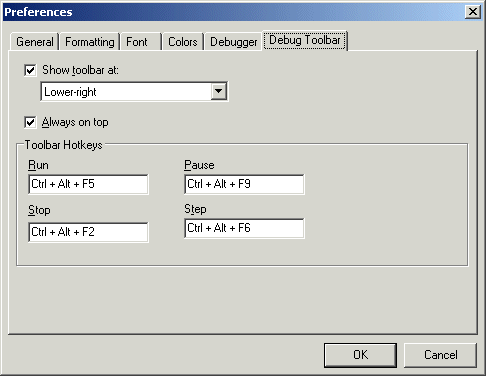
On the Debug Toolbar tab, configure the debug toolbar preferences as needed.
When you test a Workflow that includes interaction with a window, Designer minimizes to allow the steps to proceed. To aid in testing the Workflow, the Debug toolbar displays in a separate window while the Workflow runs.
There is also a set of shortcut keys that can be used when testing a Workflow. These are listed in the Debug toolbar options page, and are active only while a Workflow is being run/tested in Designer.
You can change the shortcut keys to any desired key combinations not already in use, and you can change the position of the Debug toolbar on the screen.
Show toolbar at check box: To hide the debug toolbar, clear the check box. To change the display position of the toolbar, ensure the check box is selected and select a position in the box below.
Always on top check box: To control whether the toolbar remains on top, select or clear the check box.
Toolbar Hotkeys: To change any of the shortcut keys for Run, Pause, Stop, or Step, click in its text box and then press the desired keys on keyboard. The key(s) that you press will replace the text in the box. For example, if you want to press F11 to run a Workflow, do not type an F and two 1s; instead, press the F11 key, and then "F11" will appear in the text box.
Click OK to save your preferences.
If you want to reverse the changes to the Designer interface, you can reset to the default settings. This returns all views, toolbars, and options to their original settings.
To return the interface to the default configuration
On the Designer main menu, click View > Reset Interface.