
Although creating an Advanced Workflow is quick and easy with the Advanced Workflow Designer, you might want to share workflows between Sites, import them from other users, or import them from GlobalSCAPE Customer Support. When you create a Workflow, the Advanced Workflow Engine creates a file with an extension of .aml and saves it in EFT Server's AWE folder. The filename is the name of the workflow, prepended with an underscore and the name of the Site.
Importing Workflows in the Administrator Interface
In EFT Administrator, connect to EFT Server and click the Server tab.
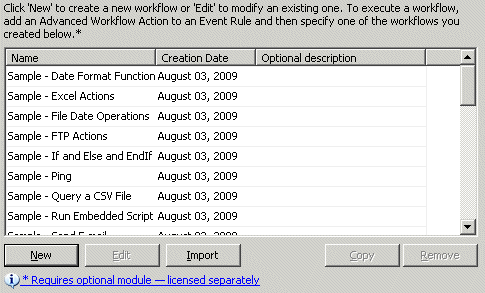
In the left pane, click the Advanced Workflow node. The Advanced Workflow pane appears.

In the right pane, click Import. The Open dialog box appears.
Navigate to the Workflow that you want to import (an .aml file), then click Open. The imported Workflow appears in the list of Workflows.
Importing Multiple Workflow Files
You can also "import" multiple Workflows at once by copying their .aml files to the AWE folder and prefacing each file name with the Site's name. For example, suppose you have created a Workflow called FTP on a Site called Boston, and the Workflow's filename is Boston_FTP.aml. You can import the .aml file into Advanced Workflow by saving it in the AWE folder (e.g., C:\Documents and Settings\All Users\Application Data\GlobalSCAPE\EFT Server Enterprise\AWE), then changing the filename to include the name of the Site that you want to use it in.
|
|
You must preface the file name with the name of the Site and an underscore, e.g., Boston_FTP.aml, and then restart the Server service for the workflows to appear in the Advanced Workflows node. |
To import Advanced Workflow files
In the AWE directory (e.g., C:\Documents and Settings\All Users\Application Data\GlobalSCAPE\EFT Server Enterprise\AWE), do one of the following:
Copy the .aml file into the AWE folder.
Create a new text file, copy and paste the text from the .aml file to the text file, then save the new file with an extension of .aml.
Copy the steps in the imported .aml file and paste them into an existing .aml file.
Rename the file by prepending the filename with the name of the Site and an underscore. For example, if the workflow is named FTP and the Site is named Boston, name the workflow Boston_FTP.aml. (You do not have to keep the original name of the workflow.)
Restart the EFT Server service, then log in to the EFT Server Administrator Interface.
Expand the Advanced Workflows node of the Site. The imported workflow appears in the tree.