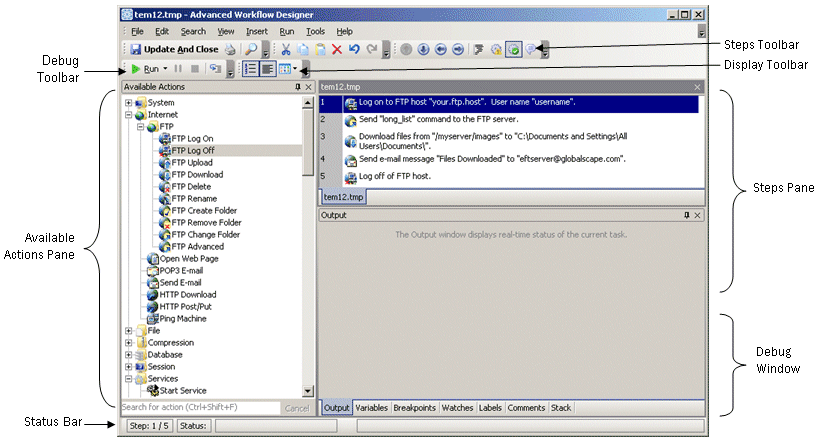

The Advanced Workflow Designer is the main interface used to define Workflows that you can use in Event Rules. The Designer is used to build and test Workflow-specific actions or steps that should be carried out when the Workflow is run (or triggered automatically); use Events to trigger the Workflow, for example, in a Scheduler (Timer) Event Rule. The name of the Workflow appears in the Title Bar and the Steps pane. When more than one Workflow is open in Designer, you select the Workflow to view by clicking its tab at the bottom of the Steps pane. When a Workflow is selected, the Status bar and Debug Window show data for that Workflow.

The Available Actions Pane
The Available Actions pane displays all of the items you can use to build your Workflows. The items are categorized into expandable folders and can also be shown alphabetically. At the bottom of the pane is a search box that you can use to search for an item.
To view available actions alphabetically, right-click the white space in the pane, then click Alphabetical.
The Steps Pane
The Steps pane displays the steps of the Workflow. You build the Workflow by dragging items from the Available Actions pane into the Steps pane. When you drag an item into the Steps pane, the properties dialog box for that item appears for you to specify the properties for the Workflow step. The item and its properties are then displayed in the Steps pane.
The Debug Window
The Debug pane of the Designer provides several views that aid debugging Workflows. The tabs in the Debug pane can be toggled off and on by clicking View > Windows, then clicking the name of the tab to hide or display. The tab can also be torn off and used as a floating window by holding the left mouse button over the page tab and dragging it off the Debug pane. The tabs are:
Output: Contains debug and general information about the currently running Workflow.
Variables: Lists the variables that are contained in the current Workflow.
Breakpoints: Lists the breakpoints associated with the current Workflow.
Watches: Expressions that are evaluated while the Workflow is running. This allows you to examine variable values and conditions in real-time.
Attachments: Lists the file attachments that are attached to this Workflow.
Labels: Labels a point in a Workflow with a specific name. Can be used with the Goto Action or On Error Goto to direct Workflow execution to a different point of the Workflow.
Comments: Comments are used to add documentation to a Workflow, but are ignored at runtime.
Stack: The Stack view displays the Workflow execution depth of the selected Workflow. The display changes when subWorkflows are used.
Status Bar
Along the bottom of the Designer window is the Status Bar, which displays the status of the step or Workflow being run. The status bar shows:
The step number currently running or selected
The status of the step, such as running, finished, or error
The percent completion of a running step
The action being done by a running step