![]()
![]()
This procedure is used ONLY if you did not configure ARM in the installer. All tables are installed regardless of version/features/modules (including the SAT module).
During installation, the installer places scripts in the Application Data folder under \EFT Server Enterprise\SQL Server. There are now several scripts that must be run in order. The script names are prefixed with numbers in the order you should run them.
The OSQL utility allows you to enter Transact-SQL statements, system procedures, and script files for maintaining the database.
For additional information on the oSQL utility, including common script samples, refer to osql Utility on microsoft.com.
The instructions below use Microsoft SQL Server Management Studio Pro, but you can use express or other methods.
To configure SQL Server
Reminder: As stated above, the necessary scripts are installed in the Application Data folder under \EFT Server Enterprise\SQL Server during installation.
Point EFT Server to the SQL Server.
On SQL Server, launch Microsoft SQL Server Management Studio or equivalent, and provide your administrator login credentials when prompted.
In the left pane, expand the Security
node, right-click Logins,
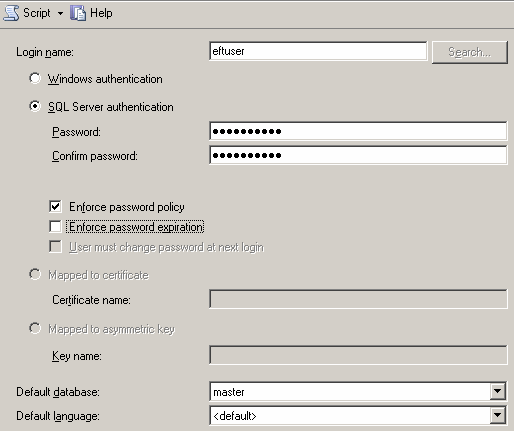
then click New Login. The New Login dialog box appears.

Create a new user called eftuser and click SQL Server Authentication.
|
|
If SQL Server Authentication is not available as a choice, verify that the SQL Server has been set up to support mixed mode. |
In the Password and Confirm password boxes, provide a complex password consisting of an alphanumeric and symbol mix of at least 8 characters.
Select the Enforce Password Policy check box.
Leave the Default database as master.
In Default language, click the list to select English, then click OK.
|
|
The user account that is doing the auditing for ARM must be set to English. |
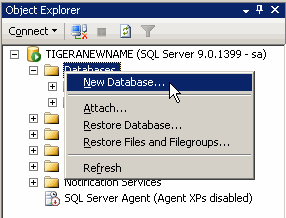
In the left pane, right-click Databases,
then click New Database.
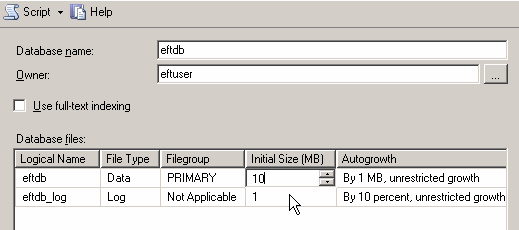
In the dialog box that appears, name the database eftdb.
|
|
If you name the database something other than eftdb, be sure to use the name you chose throughout the procedure. |
In the Owner field, provide the login name you just created (eftuser).
In the Database files
table, change the Initial size
value to 10
MB for the eftdb
logical name (first row). Leave the eftdb_log
row as is and click OK.
In the left pane under Databases, click the newly created eftdb database, then on the Query menu, click New Query. A blank screen appears in the right pane in which you can type in a SQL query.
For each script (in the order specified by the file names):
Reminder: As stated above, the necessary scripts are installed in the Application Data folder under \EFT Server Enterprise\SQL Server during installation.
Load/copy the entire script into management studio.
Add the following lines to the top of the script:
USE EFTDB
GO
Execute the script.
A message appears indicating whether the query was able to complete successfully.
Expand Databases, then eftdb, then Tables. Verify that the database has populated correctly. (The tables defined in the script should have been created.)
Test your connection
Create a test connection with your FTP client to EFT Server and upload and download a few files.
Switch back to SQL Server and select the dbo.tbl_ProtocolCommands table under the eftdb database icon. It should return several rows with the commands issued by your client from the test connection.
You can now pull reports directly from EFT Server against data audited to SQL Server.
|
|
If you are running the Administrator, you must have an entry in that system's DNS for the name of the SQL Server, otherwise the Administrator will not be able to connect to the SQL Server when attempting to pull reports. |
Administrators that prefer using command-line tools can use oSQL to create the auditing database and tables. A brief overview is provided below. Detailed instructions are outside the scope of this documentation; refer to your SQL Server documentation.
Gather the following information prior to calling the oSQL command line tool:
The SQL Server Host Name or address.
The authentication scheme. You will need to know the authentication mechanism allowed on that SQL Server. It may be Windows Authentication only, Windows Authentication, or SQL Server Authentication.
The allowed connection protocols. This can be Named Pipes, which is required for Windows Authentication, or TCP/IP, which is used by the SQL Server Authentication.
The PORT, if TCP/IP. If TCP/IP is the connection of choice, you need to know the port on which the SQL Server is listening for connections. The default port is 1433. It also supports a way that a client can dynamically determine the port, but this requires that the SQL Server have UDP port 1434 accessible by remote computers. If this port is blocked by a firewall, you will NOT be able to use the "dynamically determine port" feature. Typically, SQL Server installations use the default port 1433 (TCP) for connections.
Once you have acquired all of the above information, then you can construct the proper command line for "oSQL" to connect to the database.
You must use this procedure for each of the scripts installed in the Application Data folder under \EFT Server Enterprise\SQL Server during installation.
Open a command prompt. (Click Start > Run, type cmd, then press ENTER.)
Type the following to place the sql file in the Reports folder (e.g., C:\Documents and Settings\All Users\Application Data\GlobalSCAPE\EFT Server Enterprise\Reports):
[path to oSQL]\oSQL.exe -S [server address] -U [username] -P [password] -i "[c:\path\to\ARM_DBScript_1_1.sql]\ARM_DBScript_1_1.sql"
For example, type:
"C:\Program Files\Microsoft SQL Server\80\Tools\Binn\oSQL.exe" -S 192.168.19.17 -U jbond -P asd123!f$s1 -i "C:\Documents and Settings\All Users\Application Data\GlobalSCAPE\EFT Server Enterprise\Reports\ARM_DBScript_1_1.sql"
In the Administrator, connect to EFT Server and click the Server tab.
In the left pane, click the Server you want to configure.
In the right pane, click the Logs tab.
Under Database Audit Settings, select the Enable Auditing and Reporting check box.
In the Server Name box, type EFT Server name or IP address.
Type the Database Name, a valid user name, and a password.
To test the connection to the database, click Test Connection.
|
|
Both the auditing component
and the reporting component of EFT Server's ARM use ADO to communicate
with the data source. The connection string (automatically configured
if a database option is chosen during install) used to connect to the
data source can be anything that ADO supports to open a connection. This
can be a DSN or a DSN-less connection string. For more information on
ADO connection strings, search the MSDN library at http://msdn2.microsoft.com/en-us/library/default.aspx;
also refer to Microsoft support article 193332: |