The following example Command shows the configuration of a custom command from the perspective of both EFT Server and client. To follow the example exactly, you will need to download and install CuteFTP Professional, which is available as a free 30-day trial and can be downloaded from http://www.globalscape.com/downloads. However, any client that supports custom commands or raw FTP commands will work.
This command copies EFT Server log files from the Logs folder to C:\Temp using the Windows xcopy command and CuteFTP Pro's command-line functions.
To create a custom command
In the Administrator, connect to EFT Server and click the Server tab.
In the right pane, click New. The Custom Command Wizard appears.
Follow the instructions in The Custom Command Wizard to define the Command.
You can run the Command "on the fly," configure the Command in the FTP client (in this example, CuteFTP Professional), or insert the Command in an Event Rule.
Using the Command "on the fly" in CuteFTP Pro
Start CuteFTP Pro and connect to EFT Server.
If not already displayed, open the Session Log pane. (On the main menu, click View > Show Panes > Individual Session Logs or press ALT+2.)
Right-click a blank area of the Session
Log, then click Input Raw FTP
Command, or press CTRL+SHIFT+I. The Input
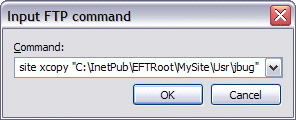
FTP Command dialog box appears.

In the Command box,
type site,
the name of the Command as defined in EFT Server and any required parameters.
For this example, type:
site xcopy "C:\InetPub\EFTRoot\MySite\Usr\jbug" "C:\Temp"
Click OK. The Command executes. In this example, each of the files in the \Usr\jbug folder was copied to the \Temp folder. If you selected the Return output to client check box when you defined the Command in EFT Server (step 8 above), the Session Log displays the results of the Command. For example:
COMMAND:> site xcopy "C:\InetPub\EFTRoot\MySite\Usr\jbug" "C:\Temp"
220-C:\InetPub\EFTRoot\MySite\Usr\jbug\cftpsaiProperties.gif
220-C:\InetPub\EFTRoot\MySite\Usr\jbug\EFTtaxonomy_filelist.xml
220-C:\InetPub\EFTRoot\MySite\Usr\jbug\EFTtaxonomy_image001.png
220-C:\InetPub\EFTRoot\MySite\Usr\jbug\inheritance.doc
220-220-C:\InetPub\EFTRoot\MySite\Usr\jbug\Message3.gif
220-C:\InetPub\EFTRoot\MySite\Usr\jbug\RE Certificate Chaining.htm
220-C:\InetPub\EFTRoot\MySite\Usr\jbug\Root Migration Scripts.htm
220-C:\InetPub\EFTRoot\MySite\Usr\jbug\Thumbs.db
220-8 File(s) copied
220-220-
220 Command completed with code 0.
Configuring the Command in CuteFTP Pro
Start CuteFTP Professional and connect to EFT Server. (Refer to the CuteFTP Pro help for details of how to connect to EFT Server.)
On the main menu, click Tools > Custom Commands > Edit Custom Commands. The Custom Commands dialog box appears.
|
|
You must be connected to an FTP server in order for the Commands option to be available. |
Click New then type a name for the command. For this example, type xcopy.
Click the command in the tree, then click Edit or right-click the new command and click Properties. The Custom Command Properties dialog box appears.
In the Label box, the name of the command appears.
In the Command box, type:
site xcopy "C:\InetPub\EFTRoot\MySite\Usr\jbug" "C:\Temp"
/d
|
|
Commands must start with site and then the command name you used in EFT Server, not the name you gave the command in CuteFTP. The /d parameter copies all new files in the specified folder. |
Optionally, specify any key or key combination for the Shortcut Key and any icon for the Toolbar Icon.
Select the Place on the Custom Commands toolbar check box, then click OK to close the Custom Commands Properties dialog box.
Click OK to close the Commands dialog box. Your custom command is now enabled and the icon, if specified, appears on the toolbar. (If the command is not displayed, click View > Toolbars > Custom Commands Bar.)
Start CuteFTP Pro and connect to EFT Server.
If it not already displayed, open the Session Log pane. (On the main menu, click View > Show Panes > Individual Session Logs or press ALT+2.)
On the toolbar, click the Command icon that you just created.
Monitor the output in the Session
Log. You should receive various response messages indicating the
progress of the archive.

If you want to copy the log file automatically every day, you can create a Scheduler (Timer) Event and insert the Execute command in folder Action. Using this method, you would have to define the parameters in the Custom Command dialog box from within the Event Rule.
Possible Error Situations
If you repeat the hard coded parameters in both the client and EFT Server, then the first parameter that the client sends will be used. For example, if SITE ZIP -c %at[archive name] %ff is configured in the client, and -c %1% %2% is configured in EFT Server, then the first parameter (-c) that the client sends will be used as %1% and the resulting string would be -c -c filename.ext. Therefore, it is important to educate the FTP user on the proper syntax and supply most of the hard-coded parameters on EFT Server side.
If you do not give the user permission to run the Command on the Permissions tab on EFT Server, they will receive a "Permission Denied" error.
Certain command line utilities that may show a Windows prompt or other dialog may not execute properly when called from the FTP Engine while it is running as a service. This is especially true when the service is being logged in from a Local System account.
EFT Server can return an error if the client provides the wrong number of parameters or invalid parameters.
To limit security vulnerabilities to EFT Server, EFT Server administrator should only allow limited access to commands that launch processes.
|
|
Always use caution when giving program access to your system32 directory (especially an FTP server). |