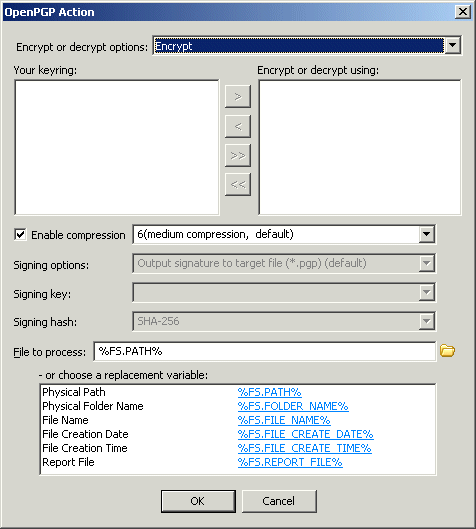
You can configure EFT Server to use OpenPGP encryption for particular events to encrypt or decrypt files, even files larger than 2GB. OpenPGP can be used with Server Events (the On Timer and On Rotate Log events), certain File System Events (File Upload, File Move, and File Rename), and a User Event (User Logout). To use this Action, the Site must be configured for OpenPGP and appropriate keys generated.
EFT Server will not process files with the .pgp or .gpg extension for encrypt Actions. EFT Server will only process files with the .pgp or .gpg extension for decrypt Actions.
|
|
This Action applies only to the On Timer, On Rotate Log, User Logout, and File Upload events. This example uses the On File Upload event. |
To set up EFT Server to use OpenPGP for particular Event Rules
Follow the procedure in Creating Event Rules or select the rule to which you want to add the Action.
In the right pane, in the Actions list,
click OpenPGP Encrypt, Encrypt
+ Sign, Decrypt. The Action
appears in the Event in the Rule pane.
In the Rule pane, select either of the underlined elements (Encrypt or %FS.PATH%). The OpenPGP Action dialog box appears.

In the Encrypt or decrypt options box, click the list to specify Encrypt, Encrypt and Sign, Sign Only, Self-Decryption Archive (SDA), or Decrypt.
If you designated a default key for the Site, that key is displayed in the Encrypt or decrypt using (right) pane. If there is no default key, the right pane will be blank. Use the arrow icons to add or remove keys between the Your keyring pane and the Encrypt or decrypt using pane, or double-click the key in the list.
Select the Enable compression check box, then click the down arrow to specify a level of compression, from 1 (least compression, fastest) to 9 (max compression, slowest). The default is 6 (medium compression, default).
In the Signing options box, click the down arrow to specify an option: Output signature to target file (.pgp), Output signature to target file ASCII armored (*asc), Output signature to separate file (*.sig), Output signature to separate file ASCII armored (*.asc).
In the Signing key box, click the down arrow to specify the signing key.
In the Signing hash box, click the down arrow to specify a hash: Use default (MD5 or SHA-256), MD5, SHA-1, RIPEMD160, SHA-256, SHA-384, or SA-1512.
In the File to process box, specify the file or folder to process. The default target file is selected.
Click a variable
to add it to the File to process
box or use actual file/folder names. Use the folder icon ![]() to browse to a file or folder.
to browse to a file or folder.
Click OK to close the dialog box and apply the parameters.
Click Apply to save the changes on EFT Server.