![]()
![]()
EFT Server will populate the EFTAdHoc
User Setting Template with the temporary user accounts as they
are created.

If you have Event Rules to trigger on account creation or password change,
those Rules are triggered when the temporary account is created.
|
|
The procedure below is for EFT Server Enterprise administrators only. This procedure is performed on the EFT Server Enterprise computer in the Administrator. EFT Server basic edition has no Timer Event Rule functionality. You cannot configure EFT Server basic edition to alert you on upload notifications of SAT users. If you send a SAT e-mail to a user, then that user uploads something back to you, there is no way to configure the “return upload” notification to let you know your temporary user has uploaded something for you to pick up. This functionality relies on a Timer Rule that is only available with EFT Server Enterprise. Nor can you configure EFT Server basic edition to automatically remove expired SAT temporary accounts. The removal of the temporary accounts is triggered by the Timer Event running a script. The script is still available in EFT Server basic edition and you can run it manually to clean up expired accounts, but there is no Timer Event to have this happen automatically. You could also run the script with the Log Rotated Event so that the script is run daily, weekly, or monthly, depending on how often the log is rotated. (For more information about logs, refer to the EFT Server help topic Log Settings.) |
The Secure Ad Hoc Transfer (SAT) module default installation handles the process of notifying your recipients when a file is sent. In addition, temporary accounts are disabled automatically one week after account creation.
To remove expired temporary accounts from EFT Server (including their home folder and any files contained within) automatically, and to receive notifications for files uploaded by recipients, you must configure EFT Server to do so, as described below.
The SendUploadNotification.wsf script contains two jobs, File Uploaded and Scheduler (Timer), that work together to send a notification mail to the account creator (the "From" e-mail address) whenever file(s) are uploaded into the temporary account. The Scheduler (Timer) job creates a hidden temporary file within the temp user's home folder indicating an upload is in progress. The Scheduler (Timer) job periodically queries the home folders for accounts and, if a temp file is found, a notification is sent to the account owner. The script uses the web.config for the SMTP configuration and the “WaitForUloadsDurationSecs” variable specifying the number of seconds to wait for uploaded files prior to sending e-mail notification. The script also requires the SendUploadNotificationMessage.tlt template located in the Templates directory.
The system is configured to notify the original sender any time the external recipient performs an upload. This is done by setting up the File Uploaded and the Scheduler (Timer) rules on EFT Server. The frequency of the Scheduler (Timer) rule governs how often the upload notifications are sent. You can edit the SendUploadNotificationMessage template file to be more descriptive. (This file is on the EFT Server computer, not the IIS computer.)
To receive notifications when recipients upload files
Part 1: Configure the “Send Upload Notification to Sender - On Upload” event rule
If EFT Server and IIS are installed on separate computers, copy the EFTAdHoc folder (by default, C:\Inetpub\wwwroot\EFTAdHoc\) and its contents to the EFT Server computer.
Open EFT Administrator and create
a new custom command for cscript.exe
(a Windows system file usually located at c:\windows\system32\cscript.exe)
as illustrated below.

In the left pane, click Event
Rules, then, in the right pane, click New.
The Create New Rule dialog box
appears.

In the Event Rule Name box, type a name for the rule. For example, type Send Upload Notification to Sender.
In the Description box, type a comment. (Optional)
In the Select event trigger list, click File Uploaded.
Click Create.
The Event Rules tab appears.
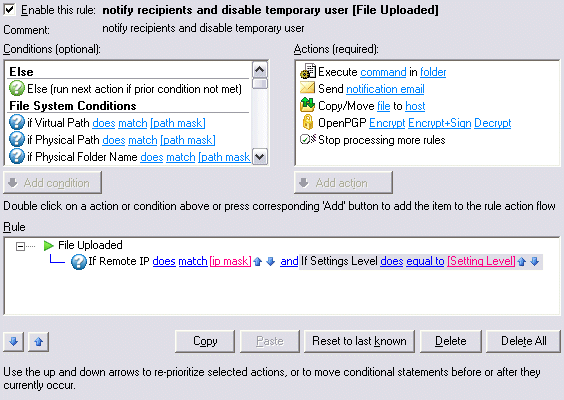
In the Conditions box, scroll to Connection Conditions, and double-click If Remote IP does match [ip mask]. The condition appears in the Rule pane.
In the Conditions box, scroll to User Conditions, and double-click If Settings Template does equal. The condition is added next to the first condition, on the same line.
In the condition If Remote IP does match [ip mask], click does once to change it to does not.
|
|
If you are using
the EFT Secure Ad Hoc Transfer Module, and if EFT Server and IIS are installed
on the same computer, when creating the Event Rule for Upload Notifications,
create an additional Condition for REMOTE IP does not match 127.0.0.1. |
Type the IP address for the IIS host; click OK.
In the condition If Settings Template does equal to [Settings Template], click [Setting Template]. The Select Settings Template dialog box appears.
Click the down arrow to click the Settings Template used by Secure Ad Hoc Transfer (by default, EFTAdHoc), then click OK.
In the Actions box,
double-click Execute command in folder.
The new action appears UNDER the new compound condition that you just
created and is indented, as shown below.

In the Action Execute
command select in folder 'c:\', click select.
The Custom Command dialog box
appears.

In the Select command drop-down list, click the name that you gave the cscript command.
In the Specify command parameters box, type or paste the following text:
SendUploadNotification.wsf //JOB:ON_UPLOAD %USER.LOGIN% %FS.VIRTUAL_PATH%
In the Specify command working folder box, click the directory in which the script exists. The script is in the Scripts subdirectory of the Secure Ad Hoc Transfer installation folder if IIS and EFT Server are on the same system (C:\Inetpub\wwwroot\EFTAdHoc\Scripts) or the Scripts subdirectory of the folder you copied in step 1.
Click OK to close the Custom Command dialog box.
Click Apply to save the changes on EFT Server.
Continue to Part 2, below.
Part 2: Configure the "Send Upload Notification to Sender - On Timer" Event Rule
Create a new Rule using the Scheduler (Timer) Event.
In the Actions box, double-click Execute command in folder to add it to the Rule pane.

In the Rule pane, in the Execute command Action, click select. The Custom Command dialog box appears.

In the Select command drop-down list, click the name that you gave the cscript command in Part 1.
In the Specify command parameters box, type or paste the following text:
SendUploadNotification.wsf //JOB:ON_TIMER
In the Specify command working folder box, click the directory in which the script SendUploadNotification.wsf exists. (In the Scripts subdirectory of the Secure Ad Hoc Transfer installation folder if IIS and EFT Server are on the same system, C:\Inetpub\wwwroot\EFTAdHoc\Scripts, or the Scripts subdirectory of the folder you copied from the IIS computer.)
Click OK to save the Command.
Click Apply to save the changes on EFT Server.