Configuring Authenticated Access to Exchange
Typically, SMTP uses port 25. However, an alternative SMTP "submission"
port has been reserved on port 587. For Exchange 2007 and 2010, installation
will create a "Default" module listening on port 25 as well
as a "Client" module listening on port 587. Exchange 2003
installation will only create the "Default" module.
For authenticated access, create a module listening on port 587. The
important requirements for Mail Express are that the module accept "basic
authentication" and that an appropriate user (with the necessary
permissions) be made available to the Mail Express system. (See also Configuring Anonymous
Access to Exchange.)
Installation of Exchange 2007/2010 creates an alternative client
submission receive connector.
Exchange 2003 does not install
an alternative client submission virtual server, so you must create
one.
Configuring Mail Express for Authenticated Access
After you have configured the Exchange Server for authenticated access
as described below, depending on the version of Exchange, you must configure
Mail Express to access the "Client" module that you defined.
On the Mail Express Mail Server
Configuration page,
in the Host box provide the
mail server domain and in the Port
box specify port 587.
If you enabled encryption, select the Connect
using SSL check box, then do one of the following:
Select the Always trust
certificates from Exchange Server check box and don’t upload
a file. This option is useful for testing, but is less secure
that the next option.
Clear the Always trust
certificates from Exchange Server and then click Choose File to upload the Public
Certificate of the of the Certificate Authority that signed the
Exchange Server’s Public Certificate (typically this is the Public
Certificate for the Active Directory server).
Because the "Client" module accepts Exchange users,
we want to ensure that the Use Exchange
authentication check box is selected. In the illustration,
the Exchange user is mail.express@dev.globalscape.com. With this configuration,
the From address and Reply to address will be used in
messages generated by the Mail Express system. The From
address will also be used in the SMTP transfer with Exchange
after authentication and must reflect the mailbox for the user specified
in the Username box. You can
set the Reply to address to
whomever the administrator wants to monitor those messages.
See also Testing
the Mail Server Configuration.
Exchange 2013
In the Exchange admin center,
in the left menu, click mail flow.
Next to Select server,
specify the exchange server to configure (if there is more than one),
then in the top menu, click receive
connectors.
On the receive connectors
page, click the plus sign +
to add a new connector. The new receive connector dialog box appears.
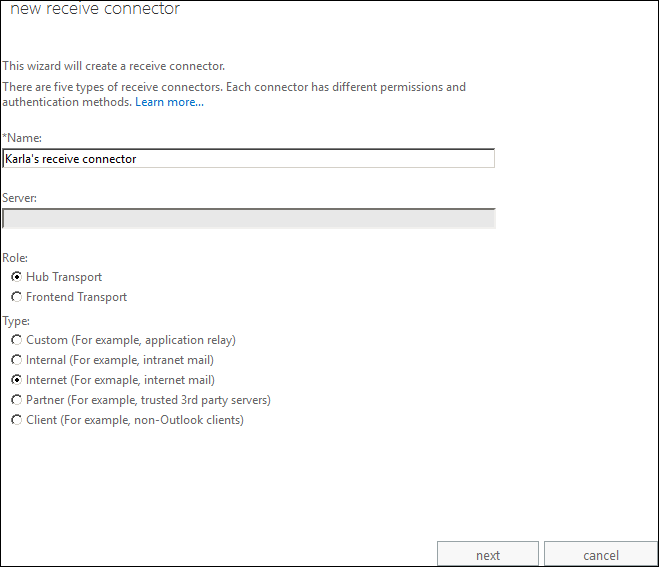
Provide the following information, then click next:
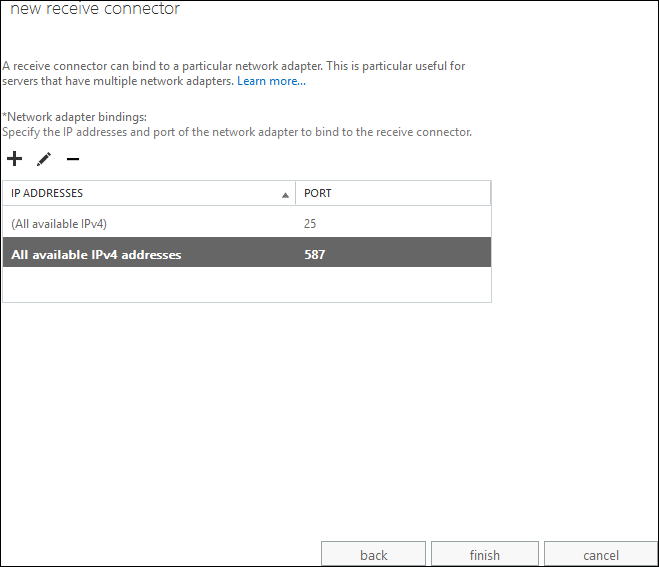
Under Network adapter bindings,
click the plus sign + to specify
the IP addresses and port that Mail Express is to use, then click
finish. (For SSL connections,
the default is port 587.)
After the receive connector is created, double-click it in the
list.
The receive connector's properties appear. Click security.
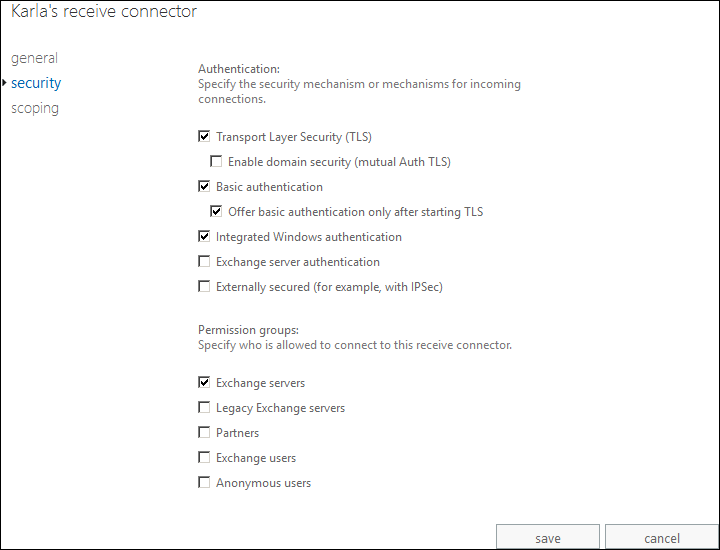
Select the following check boxes:
Transport Layer Security
(TLS)
Basic authentication
Offer basic authentication only
after starting TLS
Integrated Windows authentication
Exchange servers
Ensure the Anonymous users
check box is not
selected, then click save.
Grant permission to the Mail Express user. When Mail Express
users send packages via the web portal, Mail Express generates email
on their behalf, which it then directs to the Exchange server. The
ability to "impersonate" another user requires a special
permission. The user whose credentials with which Mail Express
will be authenticating requires the "Accept any Sender"
permission when impersonating external addresses and "Accept
Authoritative Domain Sender" when impersonating local addresses.

The first command in the image above is:
Add-ADPermission "Client
ADSERVER" –User "Mail Express" –ExtendedRights ms-Exch-SMTP-Accept-Authoritative-Domain-Sender
The second command is:
Add-ADPermission "Client
ADSERVER" –User "Mail Express" –ExtendedRights ms-Exch-SMTP-Accept-Any-Sender
The format of the commands shown in the image
above is:
Add-ADPermission "${SMTP_MODULE}"
–User "${MAIL_EXPRESS_USER}" –ExtendedRights ${REQUIRED_PERMISSION}
Where:
"${SMTP_MODULE}"
is the name of the module
"${MAIL_EXPRESS_USER}"
is the account created for Mail Express
${REQUIRED_PERMISSION}
is one of the permissions, ms-Exch-SMTP-Accept-Authoritative-Domain-Sender
or ms-Exch-SMTP-Accept-Any-Sender
Exchange 2007 and 2010
In the Exchange Management Console, click Server
Configuration > Hub Transport > ADSERVER > Client ADSERVER,
then right-click Client ADSERVER
and click Properties. The
Client ADSERVER Properties
dialog box appears.
Click the Network tab.
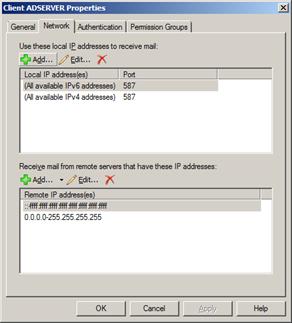
Under Use these local IP addresses
to receive mail, the Local
IP address(es) and Port
appear. Verify that the receive connector is listening on port 587. The
actual port number is not significant as long as the Mail Express
Server is configured to use the some port. If necessary, click
Add or Edit
to add or change the listening port, then click OK.
Click the Authentication
tab.
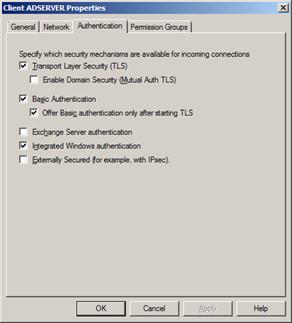
Select the following check boxes, then click OK:
Basic Authentication—The
most important requirement of this module is that it allows "basic
authentication."
Transport Layer Security
(TLS)—Requires encryption so that the user password cannot
be intercepted in transit.
Offer Basic Authentication
only after starting TLS—Ensures that the client's password
is sent encrypted.
Click the Permission Groups
tab.
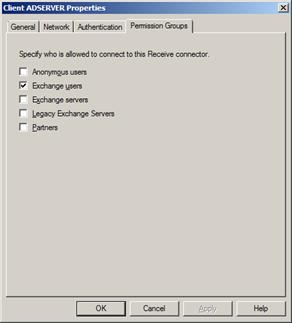
In conjunction with the "basic authentication" we
want to ensure that Exchange is authenticating against Exchange users
and not accepting anonymous users. Ensure the Exchange
users check box is selected that the Anonymous
users check box is not selected, then click OK
to close the Properties dialog
box and save your settings.
Grant permission to the Mail Express user. When Mail Express
users send packages via the web portal, Mail Express generates email
on their behalf, which it then directs to the Exchange server. The
ability to "impersonate" another user requires a special
permission. In Exchange 2007/2010, the user whose credentials
with which Mail Express will be authenticating requires the "Accept
any Sender" permission when impersonating external addresses
and "Accept Authoritative Domain Sender" when impersonating
local addresses.
Do one of the following:
The first command in the image above is:
Add-ADPermission "Client
ADSERVER" –User "Mail Express" –ExtendedRights ms-Exch-SMTP-Accept-Authoritative-Domain-Sender
The second command is:
Add-ADPermission "Client
ADSERVER" –User "Mail Express" –ExtendedRights ms-Exch-SMTP-Accept-Any-Sender
The format of the commands shown in the image
above is:
Add-ADPermission "${SMTP_MODULE}"
–User "${MAIL_EXPRESS_USER}" –ExtendedRights ${REQUIRED_PERMISSION}
Where:
"${SMTP_MODULE}"
is the name of the module
"${MAIL_EXPRESS_USER}"
is the account created for Mail Express
${REQUIRED_PERMISSION}
is one of the permissions, ms-Exch-SMTP-Accept-Authoritative-Domain-Sender
or ms-Exch-SMTP-Accept-Any-Sender
Alternatively, use
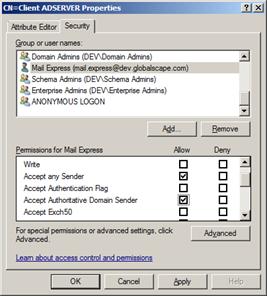
"ADSI Edit" to graphically add the required permissions. The
"ADSI Edit" application can usually be found at %SystemRoot%\system32\adsiedit.msc.
Locate SMTP Receive Connectors
which are under Configuration.Services.Microsoft
Exchange. (Parts of the path will be specific to your
installation.)
Right-click the "Client" receive connector (Client ADSERVER), then click
Properties.
Click the Security
tab, then click Add to
specify the user account with which the Mail Express Server will
authenticate.
Ensure that the Accept
any Sender and Accept
Authoritative Domain Sender permission's Allow
check boxes for that user are selected, and that every other permission's
Allow check box is cleared.
Exchange 2003
Exchange 2003 does not install an alternative client submission virtual
server, so you must create one. In this example, it is called "Alternative
Submission."
In the Exchange console, click Servers
> ADSERVER2003 > Protocols > SMTP > Alternative Submission,
then right-click Alternative Submission
and click Properties.
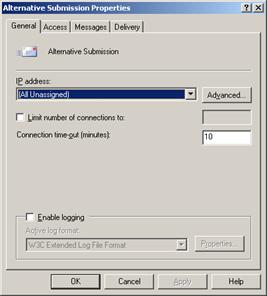
On the General tab,
click Advanced.

Configure the virtual server to listen on port 587. The
actual port number is not significant so long as it is noted so that
the Mail Express server can be configured to use the some port. Click
OK.
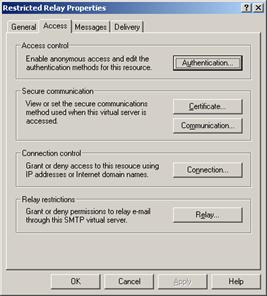
Click the Access tab,
then click Authentication.
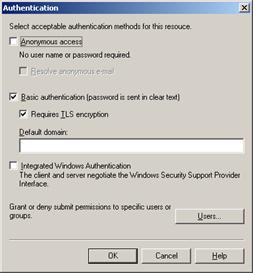
The most important requirement of this module is that it allows
"basic authentication." In the Authentication
dialog box, select the Basic authentication
check box and the Requires TLS encryption
check box (so that the user password cannot be intercepted in transit),
then click OK to close the
Authentication dialog box
and OK again to close the
Properties dialog box.
Next, you will specify the user with which Mail Express will
be authenticating on the Exchange server. When Mail Express users
send packages via the web portal, Mail Express generates email on
their behalf, which it then directs to the Exchange server. The
ability to "impersonate" another user requires a special
permission. In Exchange 2003, this is the "Send As"
permission. In the Exchange console tree, click Servers
> ADSERVER2003, then right-click ADSERVER
2003 and click Properties.
The Properties dialog box
appears.
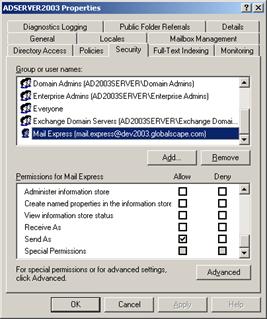
On the Security tab,
click Add to specify the user
account that the Mail Express server will be using to authenticate. Then,
with the user selected, ensure that the Send
As permission's Allow
check box is selected, while every other permission's check box is
cleared.
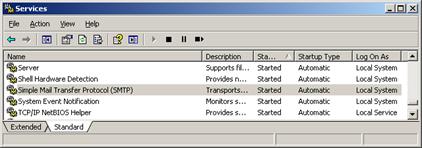
After granting the permission, the SMTP service must be restarted
so that it is aware of the changes.