Task Events Log
The Task Events table supplies comprehensive information with reference to all executed tasks. This log is useful for gathering pertinent information about task events that occurred, such as when a task ran, which trigger started the task, the total amount of time the task took to execute and whether it ran successfully or failed. Dates can be filtered by the current day, previous day, last week or month, before or after a particular date/time or a custom date range.
Data Sources
The Execution Events report displays data in a two-dimensional table. The bound data is arranged in columns and rows. Grid columns correspond to data fields in a data source, rows represent data records. The table below lists the available data sources along with a description.
|
Field |
Description |
|---|---|
|
Name |
The name of the object. |
|
Type |
The type of object. |
|
Path |
The path to the object as shown in the Workflow or Repository section of the SMC. |
|
Start |
The execution start date/time. |
|
End |
The execution end date/time. |
|
Duration |
The duration of the execution. |
|
Executed On |
The agent where the object executed on. |
|
Result |
The result of the execution. |
|
Result Text |
The text result of the execution. |
|
Event ID |
The event ID of the execution event. |
|
Construct ID |
The construct ID of the object that was executed. |
Filtering
This report can be filtered by columns which represent the data source, by starting and ending execution date/time and by repository items. In addition, a Filter drop down is available for column filtering and a Filter Editor is available for comprehensive filtering.
To filter by columns:
-
Click the Columns button. A list of available columns appear.
-
Select the columns to include in the report.
-
De-select the columns to omit from the report.
To filter by starting/ending date:
-
In the Starting/Ending field, double-click a portion of the current value to highlight the month, day, year or time.
-
Click the up or down arrow to modify the value up or down.
OR
-
In the Starting/Ending field, click the down arrow to display a calendar.
-
Select the desired month/day.
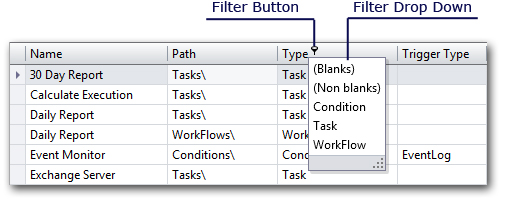
Filter Drop-Down Menu
To invoke the Filter Drop down list, hover over the column header. Click the filter button that appears within the column header (as shown below).
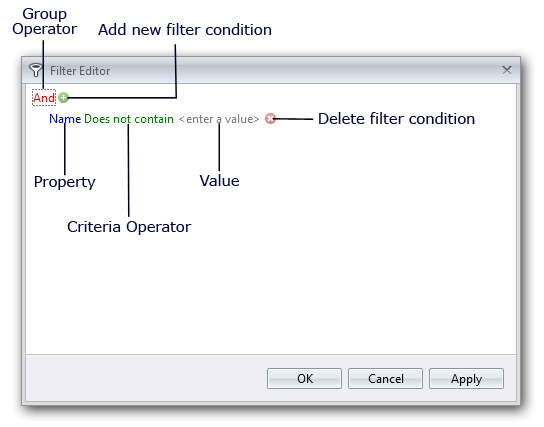
Filter Editor
The Filter Editor allows users to build complex filter criteria with an unlimited number of filter conditions, combined by logical operators. To invoke the Filter Editor, right-click any column header and select Filter Editor. The Filter Editor displays filter criteria as a tree structure, where nodes represent simple filter conditions. If the filter criteria consist of multiple filter conditions, the Filter Editor contains multiple nodes linked by logical operators into groups.
Printing/Exporting
The Print/Export button allows you to print or export the current table into a number of file types. Clicking this button opens a Print Preview window (as shown below).
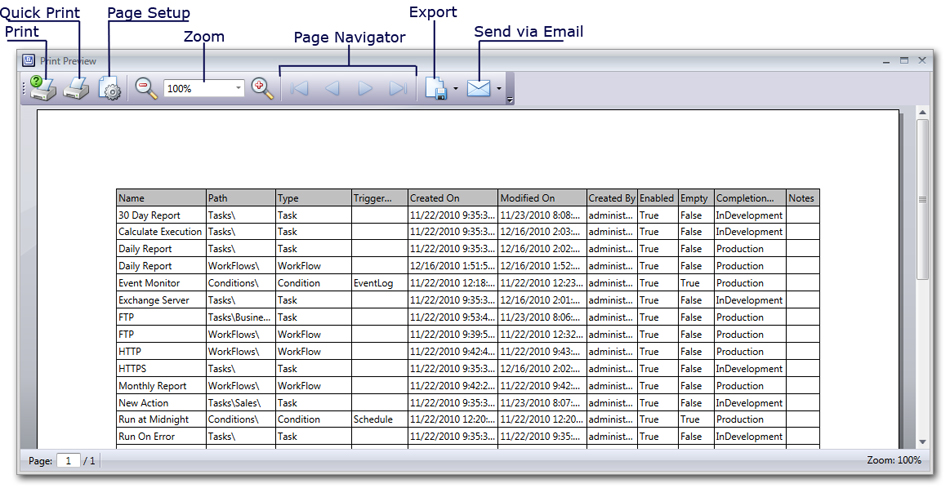
The table below lists the available options that appear when you open the Print Preview window.
|
Item |
Description |
|---|---|
|
|
Opens a Print dialog in which to select the printer to use to print the report. |
|
Quick Print |
Sends the report to the default printer. Selecting this option does not open a Print dialog, rather, the report will be printed immediately by the default printer. |
|
Page Setup |
Opens a Page Setup dialog in which to setup the page(s) to be printed/exported. |
|
Zoom |
Zooms the current view in or out. |
|
Page Navigator |
Navigates the available pages. |
|
Export |
Exports the report into the following file format:
|
|
Send via Email |
Sends the report via email in the format specified. The available formats are the same as above. |