Controlling Access by IP Address
By default, all IP addresses are granted access to DMZ Gateway. You can grant access to only one specific IP address or a range of IP addresses, or deny access to one specific address or a range of addresses. You can define up to 100 IP address masks.
To grant/deny access by IP Address
-
In the Profile tree, click the default Profile or create a new profile.
-
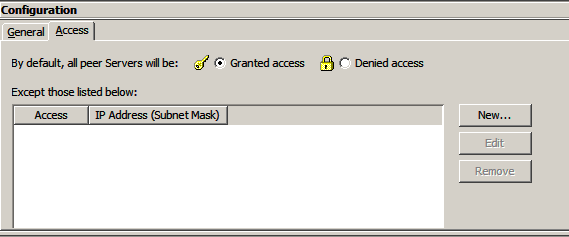
In the Configuration pane, click the Access tab. The exception list appears.
-
The Access tab displays the IP addresses that are granted or denied access. By default, all IP addresses are granted access, and no exceptions are displayed in the list.
-
To configure exceptions, click Granted access or Denied access.
-
If most IP addresses are allowed access, click Granted access, then add the exceptions (IP addresses that are not allowed access).
-
If most IP addresses are denied access, click Denied access, then add the exceptions (IP addresses that are allowed access).
-
Click Add. The New IP Access Exception Entry dialog box appears.
-
Specify the IP address or range of IP addresses to which you are denying or granting access. You can use wildcards to select ranges of IP addresses.
-
Click OK. The IP address/mask appears in the exceptions list.
-
Click Apply Changes to save the changes on DMZ Gateway.