Adding, Editing, and Deleting Fields in the Report
VSReport Designer only has one type of field object; the icons in the Toolbox simply set the properties of the field to make it look and act in a certain way.
To add, edit, or delete fields in a report
-
In the Report Designer, click View>Design or click the Design icon
 on the toolbar. The report opens in the design mode.
 -
Use the ToolBox to add fields to your report. Follow the procedures below depending on the fields that you want to add, edit, or delete.
Each icon creates a field and initializes the field's properties as follows:
|
Icon |
Name |
Description |
|---|---|---|
|
|
Label field |
Creates a field that displays static text. |
|
|
Bound field |
Creates a field that is bound to the source recordset. When you click this button, a menu appears and you can select the recordset field. Bound Fields are not limited to displaying raw data from the database. You can edit their Text property and use any VBScript expression. |
|
|
Expression Field |
Creates a calculated field. When you click this button, the code editor dialog will appear so you can enter the VBScript expression whose value you want to display. |
|
|
Check box Field |
Creates a bound field that displays a Boolean value as a check box. By default, the check box displays a regular check mark. You can change it into a radio button or cross mark by changing the value of the field's Checkbox property after it has been created. |
|
|
Unbound Picture field |
Creates a field that displays a static picture, such as a logo. When you click this button, a dialog box will appear to prompt you for a picture file to insert in the report. A copy is made of the picture you select and is placed in the same directory as the report file. You must distribute this file with the application unless you embed the report file in the application. When you embed a report file in your application, any unbound picture files are embedded too. |
|
|
Bound Picture field |
Creates a field that displays a picture (or object) stored in the recordset. When you click this button, a menu appears so you can select a picture field in the source recordset (if there is one; not all recordsets contain this type of field). |
|
|
Line field |
Creates a line. Lines are often used as separators. |
|
|
Rectangle field |
Creates a rectangle. Rectangles are often used to highlight groups of fields or to create tables and grids. |
|
|
Subreport field |
Creates a field that displays another report. When you click this button, a menu appears and you can select other reports that are contained in the same report definition file. |
|
|
Page Break field |
Creates a field that inserts a page break. |
After you click any of these icons, drag the mouse over the report and the cursor will change into a crosshair. Click and drag to define a space that the new field will occupy, and then release the button to create the new field. If you change your mind, press ESC or click the arrow button to cancel the operation.
You can also add fields by copying and pasting existing fields, or by holding down the control key and dragging a field or group of fields to a new position to create a copy.
To draw a line
-
Click Line
 , then drag the
cursor where you want to draw a line.
, then drag the
cursor where you want to draw a line.
To draw a rectangle
-
Click Rectangle
 , then drag
the cursor where you want to draw a rectangle.
, then drag
the cursor where you want to draw a rectangle.
To add or edit text
-
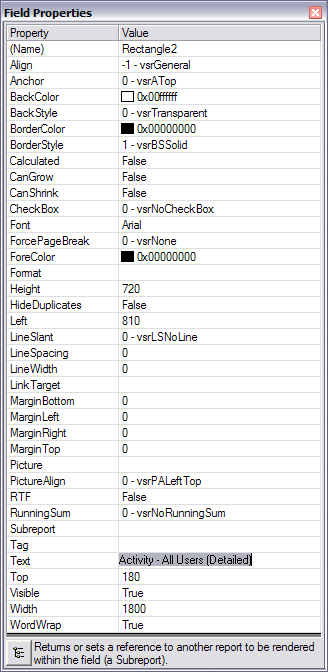
Insert a rectangle, or double-click or right-click an existing rectangle, and then click Properties. The Field Properties dialog box appears.
-
Scroll to Text in the Property column, click the Value column, then type the text; press ENTER.
To add labels
-
Click Label
 , then drag the
pointer to draw a box in the report at the place you want to add a
label. Name the label, then specify its font, color, and other properties.
You can click and drag the label to adjust its placement in the report.
, then drag the
pointer to draw a box in the report at the place you want to add a
label. Name the label, then specify its font, color, and other properties.
You can click and drag the label to adjust its placement in the report.
To add data fields
-
Click Data field
 ,
then draw a box on the report. Change the properties of the data field
by right-clicking it, and then clicking Properties.
,
then draw a box on the report. Change the properties of the data field
by right-clicking it, and then clicking Properties.
To create a VBScript expression
-
Click Calculated field
 on
the toolbar. The VBScript Editor appears.
on
the toolbar. The VBScript Editor appears.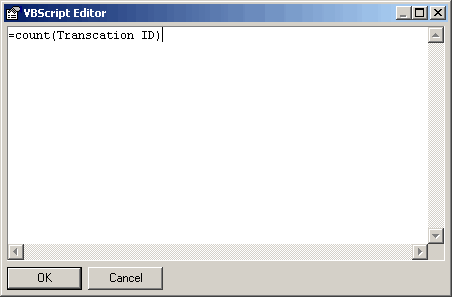
-
Type the VBScript expression. For example, type:
=count (Transaction ID)
-
Click OK.
-
Drag the pointer and place it under the respective field where you want the result to display.
-
Click the Preview icon on the toolbar to view the result.
To insert images
-
Click Picture
 .
The Open dialog box appears.
.
The Open dialog box appears. -
Click an image, and then click Open.
-
Drag the cursor to draw a box where you want the image to appear.
To delete fields
-
Click the field, then press DELETE.