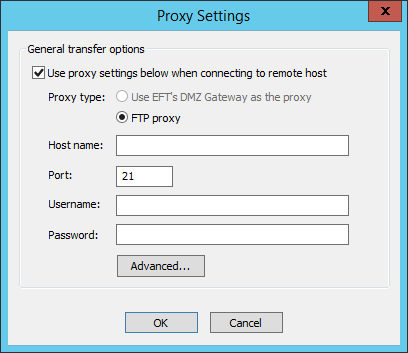
Proxy Settings Dialog Box
If you connect to EFT through a proxy server, you must enable and define the proxy. The Proxy Settings dialog box appears in the Connection Profile, File Offload configuration (Copy/Move Action), File Download configuration (Download Action), and the Invoke Web Service from URL Actions.
-
Using the DMZ Gateway as proxy is available only in EFT Enterprise.
-
Contact your system administrator for the proper host name, port, user name, password, and proxy type, as well as any required advanced authentication methods.
To configure the proxy settings
-
In the profile or action that you are configuring, click Proxy.
-
Select the Use proxy settings check box.
-
Specify the Proxy type.
-
Specify the Host name, Port, Username, and Password used to access the proxy server.
-
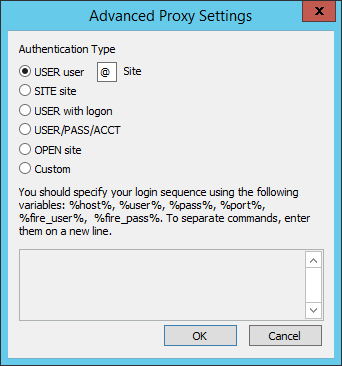
Click Advanced to specify an authentication type or login sequence. You must have selected FTP Proxy in the Proxy Settings dialog box to specify advanced settings.
-
USER user@site if your proxy server requires the USER command followed by your user name and the Site name to allow connection with a remote Site. You can change the @ symbol if a different separator is required by your proxy server.
-
SITE site if your proxy server requires the SITE command followed by the address of the remote FTP site to allow a connection.
-
USER with logon if your proxy server requires the USER command followed by a user name and password to allow connection with a remote Site.
-
USER/PASS/ACCT if your proxy server requires all three commands before allowing a connection to a remote Site.
-
OPEN site if your proxy server requires the OPEN command followed by the Site name before allowing connection to the Site.
-
Custom if your proxy server requires a login sequence different from those above. Refer to the procedure below for details of creating a custom authentication method (login sequence).
-
In the Advanced Proxy Settings dialog box, click Custom, then specify the login sequence in the text box using the following variables: %host%, % user%, %pass%, %port%, %fire_pass%, %fire_user%. Be sure to type each variable with percent signs before and after, and press ENTER to separate commands.
-
Type any other commands and variables, separating commands with a line break (press ENTER).
-
Click OK to accept the changes and close the Advanced Proxy Settings dialog box.
-
Click OK to accept the changes and close the Advanced Proxy Settings dialog box.
-
Click OK to accept the changes and close the Proxy Settings dialog box.


Specify one of the following Authentication Types:
To create a custom authentication method for a proxy server