Sending Files with the Outlook Add-In
If you have ever sent an email with attachments, you already know how to use the Outlook Add-in. Create the email, attach one or more files to the email, then click Send. You will continue to send and receive emails as always; the only difference is that the Outlook Add-in works transparently in the background to transfer the emails that have attachments.
-
The sent email is still saved to your Sent Items folder, but the attachments, if managed by the Outlook Add-in, are not saved in the Sent Items folder. Instead, a link to the attachments is added to the body of the email. The email saved to your Sent Items folder looks the same as the recipient's received email, minus the attachments.
-
The attachment and message, if managed by the Outlook Add-in, is saved on EFT in the location specified during installation, in a unique folder for each email, not on your SMTP server (such as Microsoft Exchange).
-
The Outlook Add-in stores information about emails that it is processing in an individual workspace.
-
The administrator configures message-sending options on EFT. You can configure more strict options in Outlook for all messages or for specific messages. Refer to Configuring Message Options for details.
Sending the email can fail in the following situations:
-
Offline mode—Messages are stored in the outbox until Outlook is online and the Add-In connects to the server.
-
Loss of connectivity to the server—Interrupted uploads due to loss of connectivity to the server are continued from the point at which they were stopped when connection to the server is re-established.
-
Insufficient disk space—The Add-In will receive a FileSystemError response from the server and the Add-In will treat this as an unrecoverable error.
-
RTF-formatted emails—RTF-formatted messages are not supported. To change the format for all messages sent in Outlook, refer to Changing the Message Format.
To send a file
-
Create an email as usual.
-
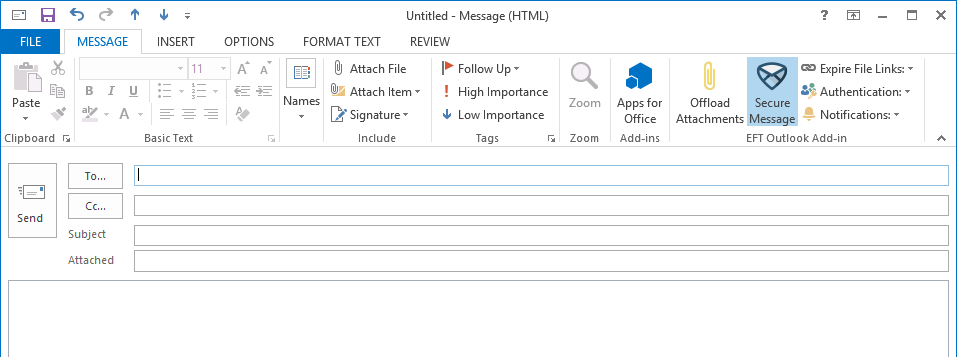
Attach the file to the email using the EFT Outlook Add-in Offload Attachments button.

-
(Optional) Click one or more of the following options:
-
Secure Message—To send the email and its attachments as a secure message, click Secure Message. The attachment(s) and message body will be available to the recipient(s), through a secure Pick-Up portal. A unique message containing a unique link is created for each recipient.
-
Expire File Links—When selected, the ability to download the attachments will expire in the time that you specify. If the recipient attempts to download a file that is past its expiration date, the following message appears: “The file you are attempting to download has expired. Please contact the sender if this file needs to be resent.”
-
Authentications—Require the user to log in to download an attachment from the Pick-up portal. Selecting this check box helps prevent unwanted downloads from email forwarding and such, and also helps guarantee that the person downloading the file is the intended recipient.
-
-
If the user clicks on an individual file link, the login or account creation page will be displayed in their default browser. After authentication is successful, the "open/save" dialog appears.
-
If the user clicks on the Pick-up portal link, the login or account creation page will be displayed in their default browser. After authentication is successful, they will be taken to the Pick-up page for that specific package.
-
When the check box is selected, only the Pick-Up page link is sent. If the check box is not selected, individual links for each file are included in the email.
The authentication will be saved in their session, so clicking multiple individual file links will not require multiple log-ins. (The session length is 10 minutes.)
-
-
Notifications—When selected, download notification is sent to you when the recipient clicks the download link in the email or Download Files on the Pick-Up page.
-
-
Click Send. The email the recipient will receive a delivery notification.
-
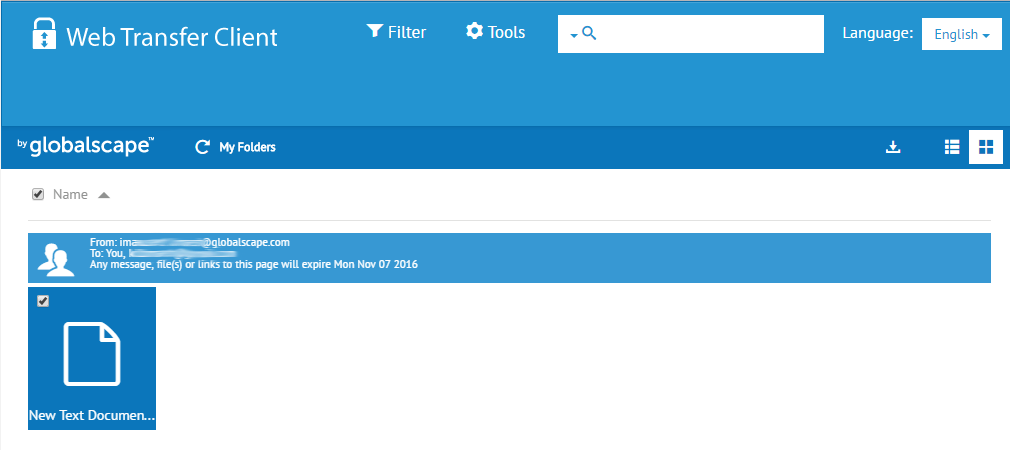
The recipient can download the attachment "package" from the Web Transfer Client.

-
If the attachment does not appear, the recipient might need to click the refresh icon. Select the check box next to the file, then click the Download icon. The file is saved to the recipient's browser downloads folder.