Customizing WTC in EFT v7.4.13 and Later
In EFT v7.4.13 and later, Guest
User registration in the Web Transfer Client has been updated to provide
a simpler registration process. You can change the "atom" graphic
on the registration page to your company logo, and change the colors around
the username and password boxes to fit your company style guide. If you
are familiar with editing JavaScript, you can customize other things.
Each of the JavaScript files are saved in:
C:\Program Files (x86)\Globalscape\EFT
Server Enterprise\web\public\EFTClient\
Please make a backup copy of any files that you plan to edit, in case you have to back out your edits.
Do not attempt to make changes to the JS or PS files unless you are well versed in doing so. If you need help, you can engage Globalscape Professional Services to make customizations.
To change the logo
-
Create or copy your logo to the EFT computer.
-
In C:\Program Files (x86)\Globalscape\EFT Server Enterprise\web\public\EFTClient\shadowfax\reg\assets\images, rename wtc-atom.png to wtc-atom-OLD.png.
-
Paste your new logo into the same folder, then rename the new logo to wtc-atom.png.
-
Open (or restart) the browser page to update it. If the logo does not update, you may need to clear the browser cache.
To change the Password and Confirm Password box colors
By default, the Password and Confirm Password boxes are blue, and then change to red if there is an error (e.g., the email that was typed is not in the correct format). To change those colors, you must edit the theme.json file and then run the PowerShell script, customize-theme.ps1, in C:\Program Files (x86)\Globalscape\EFT Server Enterprise\web\public\EFTClient\shadowfax\reg\assets\customization.
-
Edit theme.json in a text editor such as Notepad or WordPad.
-
Open Windows PowerShell ISE (click Start, then Search to find it).
-
In PowerShell, open customize-theme.ps1, then click the Run icon.
-
Go to your WTC address (e.g., https:\\mywtc), then click Forgot Password to open the forgot-username window. The text-entry boxes should be displayed in your new colors.
Language and Browser Settings
The registration page will attempt to detect the user's language stored in the browser's settings, if a supported language (Spanish, French, Dutch, and German) is detected. If the language is not detected, the page will default to English. Or, on the registration page, you can click the English drop-down to choose other supported languages.
For example, in Google Chrome:
-
Go to Settings > Advanced Settings > Languages.
-
Click Language. The Language box expands.
-
Click Add languages, select the check box of one or more languages that you want to use, then click Add. (Note: Unless you use Google Sync, you will need to do this on each computer that you use.)
-
If you are using more than one language, you can specify which language is the default by moving it to the top of the list. Click the three dots to the right of the preferred language, and then click Move to the top.
-
Click other settings as desired. Your changes are saved automatically.
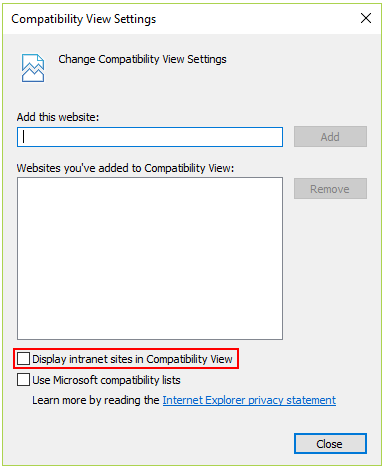
In Internet Explorer, you must disable Compatibility View (clear the check box). All other browsers display correctly.
-
In Internet Explorer, click Menu > Tools > Compatibility View. (If the File Menu is not displayed, press the ALT key.)