Rebranding (Customizing) the Web Transfer Client
Before you make any changes to the Web Transfer Client (WTC) files, make a backup copy of any files and images that you plan to edit. Deleting or incorrectly editing the WTC files can render the client unusable. When you upgrade to a new version of EFT, copy the *changes* to the new files; do not overwrite the new files with your custom files as numerous updates will have been made. Copy and then edit the files only in the custom folder as described in the procedure below.
When upgrading EFT, the \web\custom\ and \web\public\ folders are backed up and renamed with the date and time (e.g., \customBackup_9-28-2010_16-18\ and \publicBackup_9-28-2010_16-18\). The new versions of the files may have some updated content, so rather than overwriting the new files with your old files, you should manually copy your customizations to the new files after upgrading.
If you have upgraded EFT, please review the "To customize the themes style sheet" steps below, as the process may have changed since you last upgraded.
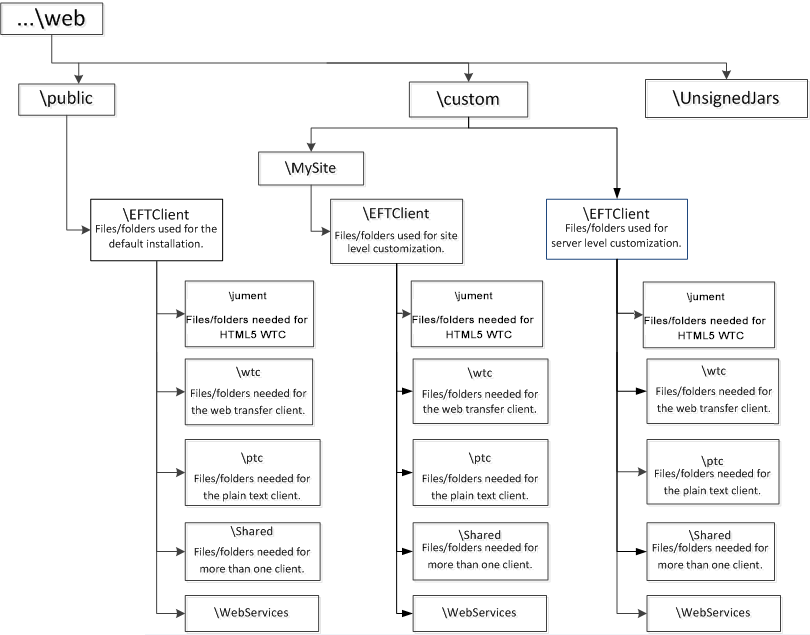
EFT provides for custom branding of the per-Site and per-Server login page, WTC interface, Plain-Text Client (PTC), Account Management interface, and AS2 Management interface. Save the edited files in the \custom\ directory for the Site and\or Server. Each file is searched for independently, so you could have some files branded on the Server (under \custom\EFTClient\), others branded on the Site (under \custom\MySite\EFTClient\), and the rest left as they were originally installed (under \public\EFTClient\).
EFT first looks in the Site's custom (branded) directory \web\custom\MySite\EFTClient and loads any branded files. For files that are not present in the Site's \custom\ directory, EFT checks the Server's \custom\ directory, \web\custom\EFTClient\, and then loads the files that it finds there. Finally, for any other files, it will load the default files from \web\public\EFTClient\. Branded files that are Site-specific override any Server-wide branded and default files, while branded files that are Server-wide override the default (Globalscape-branded) files provided by the installer.
Upon initial installation, this \custom\ directory is empty. You must create the directory structure for any Server (\custom\EFTClient\) or Site (\custom\MySite\EFTClient\) branded files. If you have multiple Sites, each Site can have different branding (e.g., one can be in English and one in French).
-
The best practice is to have only customized files in the \custom\ folder and to leave the default files unmodified in the \web\public\EFTClient folder.
-
The Site folder \web\custom\[SiteName]\EFTClient\ should hold just those files that contain customizations for that Site.
-
The Server folder \web\custom\EFTClient\ should hold just those files that contain customizations for the Server.
-
The Server-branded files will apply to all Sites defined on the Server, but any Site-branded files will override the Server-branded files.
-
It is not necessary to restart the Site or Server to see your changes, but you will have to refresh or close and reopen your browser.
Below is an illustration of the folder hierarchy:
To customize the themes style sheet
The theme_override.css file in C:\Program Files (x86)\Globalscape\EFT Server Enterprise\web\public\EFTClient\jument\styles\defaults\styles is an older, minified version of the themes style sheet and contains no line breaks, which causes a challenge for editing. A non-minified version of this file is saved in C:\Program Files (x86)\Globalscape\EFT Server Enterprise\web\public\EFTClient\jument\styles\, which you can edit and then copy over the other one.
-
In C:\Program Files (x86)\Globalscape\EFT Server Enterprise\web\public\EFTClient\jument\styles\, right-click theme_override.css, and save it as a copy.
-
Open the file in a text editor that can recognize LF line endings, such as Notepad++ or Wordpad. (A basic text-editing program like Notepad will not show the line feeds.)
-
Make your edits, then save the file with the original file name.
-
Copy and save the file in C:\Program Files (x86)\Globalscape\EFT Server Enterprise\web\public\EFTClient\jument\styles\defaults\styles, overwriting the existing file.
To customize files at the Site level
-
Create a directory structure in the form [SiteName]\EFTClient\ in the \custom\ folder.
-
It is not necessary to copy all of the default files from public to custom. Copy the default files that you want to edit (rebrand) into the \custom\SiteName\EFTClient folder that you created.
-
Edit the copy of the file and save it in the \custom\SiteName\EFTClient\ folder.
When upgrading, the \custom\ and \public\ folders are backed up and renamed with the date and time (e.g., \customBackup_9-28-2010_16-18\ and \publicBackup_9-28-2010_16-18\).
-
If you lack the resources to edit CSS and HTML pages yourself, Globalscape's Professional Services group can create custom web pages for you.
-
For information about HTML and CSS files, refer to the MSDN reference at http://msdn.microsoft.com/en-us/library/aa155133.aspx.
To customize files at the server level
-
In the \web\custom\ folder, create a folder named EFTClient.
-
Copy only the default files that you want to edit (rebrand) for the server into the \web\custom\EFTClient\ folder that you created. (It is not necessary to copy all of the default files.)
-
Make all customizations in the \custom\EFTClient\ folder following the instructions below or contact Globalscape Professional Services to request detailed customization services.
Customizing the WTC
You can customize the look and feel of the Web Transfer Client (HTML5 version) to suit your organization. The style sheets (CSS files) and index.html file are available in the installation folder (e.g., C:\Program Files (x86)\Globalscape\EFT Server Enterprise\web\public\EFTClient\jument\). The index.html file contains the links to the CSS files.
To alter CSS files (styles)
-
Navigate to \web\custom\EFTClient\jument\styles\defaults\styles. The CSS files are located in \styles\defaults\styles\.
-
vendor.css – the default css from bootstrap and fancytree libraries (You should never have to remove the vendor.css reference from index.html)
-
themes.css – the "override" files of these vendor defaults
-
main.css – most of the CSS
-
-
Modify styling.
-
Copy all contents of the defaults folder from \web\custom\EFTClient\jument\styles\ to \web\custom\EFTClient\jument\
-
If dialogs appear asking if you want to merge folders or replace existing files click Replace or Yes.
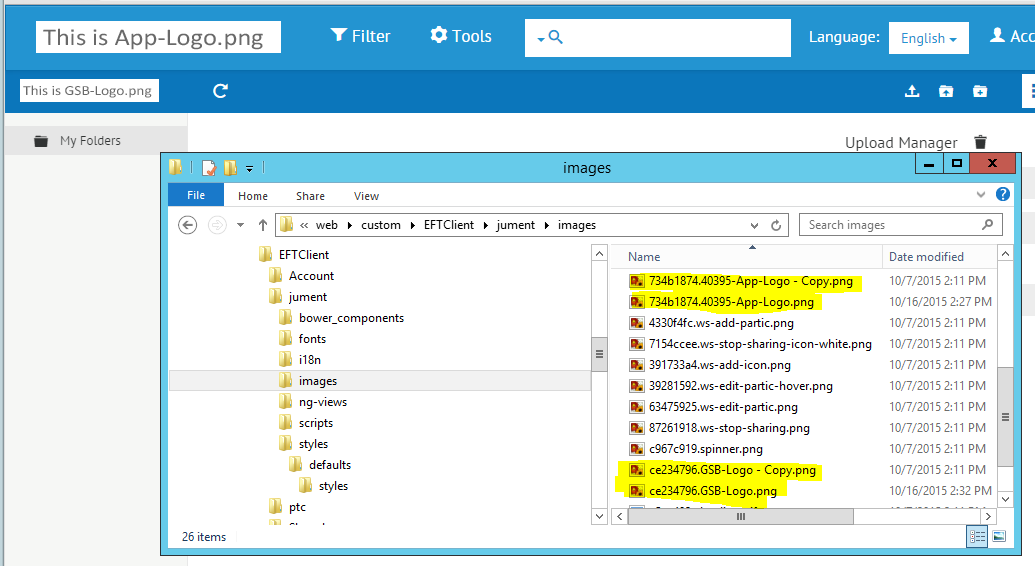
To replace the Globalscape logo with your logo
-
Copy the *.GSB-Logo.png (there are numbers in place of the asterisk) from the public directory to the corresponding custom directory.
-
Create your logo, sized 150 px by 30 px, and save it with the same name as the default logo.
-
Replace \web\custom\EFTClient\jument\images\*.GSB-logo.png with your logo.
-
Close and then reopen the browser to load the changes.
To replace the Web Transfer Client logo with your logo
-
Copy the *-App-Logo.png (there are numbers in place of the asterisk) from the public directory to the corresponding custom directory.
-
Create your logo, sized 245 px by 32 px, and save it with the same name as the default logo.
-
Replace \web\custom\EFTClient\jument\images\*-App-Logo.png with your logo.
-
Close and then reopen the browser to load the changes.
To replace the logo on the login page
-
Create your logo, sized 400 px by 120 px, and save it with the same name as the default logo.
-
Replace \web\public\EFTClient\Shared\images\gs-logo-lg.png with your logo. Maintain the same file name.
-
Close and then reopen the browser to load the changes.
To replace the English text with another language
NOTE: Subsequent versions are expected to allow for multiple languages. Meanwhile, in the Google Chrome browser, if your browser is set for a language other than English, Chrome will ask if you want to translate the page into your default language.
-
In ..\web\custom\EFTClient\jument\il8n\, open main_en.json in a text editor to change the English text in the interface to the language that you want displayed. Save a copy of the file before making any changes.
-
In ..\web\custom\EFTClient\Account\, open the HTML files in a text editor to change the English text in messages to the language that you want displayed. Be careful to not change any tags in the file. Save a copy of the file before making any changes.
-
Close and then reopen the browser to load the changes.