Configuring a Site for SAML (Web SSO) Authentication
To enable SAML (Web SSO) authentication (Requires AAMM)
-
In the administration interface, connect to EFT and click the Server tab.
-
On the Server tab, click the Site you want to configure.
-
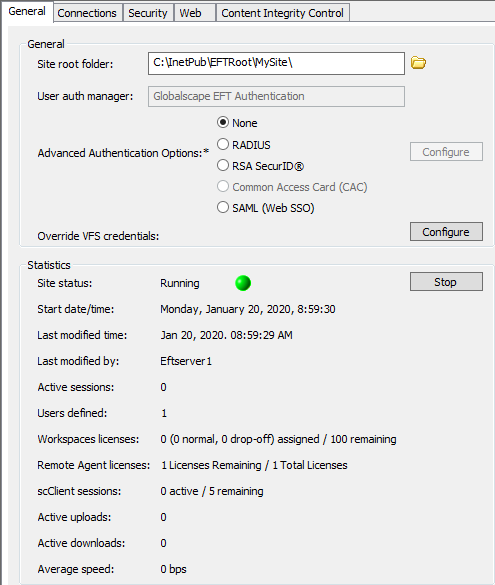
In the right pane, click the General tab.
-
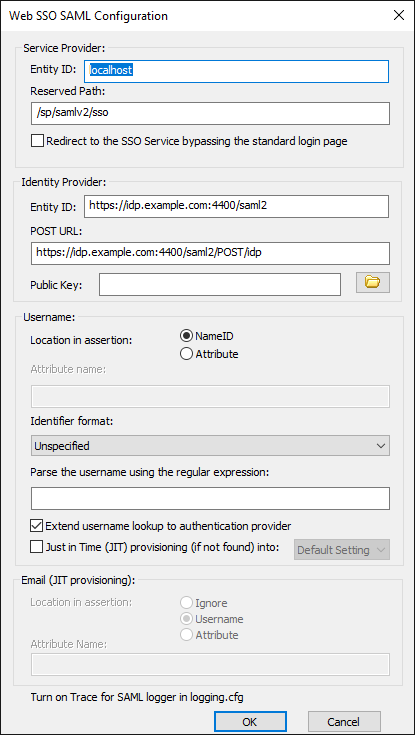
Click SAML (WebSSO), click Configure, then provide the details needed to configure SAML.
- Service Provider:
- Entity ID - The default is the host name value specified for the EFT Site being configured, e.g., MySite. Any string value can be provided, up 255 characters, including UTF-8 encoded characters.
- Reserved Path - The base address followed by the SSO path, e.g., [hostaddress]/sp/samlv2/sso. (Leaving the box blank or as root path ("/") is not allowed. You will receive an error message and configuration will not be saved. Upon upgrading to 8.0.4 or later, the Reserved path will be changed to https:///sp/samlv2/sso and the Automatically redirect to the SSO IDP check box will be selected.)
- Redirect to the SSO service, bypassing the standard login page - When selected, EFT will redirect to the SAML IdP from the WTC login page.
-
Identity Provider:
-
Entity ID - The Identity Provider's host name
-
POST URL - The Identity Provider's POST URL or endpoint that EFT should bind to.
-
Public Key - Certificate path to be used for verifying the server's identity
-
Username:
-
Location in assertion - Specify whether the username is stored as NameID or Attribute.
-
Attribute name - If Attribute is specified for location, provide the Attribute name.
-
Identifier format - Select the list box and click the format identifier from the list:
-
Parse the username using the regular expression - Use wildcards to parse the username. For example, to take everything to the left of the @ sign in an email address (typically the username), type or paste the following regular expression into this box: ^(.*)@.* (Refer to https://regex101.com for a Regular Expression quick reference and testing tools.)
-
Extend username lookup to authentication provider - Specifies that EFT should perform lookup of recipients in both EFT and LDAP. (Query LDAP in addition to users in EFT.) The check box is selected by default for new installations.
-
To enable Just in Time (JIT) provisioning of users, select the check box, then specify whether users are to be created in the Default Settings Template or the Guest Users Settings Template. If enabled, EFT will auto-provision (create) authenticated users in the Globalscape authentication database if they are not already present on that Site. Workspaces must be enabled for the Guest Users template to show under JIT provisioning.
-
Under Email (JIT provisioning) specify the location of the email in the assertion:
-
Ignore the email from the assertion provided by the IdP
-
Reuse the username
-
Look up a specific attribute.
-
Click OK. Turn on "Trace" for SAMLSSO logger in logging.cfg.


If the Automatically redirect to the SSO IDP check box is selected, it may result in redirect failures under certain conditions and with certain browsers, which can only be overcome by setting the "HTTPCookieSameSitePolicy" Advanced Property to "Lax".
The LDAP User attribute must match the Identifier attribute selected in the Web SSO SAML Configuration dialog box.
EFT will not update the email field if it is already populated or is null, other than upon initial provisioning of the user account.