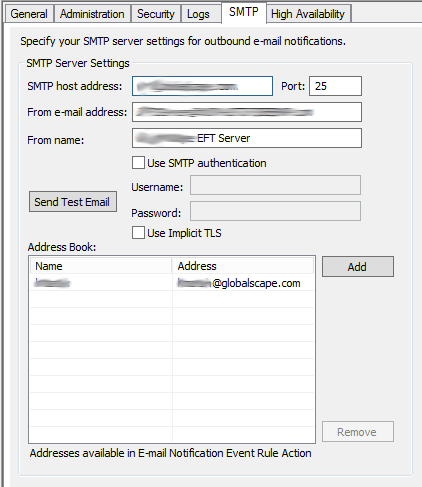
SMTP Server Settings
The SMTP Server Settings on EFT's SMTP tab are completed automatically when you define them in the Server Setup Wizard during installation. You must configure the SMTP server settings for the Server to send email notifications when Events occur, including the address for the outgoing mail server, an address for the administrator, and other details described below. SMTP does not support Unicode characters. Refer to Unicode Exceptions for details.
The SMTP server settings in EFT should be propagated to the Advanced Workflow Engine for use in Email actions. If you want to change or verify these settings in the AWE module, refer to Knowledgebase article at https://kb.globalscape.com/KnowledgebaseArticle11423.aspx
To configure EFT to send email notifications
-
Click the Server tab in the administration interface and select the Server that you want to configure.
-
In the right pane, click the SMTP tab.
-
In the SMTP host address box, specify the address of the mail server EFT will use to send outgoing messages. (If you have any trailing spaces in the host address, the address will not resolve. Be sure if you are copying/pasting an address into the dialog box that you are not including any spaces.)
-
In the Port box, specify the port number at which the mail server accepts messages. The standard is 25.
-
In the From email address box, type the "From" email address that will appear in email notifications sent from EFT. An error message appears if the email address is not properly formatted.
-
In the From name box, type the "From" name that will appear in email notifications sent by EFT. "EFT" appears by default.
-
Do one of the following:
-
If EFT can connect to the mail server without a login, clear the Use SMTP authentication check box.
-
If the mail server requires a user name and password, select the Use SMTP authentication check box, then provide the Username and Password needed to connect to the mail server.
-
In the Address Book area, click Add to add names and email addresses of recipients of EFT Event notifications. Add only the addresses that you want to receive email notifications. The email addresses will be added automatically to the To box in the Send notification email Action in Event Rules.
-
To edit a name or address, click once to select the box, and then click again to activate the box.
-
To verify your SMTP configuration:
-
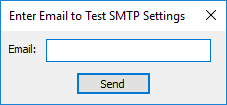
Click Send Test Email.
-
The Enter Email dialog box appears.
-
Enter an email address to send to, then click Send.
-
A confirmation message appears. Click OK to dismiss the message.
-
Select the Use Implicit TLS check box, if required by your SMTP server.
-
Certain SMTP servers, such as Gmail's SMTP server, have additional security options that, when enabled, could cause EFT's email to not work. In this particular case, they have a setting that, if enabled, locks down the service to accept oAuth authentication only, which our SMTP service (as a client) does not support. Enabling that option in Gmail will cause incompatibility with EFT. If Gmail is configured to use 2-step authentication, you cannot disable the oAuth option.
-
As explained in https://support.google.com/accounts/answer/6010255, if you receive a "password incorrect" error, use Option 2 to enable "Access for less secure apps." (Disabling the oAuth option will still allow for SSL and thus secure SMTP communications, so there is no real harm in turning it off.)
-
Click Apply to save the settings on EFT.
The Send Test Email button sends the email synchronously/directly. This differs from the Send notification email Action in Event Rules which puts the message into a send queue unless "Stop processing this rule" is enabled for a failed Action.
If you receive the test email, the SMTP configuration is correct.
Related Topics