Remote Agent Templates
In EFT, a Remote Agent template stores configuration and rules that can be shared by many Agents, and an installer script is generated for each Remote Agent template. Therefore, if one or more remote offices have one set of needs, and another set of remote offices has different needs, a separate remote agent template will distinguish between both sets of offices, allowing you to control each group separately.
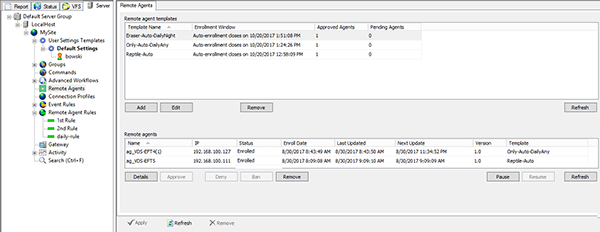
In addition to creating templates on this tab, you can monitor when Remote Agents have requested enrollment, are approved, denied, awaiting approval, or decommissioned, and information about the Remote Agents such as IP address, status, enrollment date, and dates when it was updated. The tab also provides options to deny, ban, or remove the agent, and pause and resume remote Agent rules.
Before creating your first Remote Agent Template, you should define a Remote Agent Event Rule. If you haven't created any Remote Agent Event Rules, you can still create the template, but then you'll have to edit the template after you create the Event Rule to add the Event Rule to the template.
Ensure that HTTPS is allowed on the port specified and that it is not being blocked by the Windows firewall at either end of the connection.
To create a new Remote Agent template
-
In the administration interface, connect to EFT and click the Server tab.
-
On the Server tab, expand the Site node, then click Remote Agents.
-
On the Remote Agents tab, click Add. The Remote Agent Template dialog box appears.
-
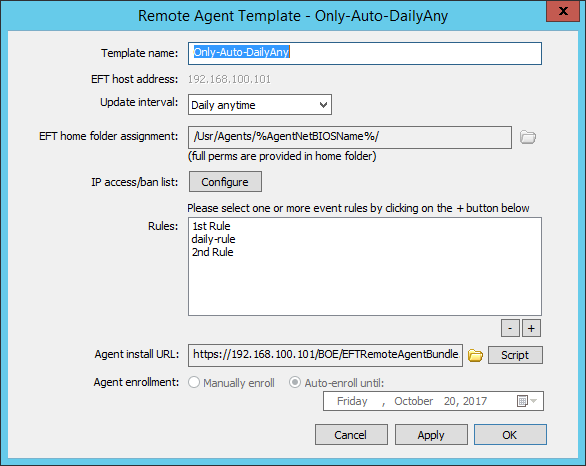
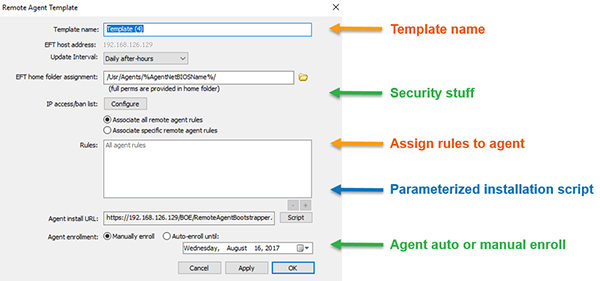
Template name - The default name is Template with a number after it (which is incremented for duplicate names). If you expect to have only one template, the default name is probably fine. However, if you anticipate having more than one, you should give the templates descriptive names, such as "Western Region," "Los Angeles office," or "District 7." (Up to 130 characters.)
-
EFT host address - Not editable in this dialog box
-
EFT server certificate - Not editable in this dialog box
-
Remote agent cert - Click Configure to create or choose an SSL certificate pair for administrator connections. Enrolled agents always verify validity, expiration, etc. of the server certificate provided against its local copy of the server's certificate that was assigned to the agent at enrollment. The Remote Agent fails the authentication attempt if the certificates don't match.
-
Update interval - Specify when to contact EFT to check for and download updates. (Hourly, Daily anytime, Daily after-hours, Weekly, Weekly on weekends, Monthly)
-
EFT home folder assignment- Agent's home folder in EFT
-
IP access/ban list - Opens the IP Access Rules dialog box to view, add, edit, or remove IP addresses that are denied or allowed access to the Site.
-
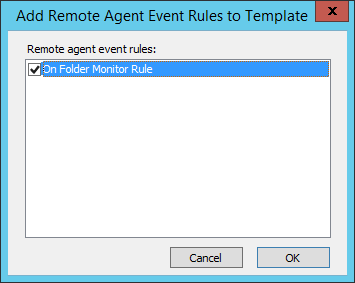
Rules - Click the PLUS SIGN to add Event Rules to this template. The Add Remote Agent Event Rules to Template dialog box appears. [Disabled rules will show as (Disabled)]
-
Click a Remote Agent Event Rule, then click OK.
-
Agent install URL - The default path to install the EFTRemoteAgentBundle.exe appears in the box. By default, the script reads:
-
Agent enrollment - Specify whether Remote Agents are manually or automatically enrolled:
-
Auto enrollment - If the Agent tries to install outside of the auto-enrollment windows the Agent will disable. A new template will have to be created and the Agent will have new template parameters. If Auto-enroll is chosen, the default expiration is 2 weeks from creation date.
-
Manual enrollment - If the Agent is approved on the EFT side but the Agent doesn’t answer for 6 days due to network connection, turned off, etc., the service stops but stays enabled so that the next time the machine has connectivity it can enroll. ("Enrollment failure" appears in the Status column.)
-
Click OK to save the template. The template appears in the Remote Agents tab.
-
Template name - Displays the name of the Remote Agent template
-
Enrollment Window - For automatic enrollment, this column indicates when the enrollment opportunity expires. Otherwise, it displays Manual enrollment.
-
Approved Agents - Displays the number of Remote Agents that are using this template.
-
Pending Agents - Displays the number of Remote Agents that have requested enrollment.
-
Name - Remote agent name
-
IP - Remote agent IP address
-
Status - Enrolled, awaiting enrollment, decommissioning
-
Enrolled date - Date/time when Remote agent was enrolled
-
Last updated - Date/time of last Remote agent update
-
Next update - Date/time when agent is scheduled to check for updates
-
RAM version number - Version of RAM
-
Template name - Name given when you defined the template
EFTRemoteAgentBundle.exe /i acceptEula="yes" host="localhost" port=443 tid="5d93bdfb-40a6-4f7e-b5da-8a67ac0d53f7"
Click Script to view the details. You should edit this to change the host and port number if you're not using "localhost" and port 443. (Port can be changed on the Site > Connections tab)
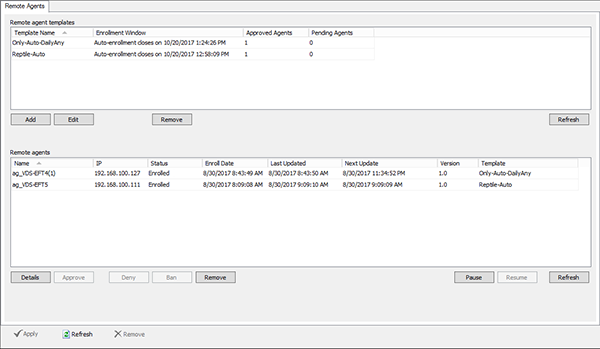
On the Remote agents tab, the following details are displayed:
Managing templates:
-
Add - Click to create a new template
-
Edit - Opens the Remote Agent Template dialog box so you can make changes. You cannot edit the following settings: host address, home folder assignment, and Agent enrollment period, (because doing so would cause the Remote Agent to fail).
-
Remove - Deletes a selected template.
-
Refresh - (top pane) Refreshes the list of approved and pending agents.
Managing agents:
-
Approve - Enables a Remote Agent that has requested enrollment
-
Ban - Prevents the Remote Agent from requesting access
-
Deny - Denies an enrollment or updates request
-
Details - Refer to Managing Remote Agents.
-
Pause - Pauses the Remote Agent Event Rules. The Remote Agent will still check for periodic updates on its defined update schedule.
-
Refresh (bottom pane) - Refresh the list of agents to see updated status
-
Remove - (bottom pane) Deletes the selected Remote Agent. Also know as decommissioning.
-
Resume - Resumes the Remote Agent Event Rules to run at the next update interval.
Refer to Managing Remote Agents for details of managing Remote Agents.