Creating SSL Certificates
A self-signed certificate contains a public key, information about the owner of the certificate, and the owner's signature. It has an associated private key, but it does not verify the origin of the certificate through a third-party certificate authority.
To achieve the highest level of authentication between critical software components, do not use self-signed certificates, or use them selectively.
A certificate on the client must be associated with EFT to initiate an SSL connection. When you are administering EFT on the local computer, you can import your own certificates or create new ones using the Certificate Creation Wizard (described below).
EFT does not support SSL Certificate Private Keys without passphrases.
Three types of files are associated with an SSL certificate key pair:
-
Private key file - The private key should never be distributed to anyone. It is used to decrypt the session, which is encrypted by the public key. Available formats include:
-
PEM (ASCII) encoded - *.key
-
PKCS#12 (PFX combined) - *.pfx
-
DER (binary private key) - *.der
-
Certificate file - This is a signed certificate, whether self-signed or signed by an intermediate certificate authority. Available formats include:
-
PEM (ASCII) encoded - *.crt
-
PKCS#7 (P7B public key) - *.p7b
-
DER (binary public key) - *.cer
-
Certificate signing request file (.csr) - Each time you create a certificate using EFT, a Certificate Signing Request file is also created. A Certificate Signing Request (CSR) is an unsigned copy of your certificate. This file can be signed by EFT's Certificate Signing Utility or sent to an intermediate certificate authority, such as GeoTrust, for signing.
For maximum compliance with security standards, you should use a trusted authority signed SSL certificate. You can import certificates or use this wizard to create your own. The private key (.key) and certificate request (.csr) files are created at the same time. You are prohibited from creating certificates for EFT while remotely administering EFT because this Action can create a security breach. Any certificates you create remain on the computer on which you create them, unless you take special steps to deliver and associate these files with another computer.
The Certificate Creation Wizard does not create SHA-2 certificates; however, EFT can apply a SHA-2 certificate generated through other means, like certificate authorities and third party applications.
The current build of EFT does not provide a mechanism to "decrypt" the file created with the signing process.
The current build of EFT does not provide "Browse" objects for the TEXT boxes.
To create an SSL certificate
-
In the administration interface, connect to EFT, click the Server tab, then do one of the following:
-
On the main menu, click Tools > Create SSL Certificate.
-
On the toolbar, click the New SSL Certificate icon
 .
. -
On the keyboard, press ALT+T+C.
-
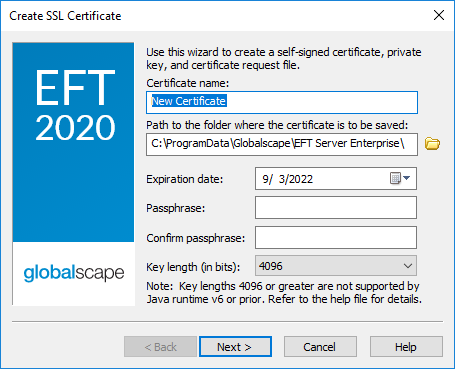
In the Certificate name box, specify the name (up to 256 characters) of the certificate that will be generated.
-
In the Path box, specify the path to the folder in which the certificate is to be saved. The wizard saves each of the files in this folder.
-
In the Expiration Date box, specify the date on which the certificate will expire.
-
In the Passphrase and Confirm passphrase boxes, type the passphrase used to encrypt the private key. The passphrase can be any combination of characters or spaces. Do not lose the passphrase; the certificate is useless without it.
-
In the Key Length (in bits) box, specify the key length: 512, 1024, 2048, and 4096 bits. Smaller keys are faster, larger keys are more secure.
-
Click Next. The Certificate Information page appears.
-
In the City/Town box, provide the name of your city, town, or other locality.
-
In the State/Province box, provide the name of the state or province.
-
In Organization box, provide the name of your organization, or any other designator.
-
In the Common Name box, provide the common name or fully qualified domain name, such as www.globalscape.com. (Typically, the name or domain name associated with the Site.)
-
In the email box, provide your email address in the format username@domain.com.
-
In the Unit box, type any other information about your organization, such as department name.
-
In the Country box, provide the 2-letter ISO country code using uppercase letters.
-
Click Next. The Certificate Options page appears.
-
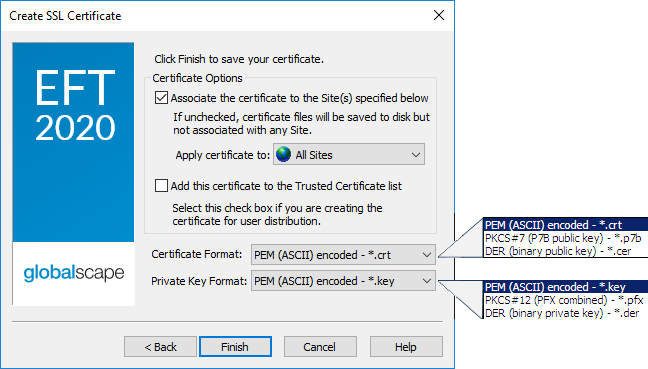
If the Associate the certificate to the Site(s) specified below check box is cleared, the wizard saves only the certificate files in the folder you previously specified, but does not associate it with any Site. If the check box is selected, the wizard associates the certificate to the administration service or Site(s) you specify in the Apply certificate to box.
-
In the Apply certificate to box, specify which components of EFT are affected (administration Service, All Sites, or a specific Site).
-
If the Add this certificate to the Trusted Certificate list check box is selected, the wizard adds the certificate to the Trusted Certificates database. Use this feature if you are creating certificates for user distribution. You can limit EFT access to just the users that have the certificate. You can verify the addition to the Trusted Certificate database by clicking Tools >Certificate Manager or, on the toolbar, click the Certificate Manager icon
 . (Refer to The
Certificate Manager for more information.)
. (Refer to The
Certificate Manager for more information.) -
In the Certificate Format box, specify the format of the certificate file.
-
In the Private Key Format box, specify the format of the key file.
-
Click Finish. The certificate is created and a message box appears. You can select and copy the certificate information, if desired, and then click OK to dismiss the message.
- Refer to Enabling SSL on the Site and Enabling SSL on the Server for instructions for using the SSL certificate.
The Create SSL Certificate wizard appears.
If you are purchasing a signed certificate from a certificate authority (CA), you usually need to forward the contents to the CA. To do this, locate the .csr and open it in a text editor. Then you can copy and paste the contents.
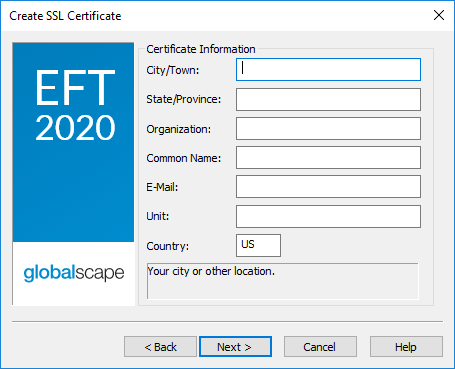
Each of the boxes must be completed before continuing. The information you provide is stored in the certificate.
Associating a new certificate with a Site requires a restart of the Site, and any active users will be disconnected, so it is recommended that you associate certificates when Sites are inactive or stopped.
