Windows Account for the EFT Server Service
After it is installed, EFT has access to local folders and files. To run EFT as a service with permissions to the network and mapped drives, you must create an NT account, assign the EFT server service to the account, and log EFT on as a service. Security policies should allow user accounts to log in locally.
The EFT server service must have full administrative rights to:
-
the folder in which you install EFT
-
the location in which the users' home folders are stored
-
the Windows Registry
With administrative rights, the service can save all of your settings. If the service does not have administrative rights, you will lose settings and user accounts whenever you restart the EFT server service, and you will need to reset permissions on the computer on which the EFT server service is running.
If EFT is running in HA mode and sharing a network resource, you must run the EFT server service with an account that can access that shared network resource.
Refer to Local Security Policy Setting when Using Active Directory Authentication for more information about configuring EFT on an AD network. Consult with your AD network administrator for assistance, if necessary.
After you have installed EFT, created a Windows account for EFT, and assigned permissions to the account, you should edit the service itself so that it will not run as a "System Account" (the default account choice). Running the service as System Account poses the potential hazard of giving users complete access to your system.
Creating a Windows User Account for EFT
To create a user account in Windows
- After you install EFT, open the Computer Management console.
- Expand the Local users and Groups node, right-click Users, then click New User. The New User dialog box appears.
- Create a user account for EFT (for example, EFTUser), clear the User must change password at next logon check box, and then click Create, and then click Close.
- Close the Computer Management console.
- In Administrative Tools, click Local Security Policy. The Local Security Policy dialog box appears.
- Expand the Local Policies node, and then click User Rights Assignment.
- In the right pane, in the Policy column, double-click Act as part of the operating system. The Properties dialog box appears.
-
Click Add user or Group. The Select Users or Groups dialog box appears.
- Select the new user you just added (for example, EFTServer), click Add, then click OK.
-
If necessary, assign permissions for this user account in Windows.
- Assign EFT to the new user account and log EFT on as a service.
Set Windows NT Permissions for EFT
After you have created a new Windows user account for EFT, use Windows' permissions to set the permissions for folders, files, or drives for the account. Permissions should be as restrictive as possible while still allowing EFT enough permission to run.
Using Windows NT’s permissions, set the permissions for files or drives of this user to be as restrictive as possible, while still allowing EFT to run. After carefully determining which files and network folders your users will need to access, gradually increase the permissions.
Make sure that full permissions are granted to the EFT service domain user account for the following locations:
-
Installation folder
-
Application data folder
-
Windows Temp folder
-
Any shared drive paths required by EFT
-
Any output directories that EFT may need to read/write files to
-
The Windows Registry
If you run into permissions issues, run Process Monitor or similar tools and isolate non-success results caused by cftpsai.exe, cftpstes.exe, gsawe.exe, and any other EFT-related processes.
Using NT Authentication, user permissions override EFT's permissions. For example, if EFT has read-only access to folder1, but user John Doe has read and write permission to folder1, John Doe has the same permission when he accesses folder1 through EFT.
Windows NT permissions can be edited through the Security tab in the Properties of a file or folder. On the Security tab, select Permissions to display and edit the permissions for the object. The appearance of this dialog box is slightly different for files and directories, but in both cases, the following permissions can be granted to users or groups:
-
R (Read)
-
W (Write)
-
D (Delete)
-
P (Edit permissions)
-
O (Take ownership)
Keep in mind that you have the option to grant or withhold read and write permissions. Read-only permissions are the most secure, because they allow users to access a file, but not to change it. For example, most users will need limited read access to the Windows folders (C, WinNT); however, most FTP Servers will not need any access to these directories at all.
In addition to the individual permissions, Windows NT permissions also provide access levels that are pre-built sets of the existing permissions. Typically, you assign an access level to a user rather than granting individual permissions. One such access level is called "No Access," which does not contain any permissions.
To view and edit the permissions for a folder or file
-
In Windows File Explorer, right-click the file or folder, then click Properties.
-
On the Security tab, click Permissions. The appearance of this dialog box is slightly different for files and directories and for different versions of Windows (W2K, XP, etc.).
For more information about setting permissions to folders and files, refer to the Windows Help documentation for your specific operating system. (for example, click Start > Help and Support, then search on keyword permission.)
Assigning the Service to a Windows User Account
To assign the service to a Windows user account
-
Click Start > Run, type services.msc, then press ENTER.
- In the Services console, right-click the EFT server service, and then click Properties.
-
Click the Log On tab, then click This account.
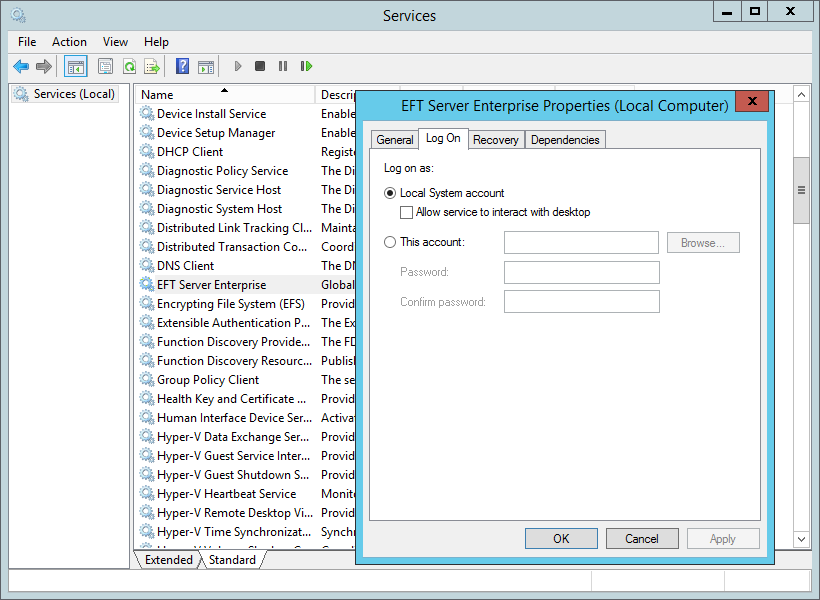
-
Provide the proper credentials, then click OK.
-
Restart the server service.