Configuring Secure PNC
Secure PNC will work using a self-signed certificate created with OpenSSL or one created from EFT. Depending on the certificate used, different configuration steps must be taken, as described below.
There are two ways of authenticating the communication between EFT and DMZ:
-
EFT will only trust that single certificate and DMZ Gateway will require EFT to provide a client certificate during the SSL handshake and it must match the DMZ Gateway server's certificate trust store.
Configuring Secure PNC using a Self-Signed Certificate
To configure Secure PNC using a self-signed certificate
-
Stop the DMZ Gateway Service.
-
On the DMZ Gateway server, open a command prompt and navigate to C:\Program Files\GlobalSCAPE\DMZ Gateway\bin\jre1.8.0_74\bin\.
-
Type the following command to create a self-signed certificate:
keytool -genkeypair -alias test -keyalg RSA -validity
	 365 -keystore keystore.jks
-
Follow the prompts for creating the self-signed certificate.
-
Follow the steps for Non-Mutual Authentication between EFT and DMZ or steps for Mutual Authentication between EFT and DMZ, above.
Configuring Secure PNC using an EFT Certificate
This certificate will be used later for Mutual Authentication with the DMZ Gateway server.
The procedure below requires OpenSSL to convert the public and private EFT keys into a .p12 format and Java's keytool to create a keystore.jks file.
To configure Secure PNC using an EFT-generated certificate
-
Install EFT Server.
-
Launch the EFT administration interface.
-
Create the default Site with SSL enabled
-
Create a new SSL Certificate, making sure the certificate password is at least 6 characters long. (This certificate will not be associated with any EFT Site; this is used instead of creating a certificate using OpenSSL.)
-
Install OpenSSL (use version 1.0.2 or later).
-
Copy the private and public certificates from Step 4 into the bin directory of OpenSSL (this makes it easier), C:\OpenSSL-Win32\bin\
-
Using OpenSSL, run the following (update where necessary):
openssl pkcs12 -export -in [filename-certificate]
	 -inkey [filename-key] -name [host] -out [filename-new-PKCS-12.p12]
(Refer to https://www.wowza.com/docs/how-to-import-an-existing-ssl-certificate-and-private-key for information about how to convert the certificate and private key to PKCS 12 (.p12).)
-
If you see a warning related to "can't open config file," then cancel the entry from Step 7 and run this command instead:
set OPENSSL_CONF=[path-to-OpenSSL-install-dir]\bin\openssl.cfg (i.e. set OPENSSL_CONF=c:\OpenSSL-Win32\bin\openssl.cfg)
-
When prompted for a passphrase, enter the certificate password you used when this certificate was created in EFT.
-
On the DMZ Gateway server, use Windows File Explorer to navigate to the DMZ Gateway installer's /bin/ path, e.g., C:\Program Files\GlobalSCAPE\DMZ Gateway\bin\jre1.8.0_74\bin.
-
Copy the .p12 certificate from Step 7 into the DMZ Gateway installer's /bin/ path in the previous step. (This makes it easier to create the keystore.jks file.)
-
Open Command Prompt to the DMZ Gateway installer's /bin/ path and enter the following command (update where appropriate):
keytool -importkeystore -deststorepass [password]
-destkeystore [filename-new-keystore.jks]
-srckeystore [filename-new-PKCS-12.p12]
-srcstoretype PKCS12
(where [password] is the original password set when the private key was created in Step 4)
You have successfully created a keystore.jks file that can be used to use non-mutual authentication between EFT and DMZ, described below.
Non-Mutual Authentication setup
-
For simplicity, you can copy the keystore.jks file that was created above to a path that is easily accessible (for example, C:\keystore\keystore.jks), because you will have to paste the path in the DMZ Gateway xml configuration file.
-
Open Notepad or another text editor as an administrator.
-
Open the DMZ Gateway configuration file (gwconfig.xml), located in C:\Program Files\GlobalSCAPE\DMZ Gateway.
(If the configuration file does not exist, start or restart the service and the file will be created.)
-
Set the <SecurePNCEnabled> value to "true."
-
Set the <PNCKeyStorePath> to the path where the keystore.jks is located (for example, C:\keystore\keystore.jks)
NOTE: You must enter the proper XML format for these values otherwise the service will not start, e.g., <PNCKeyStorePath>c:\keystore\keystore.jks</PNCKeystorePath> -
Enter the store passphrase; because we imported the certificate into the keystore, this will default to the password created in EFT's certificate creation.
-
Save the XML file.
-
Close the XML file.
-
Start the DMZ Gateway service.
-
Re-open the XML file and verify the passphrase is now encrypted (this will also help confirm DMZ picked up the changes).
NOTE If you are making any changes to the XML file, make sure the DMZ Gateway service has been stopped prior to making the changes.
-
To verify EFT detects that DMZ is configured, launch the EFT administration interface.
-
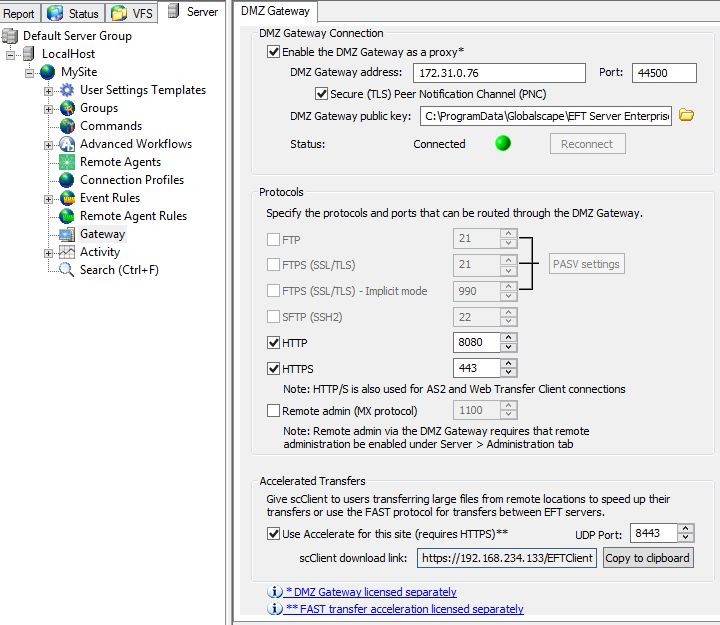
Click the DMZ Gateway tab.
-
Enable DMZ Gateway and provide the IP address of the DMZ Gateway, but do not select the Secure TLS/PNC check box.
-
Click Apply.
-
Verify that the EFT administration interface receives an error message.
-
Click OK on the error message.
-
Select the Secure (TLS) Peer Notification Channel (PNC) check box.
-
Click Apply.
DMZ Gateway and EFT are now configured with PNC SSL+ non-mutual authentication.
-
Copy the EFT SSL Site certificate (certificate associated with the SSL certificate settings) into the DMZ bin directory, e.g., C:\Program Files\GlobalSCAPE\DMZ Gateway\bin\jre1.8.0_74\bin.
-
Stop the DMZ Gateway Service.
-
To import EFT's SSL site certificate into the DMZ's Java truststore, open a command prompt and navigate to C:\Program Files\GlobalSCAPE\DMZ Gateway\bin\jre1.8.0_74\bin.
-
Run the following command:
keytool -import -alias EftClientCert -file "MySite
	 Certificate.crt" -keystore truststore.jks
-
When prompted, enter the password of the keystore (not the password of the EFT site's certificate).
-
When prompted, type yes and press ENTER to trust the certificate.
-
Copy truststore.jks from the C:\Program Files\GlobalSCAPE\DMZ Gateway\bin\jre1.8.0_74\bin and place it in an easily accessible location (for example, C:\keystore\truststore.jks).
-
Open Notepad (or another text editor) as an administrator.
-
In Notepad, open the DMZ Gateway configuration (XML) file: C:\Program Files\GlobalSCAPE\DMZ Gateway\gwconfig.xml
-
Add the PNCTrustStorePath value, e.g., <PNCTrustStorePath>c:\keystore\truststore.jks</PNCTrustStorePath>.
-
Save and close the XML file.
-
To export the truststore certificate, open a command prompt and navigate to C:\Program Files\GlobalSCAPE\DMZ Gateway\bin\jre1.8.0_74\bin.
-
Run the following command:
keytool -export -alias test -keystore keystore.jks
	 -rfc -file DMZGatewayCert.cer
-
If you don't recall the alias that you used, type the following command:
keytool -list -v -keystore keystore.jks
(This will give you the alias of your keystore)
-
When prompted enter the password of the keystore.
-
Copy the newly created certificate to EFT.
-
Log in to the EFT administration interface, and click the DMZ Gateway tab.
-
In the DMZ Gateway public key section, click the folder and navigate to the certificate that was copied to EFT.
-
Click Apply.
Remote administration via the DMZ Gateway requires that remote administration be enabled on the Server > administration tab.
DMZ Gateway and EFT are now configured with Secure PNC with mutual authentication