Managing Event Rules
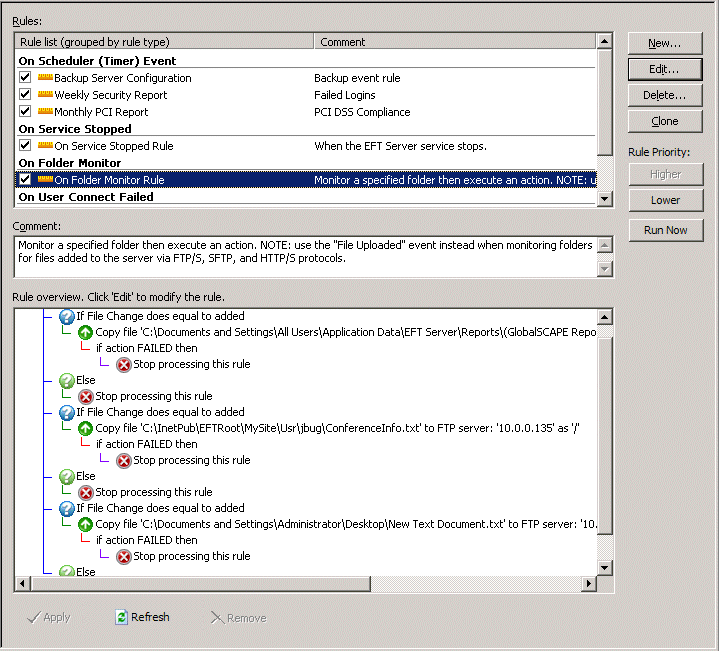
When you click the Event Rules node for a Site, the right pane provides controls for managing the Event Rules defined for that Site. Using this interface, you can do the following:
Edit - You can fine tune your Rules by adding, editing, deleting, and rearranging Conditions and Actions.
While you can have two administrators working on Event Rules at the same time, if they are working on the same Rule at the same time, when they save their Rule, the second administrator to save will get a notice that the changes could not be saved because the system changed underneath them. They then need to refresh to see the other changes, and then make their changes to the Rule again.
Delete - If an Event Rule is no longer needed and you are sure you will not need it again in the future, you can delete it. However, you can also disable the Rule so that, if you need the Rule again, you can simply enable it.
Clone - You can create a copy of Rule and modify it to your needs. You can then rename the Rule.
Prioritize - If you create more than one Rule for a single type of Event, EFT prioritizes the Rules in the order they appear on the Event Rules list. You can rearrange them using the Rule Priority buttons.
Disable - If you want to disable a Rule temporarily without deleting it, you can disable it by clearing the Enable this rule check box.
Rename - You can rename an Event Rule.
To manage the Event Rules
-
In the administration interface, connect to EFT and click the Server tab.
-
On the Server tab, click the Site you want to configure, and then click Event Rules. The list of configured Event Rules appears in the Event Rules node and in the right pane in the Rule list.

-
Click the Event Rule you want to change, and then click Edit, Delete, or Clone. The right pane updates to display the details specific to that Event Rule. Actions are indicated by their associated icons.
Event triggers are indicated by a green triangle icon
 .
.Conditions are indicated by a blue question mark icon
 .
.Else Conditions are indicated by a green question mark icon
 .
.-
To add a Condition to a Rule, click a Condition from the Conditions list then click Add condition. The Condition appears in the Rule pane below the current highlighted insertion point. You can add multiple Conditions to a single line and create AND/OR criteria.
-
To add an Action to a selected Condition, click it in the Actions list, and then click Add action. The Action appears in the Rule pane below the highlighted Condition.
-
Configure the Condition or Action by clicking the underlined variables (red or blue underlined text)
-
You can reorder Conditions and Actions by dragging them where you want them and using the up
 and down
  arrows.
 -
Click Apply to save the changes on EFT.
-
In the right pane, click Delete. A confirmation message appears.
-
Click Yes. The Rule is deleted from the Site.
-
In the right pane, click Clone. A clone of the Rule opens in the Event Rule editing pane and is added to the Rules list.
-
Edit the copy of the Rule as needed, and then click Apply to save the changes on EFT. Your new Rule appears in the Event Rules node with "Copy" appended to the name.
-
To rename the Rule, in the left pane, right-click the Rule, and then click Rename.
To change the priority of a Rule
-
In the right pane, click the Rule you want to move.
-
Under Rule Priority, click Higher and Lower.
Refer to Event Rule Order of Execution for details of changing the priority of a Rule.
-
In the right pane, clear the Enable this rule check box.
-
Click Apply to save the changes on EFT.
To re-enable an Event Rule
-
In the right pane, click the Enable this rule check box.
-
Click Apply to save the changes on EFT.
-
In the Event Rules node, do one of the following to make the name editable:
-
Right-click the Event Rule, and then click Rename.
-
Click the Event Rule, and then click it again. (Do not double-click it.)
-
-
Type the new name, then press ENTER or click away from the name. The name is changed.
-