Configuring Message Options in Outlook
You can configure message options for all emails or for a specific email. In each email that you send, you can specify message options that pertain to that email only, overriding the default send options. You can make these settings stricter, but not less strict. Each procedure is described below.
Use the Message Options dialog box to specify whether the EFT Outlook Add-in should:
-
Manage embedded attachments
-
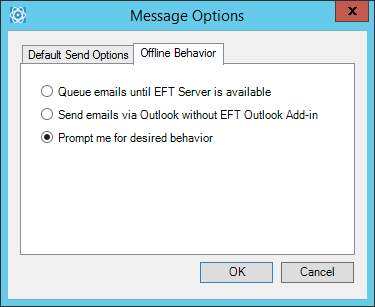
Queue or send emails when EFT is not available
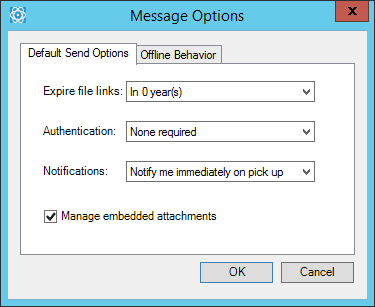
To configure message options to apply to ALL emails
-
On the EFT Outlook Add-In toolbar/ribbon, click Message Options. The Message Options dialog box appears.
-
On the Default Send Options tab, specify expiration, authentication, and notification options.
-
If you want EFT to manage embedded attachments, such as a signature logo, select the Manage embedded attachments check box.
-
Queue emails until EFT server is available—Emails are sent after EFT server becomes available.
-
Send emails via Outlook without EFT Outlook Add-in—Emails are sent immediately, but not managed by EFT.
-
Prompt me for desired behavior—Display a prompt when EFT is not available so you can choose whether to send immediately or hold the email until EFT is available.
-
Click OK to save your changes, or click Cancel if you do not want to save your changes.
To configure send options for a specific email
-
Create the email as you normally do.
-
In the EFT Outlook Add-In area, click the options you want to change just for this email.
-
In the Send Options dialog box, you can specify the following options:
-
Offload attachments—Embedded attachments are files that are inserted into the body of the email rather than attached to the email, such as a company logo in an email signature or a picture. If you want to make these embedded attachments into file download links, select the check box. (Cleared by default.)
-
Expire File Links—When selected, the ability to download the attachments will expire in the time that you specify. If the recipient attempts to download a file that is past its expiration date, the following message appears: “The file you are attempting to download has expired. Please contact the sender if this file needs to be resent.” (Cleared by default.)
-
If the administrator has selected the Retain files after link expiration check box, the temporary Workspace is removed from the virtual file system in EFT, but the files are still available on disk until the "retain files" expiration date.
-
Authentications—Require the user to log in to download an attachment from the Pick-up portal. Selecting this check box helps prevent unwanted downloads from email forwarding and such, and also helps guarantee that the person downloading the file is the intended recipient.
-
If the user clicks on an individual file link, the login or account creation page will be displayed in their default browser. After authentication is successful, the "open/save" dialog appears.
-
If the user clicks on the Pick-up portal link, the login or account creation page will be displayed in their default browser. After authentication is successful, they will be taken to the Pick-up page for that specific package.
-
When the check box is selected, only the Pick-Up page link is sent. If the check box is not selected, individual links for each file are included in the email.
-
Notifications—When selected, download notification is sent to you when the recipient clicks the download link in the email or Download Files on the Pick-Up page.
-
Click OK to save your changes or Cancel if you do not want to save your changes.
The authentication will be saved in their session, so clicking multiple individual file links will not require multiple log-ins. (The session length is 10 minutes.)