Connecting to EFT from Outlook
Typically, the EFT Outlook Add-In server connection information is configured by the administrator. You should not edit these settings unless directed to do so by your administrator. EFT administrators should also refer to Configure a Service Principal Name SPN for Windows Authentication, to configure Integrated Windows Authentication (Kerberos).
You might want to edit these settings are if your username/password has changed, if the server is moved to another host, if your login type was changed, or if you need to change the log file location.
If the EFT Outlook Add-In is not connected to the server, it will not try to upload packages.
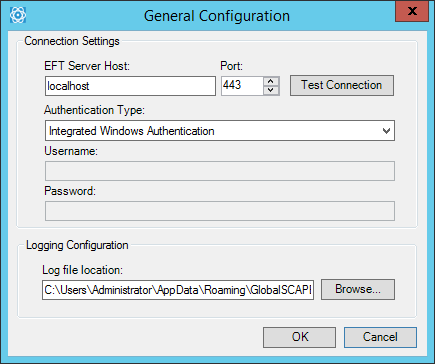
In the General Configuration dialog box, accessed from the EFT Outlook Add-In toolbar/ribbon, you can specify to which server you want to connect, how to authenticate your connection, and where to save log files. In most cases, your administrator will configure this for you during setup.
To configure the EFT Outlook Add-In
-
On the EFT Outlook Add-In toolbar/ribbon, click General Configuration. The General Configuration dialog box appears.
-
In the EFT Server Host box, provide the host name of EFT.
-
In the Port box, provide the port used by EFT for HTTPS connections.
-
In the Authentication type box, specify either manual or Windows authentication:
-
Manual—You must provide the username and password that you use to connect to EFT or your AD credentials.
-
In the Username box, provide the username that you use to connect to EFT or your AD username.
-
In the Password box, provide the password that you use to connect to EFT or your AD password. Use the EFT login credentials for the EFT user account, not the administrator.
-
Integrated Windows Authentication—Used this login type if you connect to EFT via Single Sign On (Kerberos). In this case, you do not need to provide a username and password. Your Windows credentials are used to connect.
-
If you want to test your connection, click Test Connection.
-
(Optional) In the Log file location box, specify the path at which the log file is saved.
-
Click OK to save your changes, or click Cancel if you do not want to save your changes.