Deploy Outlook Add-In on End-User's Computers
Configure the Outlook Add-In in the File Send dialog box on the Web tab in the EFT administration interface before deploying the EFT Outlook add-in on end-users' computers.
To deploy the EFT Outlook add-in on end-users' computers
-
In the administration interface, connect to EFT and click the Server tab.
-
On the Server tab, click the Site you want to configure.
-
In the right pane, click the Web tab.
-
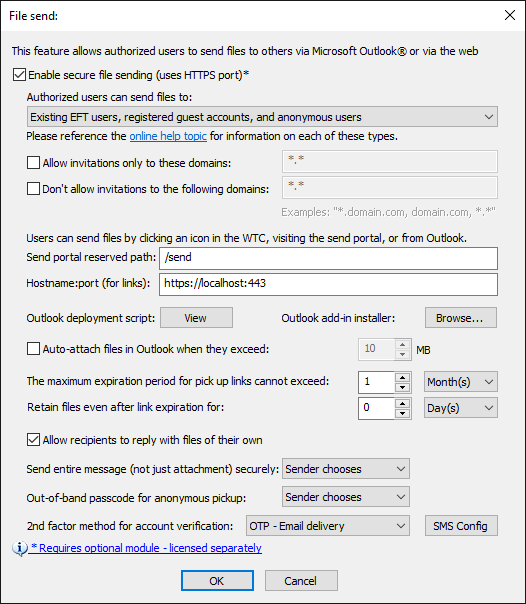
Next to Send Portal, click Configure. The File send dialog box appears.
-
Use the EFT Outlook add-in installer. Click Browse to open C:\Program Files\Globalscape\EFT Server\OAI Installers, get the EFT Outlook add-in installer, and install the EFT Outlook Add-In as described in Installing the EFT Outlook Add-In. Choose either the EXE or the MSI file. (The EXE will launch the MSI.)
-
EFTOutlookAddinSetup.exe will check if Microsoft Outlook is present, install any missing pre-requisites, and then launch the .MSI to install the add-in. When you run the "EXE" make sure the "MSI" file is in the same directory, as the "EXE" launches the "MSI" as part of the install process.
-
EFTOutlookAddinInstaller.msi will check if Microsoft Outlook is present, check whether .NET 4.6 is present, and then install the add-in. The "MSI" will not check for or install any missing pre-requisites. It only checks for the presence of Outlook and .NET.
-
Use the Outlook add-in deployment script. Click View to open the Outlook Add-in Deployment Script box.
-
Copy and paste the script into the tool you are using to deploy the Outlook Add-In across your organization.
-
Click OK or press ENTER to close the Outlook Add-in Deployment Script box.
-
Edit the script to match your environment (that is, the EFTHOST IP address and port, username, password).
-
EFT supports Manual authentication, which is really Basic authentication, so you have to explicitly provide the user's EFT username and password (that is, the username and password that this Add-In user uses to log in to EFT--not the administrator credentials). EFT also supports Integrated Windows Authentication (IWA) where you don’t have to explicitly provide a username and password if you are logged into Windows with your domain account.
-
Edit the Add-In installer command-line arguments depending on the authentication type you want:
Do one of the following:
-OR-
For manual authentication, do the following (EFTUSERNAME and EFTPASSWORD values have to be substituted with the actual Add-in user’s EFT username and password):
msiexec /lv installation.log
			 /qn /i EFTOutlookAddinInstaller.msi EFTHOST=https://WIN-KST875BEBNP EFTPORT=443
EFTAUTHTYPE=MANUAL EFTUSERNAME=username
EFTPASSWORD=test123! INSTALLLOCATION="%userprofile%\AppData\Roaming\GlobalSCAPE\EFT
Outlook Add-in" FILESTORELOCATION="%userprofile%\AppData\Local\GlobalSCAPE\EFT
Outlook Add-in"
For Integrated Windows authentication, do the following (EFTUSERNAME and EFTPASSWORD don’t need to be supplied):
msiexec /lv installation.log
/qn /i EFTOutlookAddinInstaller.msi EFTHOST=https://WIN-KST875BEBNP EFTPORT=443 EFTAUTHTYPE=IWA
INSTALLLOCATION="%userprofile%\AppData\Roaming\GlobalSCAPE\EFT
			 Outlook Add-in" FILESTORELOCATION="%userprofile%\AppData\Local\GlobalSCAPE\EFT
			 Outlook Add-in"