Changing Logo and Colors in the WTC and Login Page
"Rebranding" the Web Transfer Client (WTC) is a common request from customers. This topic provides the procedures for changing the logo and colors in the Login pages and in the WTC itself.
-
Please make a backup copy of any files that you plan to edit, in case you have to back out your edits.
-
Do not attempt to make changes to the JS or PS files unless you are well versed in doing so. In most cases, it is not necessary to change them.
-
You will need to install PowerShell if you don't have it already.
-
Be aware when you upgrade from older versions to v8.0.5 or later, the file paths have changed. There is no longer an \EFTClient\ folder.
The Web folder contains shared files, reg files, WTC files, and Workspaces files. When changing logos, be aware of which images you need to edit. (The \Web\ directory is in the cluster share for HA installations.)
-
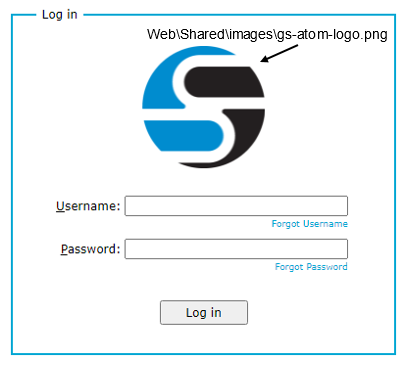
..\Web\Account\Login.htm page uses the logo in the shared images folder
-
..\web/shadowfax/reg/register.html#/forgot-username and lost password pages use the logo in the \wtc\assets\images folder
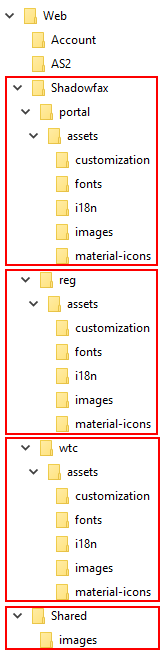
The Shadowfax\portal\assets\customization folder contains the theme.json file and the customization-theme.ps1 file.
-
theme.json is used to define the colors used in the WTC
-
customization-theme.ps1 is a PowerShell script used to change the colors throughout the product
The procedures below describe how to change the colors, and then run the PowerShell script, as well as changing the logos.
The default colors in the theme.json file are in hexidecimal.
-
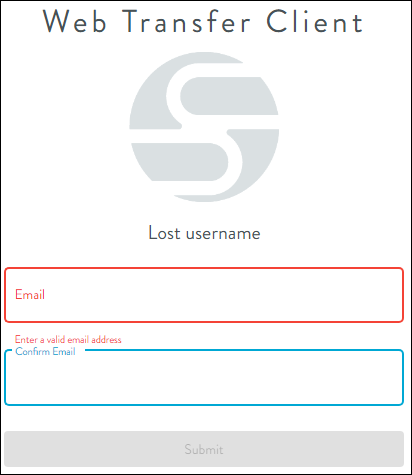
"primary": "#00a8d4", - blue, used for input field outlines, e.g., the border around the password and username boxes
-
"accent": "#7400d4", - purple, used for check boxes
-
"warn": "#f44336", - red, used as outline for input field errors, such as invalid characters in a password
-
"header": "#232323", light black background
-
"headerText": "#DAE0E2", the light gray text in the header, Web Transfer Client
-
"toolbar": "#FEFEFE", light gray background
-
"toolbarText": "#242424" light black text on the toolbar
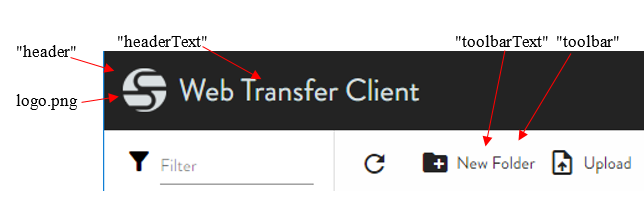
The logo next to Web Transfer Client in the header is called logo.png. You can replace it with your company logo with the same file name (logo.png). The file is located in the ..\Web\Shadowfax\wtc\assets\images\ folder.
To change the colors in the lost username or forgot password dialog box
-
Open theme.json in a text editor such as Notepad.
-
Edit the colors as desired. (You can find color numbers on the Internet or use Adobe PhotoShop to identify the color number.)
-
Save the changes to theme.json.
-
Open Windows PowerShell ISE (click Start, then Search to find it).
-
In PowerShell, open customize-theme.ps1, then click the Run icon.
-
Go to your WTC address, then click Forgot Password to open the forgot-username window. The text-entry boxes should be displayed in your new colors.
To replace the logo on the login pages
Replace the logos with your own of a similar size, then restart the Site and/or clear the browser cache to see the changes.
The WTC login page comes from EFT; the username/password logos come from Workspaces:
The logo that appears on the forgot-password page is ..\web\shadowfax\wtc\assets\images\logo.png:
The logo that appears on the WTC login page (for example, https://localhost/Web/Account/Login.htm), the logo is \Web\Shared\images\gs-atom-logo.png.
For multiple sites
The procedure is basically the same, but you must first create a separate folder for each Site that you want to customize:
-
In the <EFT installation>\Web\ folder, create a folder named Custom (with a capital C).
-
In the Custom folder, create folders named after the individual sites (e.g., MyUSsite, MyUKsite, MyCanadianSite).
-
Copy the entire Shadowfax folder into each of the new Site folders. For example, ..\Web\Custom\MyUSSite\Shadowfax.
-
In each Site's \Shadowfax\portal\assets\customization folder (as shown above for a single site):
-
Adjust the colors you want in the theme.json file.
-
Run the customize-theme.ps1 script.
-
-
Restart the EFT Server Service.
-
View each site to verify your changes.