Creating a Report in Design Mode
The New Report Wizard is used to specify a data source and a basic framework for the report. To get exactly the report you want, you can adjust and enhance the data fields and layout. The Report Designer provides the options to modify the report to fit your needs.
To use the Report Designer design mode
-
In the administration interface, click the Reports tab, then do one of the following:
-
Click the report that you want to modify, and then click Edit Report.
-
Create a new report. (Refer to Creating a Report with the Report Wizard for instructions.)
The report appears in the Report Designer.
-
-
The left pane of the Report Designer lists all report templates contained in the current report definition file. Click the report that you want to modify, and then click the Design
 icon
on the View toolbar, or on
the main menu, click View >Design.
icon
on the View toolbar, or on
the main menu, click View >Design.
The right pane switches from Review mode to Design mode, and displays the controls and fields that make up the report.
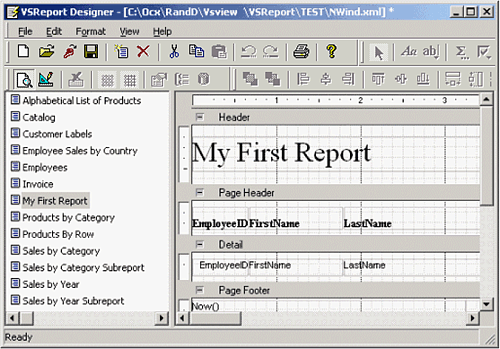
The Report Sections
The report is divided into sections, labeled Header, Page Header, Detail, and Page Footer, containing fields that hold the labels, variables, and expressions that you want in the generated report. The sections determine the appearance of the beginning and end of the report, and each page and group. The table below describes where each section appears in the report and the sort of data that typically appears in each section.
|
Section |
Appears |
Typically Contains |
|---|---|---|
|
Report Header |
Once per report |
The report title and summary information for the whole report |
|
Page Header |
Once per page |
Labels that describe detail fields and/or page numbers |
|
Group Header |
Once per group |
Fields that identify the current group and possibly aggregate values for the group (e.g. total, percentage of the grand total) |
|
Detail |
Once per record |
Fields containing data from the source record set |
|
Group Footer |
Once per group |
Aggregate values for the group |
|
Page Footer |
Once per page |
Page number, page count, date printed, report name |
|
Report Footer |
Once per report |
Summary information for the entire report |
You cannot directly add and delete sections. The number of groups determines the number of sections in a report. Each report has exactly five fixed sections (Report Header/Footer, Page Header/Footer, and Detail) plus two sections per group (a Header and a Footer).
To hide sections that you do not want to display
-
Right-click the field, click Properties. The Field Properties dialog box appears.
-
Change the property of Visible to False.
To resize a section
-
Click and hold the border of the section and drag it to the position where you want it.
The rulers on the left and on top of the design dialog box show the size of each section (excluding the page margins). You cannot make the section smaller than the height and width required to contain the fields in it. To reduce the size of a section beyond that, move or resize the fields in the section first, then resize the section. -
Press and hold SHIFT, and then click fields to toggle their selection status.
-
Press and hold CTRL, then drag the cursor to copy a selection.
-
Click on the corners of a field to resize it.
-
Press TAB to move the selection to the next field.
-
Press the arrow keys to move selected fields.
-
Press DELETE to remove selected fields.
If you make any mistakes while moving or editing the fields, click Undo and/or Redo.
When multiple fields are selected, you can use the buttons on the Format toolbar to align, resize, and space them.
![]()
You can control the design grid using the Show Grid and Snap To Grid icons.
Related Topics