Specifying Multifactor Authentication for Admin Accounts
EFT supports multifactor authentication (MFA) for administrator accounts. (This is also a requirement for PCI DSS 4.0.1 compliance.) This is similar to the MFA in the File send dialog box for the Send and Reply portals, and on the Site > Connections tab for the WTC and Workspaces.
How does MFA work in EFT?
-
When logging in to the admin interface, if the Require additional factor authentication check box is selected and configured (shown below), EFT prompts for a passcode, and informs the recipient to check their email or text messages.
-
EFT generates a OTP and sends it in an email or text message to the recipient. (The user account details must include their mobile phone number to use SMS; otherwise the email address is used. Therefore, for ad hoc interactions, you should specify email delivery of the OTP.)
-
The recipient checks email/text, and copies the passcode to the clipboard (or clicks the link).
-
The recipient pastes the passcode (or follows link) into the prompt.
-
If the passcode is verified, EFT allows access.
To set up multifactor authentication for an administrator account
-
In the administration interface, connect to EFT and click the Server tab.
-
On the Server tab, click the Server node you want to configure, then click the Administration tab.
-
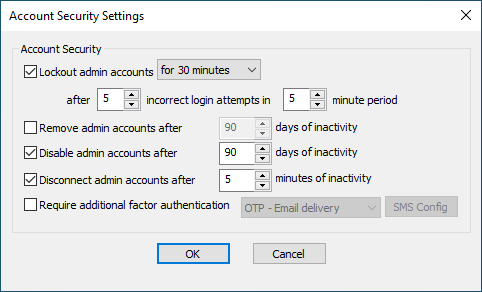
Click any administrator account name (except Local computer\administrators), and then click Account Policy. The Account Security Settings dialog box appears.
-
Select the Require additional factor authentication check box, then select OPT - Email delivery.
-
In the OTP -Email delivery drop-down list, choose OTP - Email Delivery, SMS Delivery, or try SMS then email.
-
If you chose SMS Delivery or OTP - try SMS then email, click SMS Config, to open the SMS profiles dialog box.
-
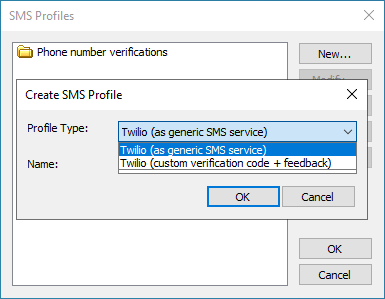
Click New to create a new profile. The Create SMS Profile dialog appears.
-
In the Profile Type list, specify either Twilio (as generic SMS service) or Twilio (custom verification code + feedback) then click OK. Depending on which one you chose, the Twilio SMS Settings or the Twilio SMS for Phone Verification Settings dialog box appears.
-
Provide the Twilio Account SID copied from your Twilio account.
-
Provide the Auth Token copied from your Twilio account.
-
Provide the Twilio Number copied from your Twilio account. You must include the country code and the + PLUS SIGN (that is, in the USA, +1) in front of the number.
-
Provide the Message that will be sent in the SMS, but keep the variable %Account_Session_OTP%. This variable is used by EFT to send the OTP. Do not edit anything between the percent symbols.
-
Provide the Post URL copied from your Twilio account.
-
Configure a Proxy, if needed. Refer to Defining a Proxy for details.
-
Click Test to verify the connection.
-
If the test is successful, click OK.
-
Click OK to close the SMS Profiles dialog box.
-
Click Apply to save your settings.