Configuring Message Options
Use the Message Options dialog box to specify whether Mail Express should:
-
manage email attachments
-
manage embedded attachments (such as images)
-
notify you when files are picked up
-
send attachment links or only a pickup page link
-
expire links
-
when to include reply links
-
what to do when Mail Express Server is not available
Internal senders can make these settings stricter, but not less strict. For example, if the server is configured to Always use Mail Express, you cannot set message options to not require Mail Express. However, if link expiration is not configured on the server, you can freely configure link expiration options in the Outlook Add-In. If link expiration was enabled on the Mail Express server, you can set the expiration to occur sooner, but cannot set it to a longer expiration or turn off link expiration. Other settings in this dialog box behave similarly.
You can configure message options for all e-mails or for a specific email. Each procedure is described below.
To configure message options for all e-mails
-
On the Mail Express toolbar/ribbon, click Message Options. The Message Options dialog box appears.
-
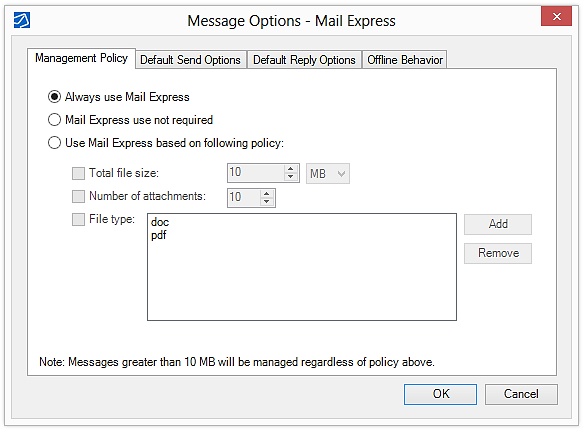
On the Management Policy tab, specify whether to use Mail Express to manage attachments. (The availability of the options depends on the Mail Express Server configuration in the Administration portal.)
-
Always use Mail Express—Use Mail Express to manage all email attachments.
-
Mail Express use not required—Do not use Mail Express to manage email attachments, unless at least one was attached using the Mail Express Attach File button.
-
Use Mail Express based on following policy—Specify criteria that determine whether Mail Express should manage email attachments.
-
-
Total file size—To manage attachments only if the total file size of all attachments exceeds a certain threshold, select the check box, then specify the threshold at which to manage attachments.
-
Number of attachments—To manage attachments based on the number of attachments, select the check box, then specify the number of attachments at which to use Mail Express.
-
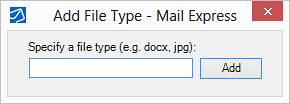
File type—To manage attachments based on file type, select the check box, then click Add. The defaults are specified on the Mail Express server. In the Specify a file type box, type the file extension (e.g., docx, jpg, xls), then click Add. Do not type a period before the extension.
-
-
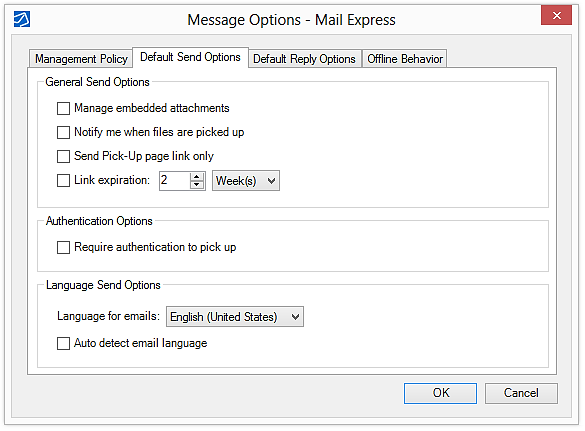
On the Default Send Options tab, specify the following options:
-
Manage embedded attachments—Select the check box if you want embedded attachments, such as graphics inserted into the email, to be managed by Mail Express.
-
Notify me when files are picked up—Select the check box if you want to receive an email when the files are picked up by the recipient.
-
Send pick-up page link only—Select the check box if you want to send only a link to the Pick-Up portal without any attachments.
-
Link expiration—Link expiration is enforced by the Mail Express server. You can set the expiration to happen sooner than what is defined on the server, but you cannot specify a longer time to expiration.
-
Require authentication pick up—Select the check box to ensure that your recipient is really the one downloading the file(s) you sent. The recipient will be provided with instructions for creating an account, if they don’t already have one. If you’ve already invited them to use the Drop-Off portal using the Invite feature, they can use their existing account.
-
Language Send Options—Specify one of the following options:
-
-
Language for emails—Click the down arrow to select a language.
-
Auto detect email language—Select the check box to automatically detect the language. You must enable Outlook's Detect language automatically proofing setting. Refer to Enabling Outlook's Language Detection for details.
-
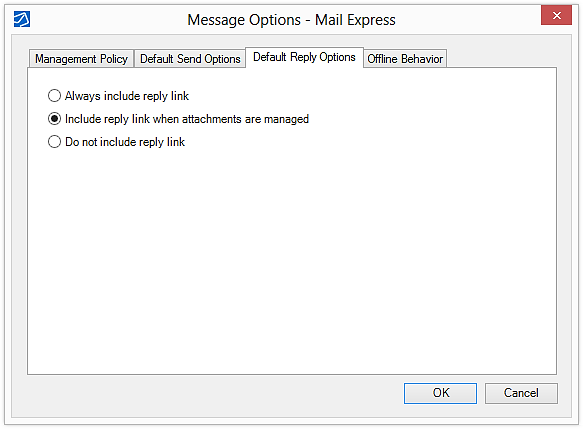
On the Default Reply Options tab, specify one of the following options:
-
Always include reply link—Always include the "Reply to Sender" and "Reply to all" links in the email.
-
Include reply link when attachments are managed—Include the "Reply to Sender" and "Reply to all" links in the email only when Mail Express is managing the attachments.
-
Do not include reply link—Do not include the "Reply to Sender" and "Reply to all" links in the email.
-
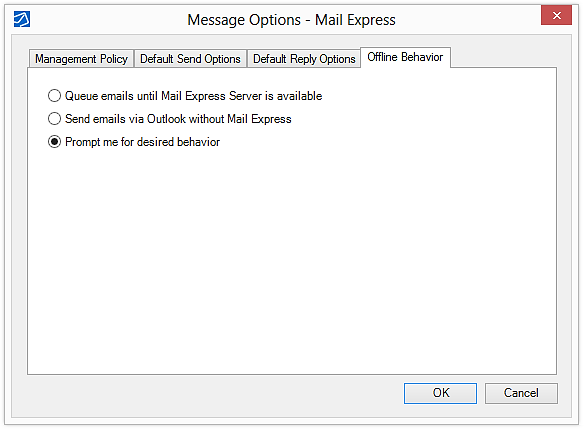
On the Offline Behavior tab, specify what you want the Mail Express Add-In to do when it cannot connect to Mail Express Server (e.g., during network maintenance):
-
Queue e-mails until Mail Express Server is available—Emails are sent after Mail Express Server is available.
-
Send email via Outlook without Mail Express—Emails are sent immediately, but not managed by Mail Express.
-
Prompt me for desired behavior—Display a prompt when Mail Express is not available so you can choose whether to send immediately or hold the email until Mail Express is available.
-
Click OK to save your changes, or click Cancel if you do not want to save your changes.
To configure Send Options for a specific email
In each email that you send, you can specify message options that pertain to that email only, overriding the default send options specified by the Mail Express administrator. You can make these settings stricter, but not less strict. For example, if the server is configured to Always use Mail Express, you cannot set message options to not require Mail Express. (To set email options for all e-mails, refer to the procedure above.)
-
Create the email as you normally do.
-
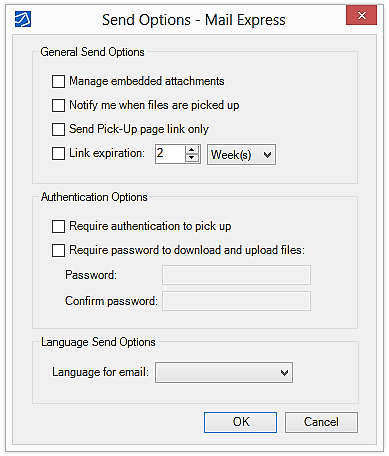
In the toolbar/ribbon, click Mail Express Send Options. The Send Options dialog box appears.
-
In the Send Options dialog box, you can specify the following options:
-
Manage embedded attachments—Embedded attachments are files that are inserted into the body of the email rather than attached to the email, such as a company logo in an email signature or a picture. If you want Mail Express to make these embedded attachments into file download links, select the check box. (Cleared by default.)
-
Notify me when the files are picked up—When selected, download notification is sent to you when the recipient clicks the download link in the email or Download Files on the Pick-Up page. (Cleared by default.)
-
Send pick-up page link only—When the check box is selected, only the Pick-Up page link is sent. If the check box is not selected, individual links for each file are included in the email. (Cleared by default.)
-
Link expiration—When selected, the ability to download the attachments will expire in the time that you specify. If the recipient attempts to download a file that is past its expiration date, the following message appears: “The file you are attempting to download has expired. Please contact the sender if this file needs to be resent.” (Cleared by default.)
-
Require authentication to pick up—Require the user to log in to download an attachment from the Pick-up portal. Selecting this check box helps prevent unwanted downloads from email forwarding and such, and also helps guarantee that the person downloading the file is the intended recipient.
-
-
If the user clicks on an individual file link, the login or account creation page will be displayed in their default browser. After authentication is successful, the "open/save" dialog appears.
-
If the user clicks on the Pick-up portal link, the login or account creation page will be displayed in their default browser. After authentication is successful, they will be taken to the Pick-up page for that specific package.
-
The authentication will be saved in their session, so clicking multiple individual file links will not require multiple log-ins. (The session length is 10 minutes.)
-
Require password to download and upload files—When selected, the recipient must provide a password that you provide them to download the attachments and to upload files to send back to you via an account or reply invitation. The password you create is only valid for that specific package. The password will be placed on the email in the Sent Items folder after the email is sent in case the sender needs to recall which password was used with a particular email. (Cleared by default.)
-
Language for email—Specify the language of the email, if different than the default language.
-
Click OK to save your changes or Cancel if you do not want to save your changes.


