Device Manager Settings
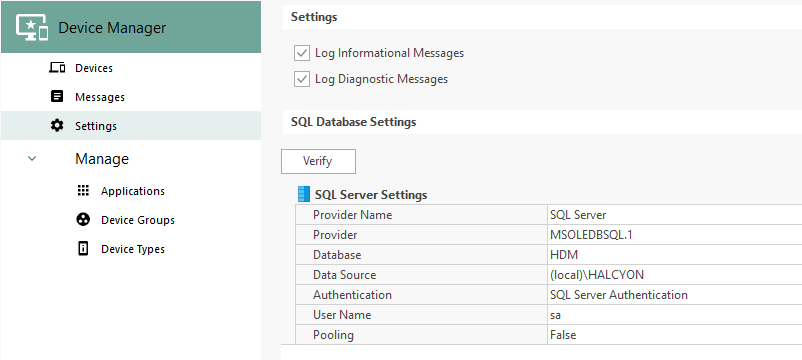
Device Manager Settings are used to set display view options, specify logging and view the current database settings.
From the Device Manager side navigation panel, select ![]() Settings to open the Device Manager Settings display.
Settings to open the Device Manager Settings display.
The display view options, current logging and SQL Server Settings are shown in a quick view format.

Logging options
Logging of messages allows for the provision of housekeeping and fault-finding analysis. The information recorded may also be useful to the technical support team should an issue arise that requires further investigation. The default name for the saved Log file information is DevManager.hlf, which is saved in C:\ProgramData\Halcyon\Device Manager\Logs unless the default settings were changed at the point of installation. if logged, messages are also displayed in the Messages panel of the Device Manager display.
Log Informational Messages
Click to log all messages relating to the operation of Device Manager.
Log Diagnostic Messages
Click to log all Device Manager diagnostic messages.
SQL Database Settings
The SQL Database Settings panel allows the view, but not the ability to amend, the details of the database to which Device Manager is connected.
Provider Name
Displays the name of the type of database that this installation is currently using.
Database
Displays the name of the database being used by this installation of Device Manager.
Data Source
Displays the name and location of the database source.
Authentication
Displays the method of authentication being used between Device Manager and the database.
User
Displays the name of the user that is currently accessing the database.
Pooling
Indicates whether or not the pooling of database connections is used so that the connections can be reused when future requests to the database are required.
Minimum Pool Size
Displays the minimum number of database connections that can be used concurrently.
Maximum Pool Size
Displays the maximum number of database connections that can be used concurrently.
Verifying the Connection
Click Verify to ensure that a connection is made to the database with the current settings. Please contact Technical Support if the connection is not verified.
Once the contents have been viewed, click OK to close this dialog.