Purging Alerts
Purging alerts allows you to remove alerts from the database based on alert and device selection. At least one device must be selected for the purge action.
Alerts are purged using the Purge Alerts dialog.
To purge alerts
- From the Enterprise Console menu bar, click
 .
.
- From the drop-down menu select
 Purge.

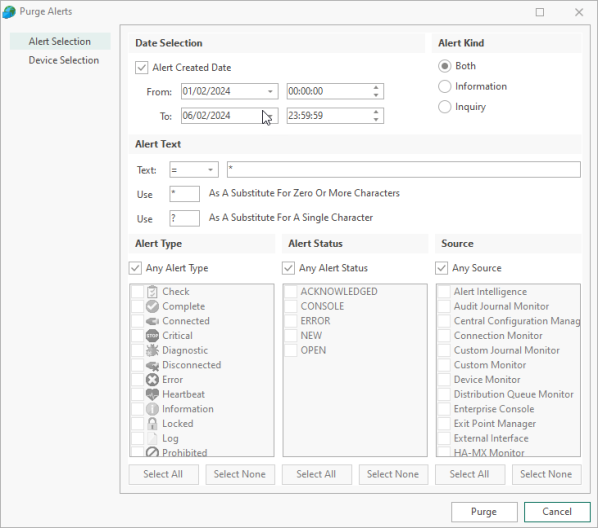
Use the following sections to determine the alerts to be purged:
Date Selection section
The fields in this section define the dates and times between which alerts are purged.
Alert Created Date
Check this box to enable options to select alerts to be purged between a specified date and time range.
From Date/Time
The From Date field defaults to the first day of the current month and the From Time field defaults to midnight 00:00:00. Either over type the current entry or use the drop-down menu or arrows to select a new date/time.
To Date/Time
The To Date field defaults to the current date and the To Time field defaults to 23:59:59. Either over type the current entry or use the drop-down menu or arrows to select a new date/time.
Alert Kind
Select whether to purge just Inquiry Alerts, Info Alerts or Both. The default setting is Both.
Alert Text section
Text
Defines the alert text based on conditional parameters (equals, less than, greater than, etc.) when used in combination with entry in the subsequent field. This can be generic or free text and can also use specific textual values that vary depending on the type of alert to be purged. Wildcard characters can be used when defining this text.
Use ... As A Substitute For Zero or more Characters
Enter the character to use as a substitute for this search span. '*' is defined as the default search span character.
Use ... As A Substitute For A Single Character
Enter the character to use as a substitute for a single character. '?' is defined as the default single wildcard character.
Alert Selection section
The fields in this section define the status, type and originating source for alerts to be purged.
Alert Status
By default, alerts of any status are selected. Click the Any Alert Status box, to be able to select alerts by individual status type.
Alert Type
By default, alerts of any type are selected. Click the Any Alert Type box, to be able to select alerts by individual status type.
Source
By default, alerts from any source are selected. Click the Any Source Type box, to be able to select alerts by individual source type.
Select All
With the Any Alert Status, Type or Source defaults removed, use Select All to select all the entries in the corresponding panel.
Select None
With the Any Alert Status, Type or Source defaults removed, use Select None to remove the selection from all the entries in the corresponding panel.
The Device Selection tab is used to select the devices that currently hold the alerts to be purged.
Selected Devices section
This section shows the devices that are currently selected. When this tab is opened for the first time, this section is empty.
Information is listed in five columns:
- Device Group: Displays the name of the Device Group to which the device belongs.
- Category: Displays the category in which the device is defined.
- Device Type: Displays the Device Type of the device.
- Name: Displays the name of the device.
- Address: Displays the IP Address or Host name of the device.
Clear All
Click Clear All to remove all of the currently selected devices from selection.
Clear Selection
Highlight a device in the Selected Devices section and click Clear Selection to remove this device from selection. Multiple devices may be selected in one action.
Sorting columns
Column order can be rearranged by left-clicking on a column heading and keeping the mouse button depressed, dragging the column to the new position and releasing the button. Information in each column can be sorted in ascending or descending order by clicking on each column title to change the sequence.
Available Devices section
This section lists all of the devices that have been defined in Device Manager.
Filter options
These options allow the filtering of available devices on the network in order to restrict the list of available devices to just those that meet the filter criteria.
The categories comprise:
- Device Group: Device groups are collections of similar devices, such as all those that belong to a specific department. Device groups are set up and maintained in Device Manager
- Category: Devices, such as servers that can be divided into specific types. Items listed here are by default. No other items can be added to this list.
- Device Type: Device types, such as proxy servers are listed on this drop down and comprise a mix of default items and any other items identified on the network, which are automatically added to this list.
Add Device
To load a device into the Selected Devices section of this page, select the required device in the Available Devices section and click Add Device to move it into the Selected Devices section.
Show/Hide Selected
Click to show in the Available Devices section, only those devices not already listed in the Selected Devices table. This avoids duplicating device information in both tables. Click again to show all available devices, including those that have already been selected.
View Details
This button is used to open the View Device dialog, which displays the attributes of a selected device. No amendments can be made on this display. If changes are required, use Edit Device in Device Manager.
Deselect All
Click to deselect all of the currently selected devices in the Available Devices section.
Select All
Click to select all of the devices listed in the Available Devices section.
Click Purge to purge alerts that match the specified criteria.